Mask properties, Tools, Distort an image with the liquify effect – Adobe After Effects CS4 User Manual
Page 480: Undo distortions with the liquify effect
474
USING AFTER EFFECTS CS4
Effects and animation presets
Last updated 12/21/2009
Mask properties
Freeze Area Mask
Determines the area of the image in which mask opacity and feather settings affect the distortion.
Areas outside the mask are distorted; areas within the mask are distorted according to Mask Opacity and Mask Feather
settings.
Mask Opacity
Determines how the distortion affects the area within the mask. If Mask Opacity is set to 100%, the
distortion doesn’t affect the area within the mask; if it’s set to 50%, the area within the mask is somewhat affected. If
you set Mask Opacity to 100%, make sure to feather the mask to prevent jagged edges on the mask.
Mask Feather
The width of the feather used to blend pixels between the masked area and the nonmasked area.
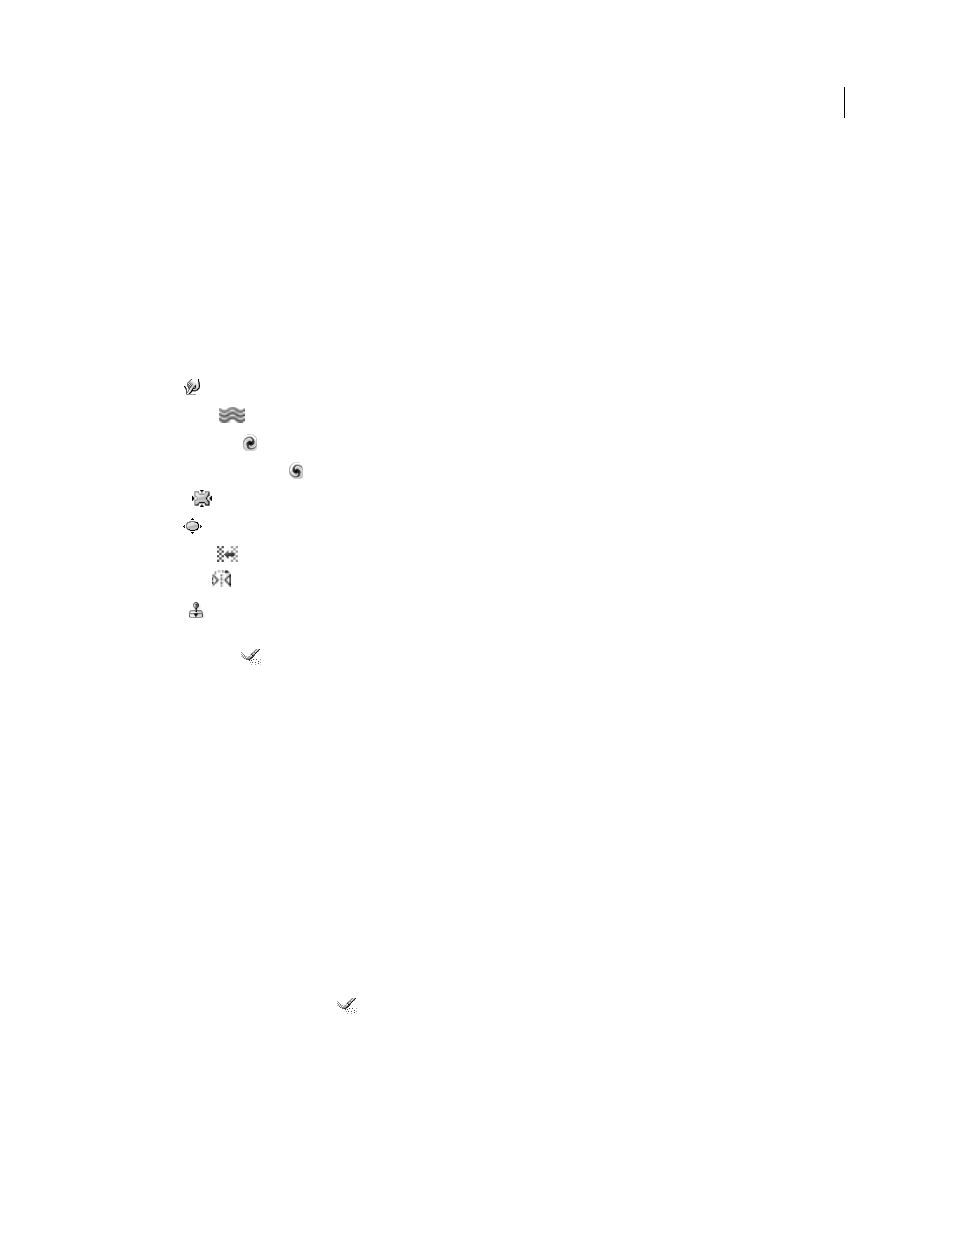
Tools
Warp
Pushes pixels forward as you drag.
Turbulence
Smoothly scrambles pixels. This setting is useful for creating fire, clouds, waves, and similar effects.
Twirl Clockwise
Rotates pixels clockwise as you hold down the mouse button or drag.
Twirl Counterclockwise
Rotates pixels counterclockwise as you hold down the mouse button or drag.
Pucker
Moves pixels toward the center of the brush area as you hold down the mouse button or drag.
Bloat
Moves pixels away from the center of the brush area as you hold down the mouse button or drag.
Shift Pixels
Moves pixels perpendicular to the stroke direction.
Reflection
Copies pixels to the brush area.
Clone
Copies the distortions from around a source location to the current mouse location. Set the source location
by Alt-clicking (Windows) or Option-clicking (Mac OS) the source point.
Reconstruction
Reverses distortions or applies them in different ways.
Distort an image with the Liquify effect
1
Select the layer, and choose Effect > Distort > Liquify.
2
In the Layer panel, create a mask to freeze areas of the image, and then set mask properties.
3
In the Effect Controls panel do the following:
•
Choose the mask you created from the Freeze Area Mask pop-up menu.
•
Specify a brush size and brush pressure. A low brush pressure makes changes occur more slowly, so it’s easier to
stop them at exactly the right moment.
•
Specify a turbulent jitter to control how tightly the Turbulence tool scrambles pixels.
•
Select View Mesh under the View Options control.
•
Set a distortion mesh offset if desired.
•
Drag the Distortion Percentage slider to specify the amount of distortion.
4
Use the tools to distort the preview of the image.
5
Use the Reconstruction tool
to fully or partially reverse the distortions or to change the image in new ways.
Undo distortions with the Liquify effect
Use the Reconstruction tool and its modes to reverse distortions or redo them in new ways.
1
Select the Reconstruction tool, and then choose a mode from the Reconstruction Mode pop-up menu:
Revert
Changes unfrozen areas back to their predistorted state.