Westermo RedFox Series User Manual
Page 98
Westermo OS Management Guide
Version 4.17.0-0
1. Power off the switch and disconnect all Ethernet cables (including copper
and fiber cables) and DSL cables.
2. Connect one pair (or two pairs) of Ethernet ports as described in the table
below. The ports need to be connected directly, i.e., not via a hub or switch.
Use a straight cable - not cross-over cable - when connecting a port pair.
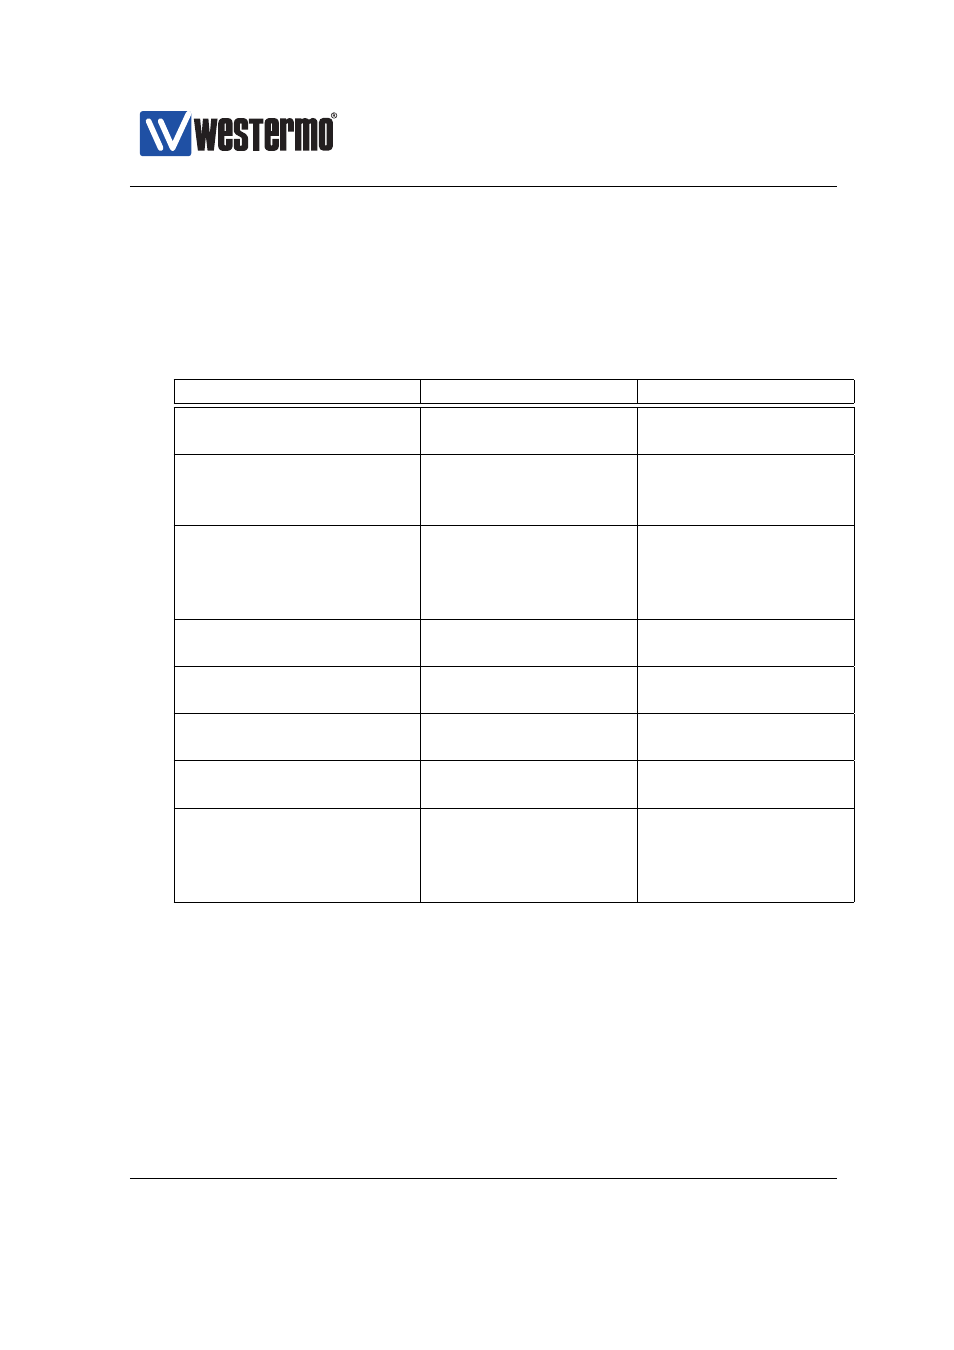
Product/Model
Ethernet Port Pair 1
Ethernet Port Pair 2
Falcon
FDV-206-1D1S
port 1 ⇔ port 4
port 2 ⇔ port 3
Lynx
L106/206-F2G
port 3 ⇔ port 6
port 4 ⇔ port 5
L110/210
port 3 ⇔ port 10
port 6 ⇔ port 7
Lynx-DSS
L105/205-S1
port 1 ⇔ port 4
port 2 ⇔ port 3
L106/206-S2
port 1 ⇔ port 4
port 2 ⇔ port 3
L108/208-F2G-S2
port 3 ⇔ port 6
port 4 ⇔ port 5
RedFox Industrial
All RFI models
port 1/1 ⇔ port 1/2
Not applicable
RedFox Industrial Rack
All RFIR models
port 1 ⇔ port 2
Not applicable
RedFox Rail
RFR-12-FB
port X1 ⇔ port X6
port X2 ⇔ port X5
Viper
All Viper-12 models
port X1 ⇔ port X6
port X2 ⇔ port X5
Wolverine
DDW-142
port 1 ⇔ port 2
Not applicable
DDW-142-485
port 1 ⇔ port 2
Not applicable
DDW-225/226
port 2/1 ⇔ port 2/4
port 2/2 ⇔ port 2/3
3. Power on the unit.
4. Wait for the unit to start up. Control that the ON LED is flashing red. The
ON LED flashing indicates that the unit is now ready to be reset to factory
default. You now have the choice to go ahead with the factory reset, or to
skip factory reset and boot as normal.
❼ Go ahead with factory reset: Acknowledge that you wish to conduct the
factory reset by unplugging (one of) the Ethernet cable(s). The ON LED
will stop flashing.
98
➞ 2015 Westermo Teleindustri AB