Load configuration view – Rockwell Automation Energy Management Accelerator Toolkit Quick Start User Manual
Page 383
Rockwell Automation Publication IASIMP-QS016C-EN-P - October 2014
383
Demand Control Chapter 12
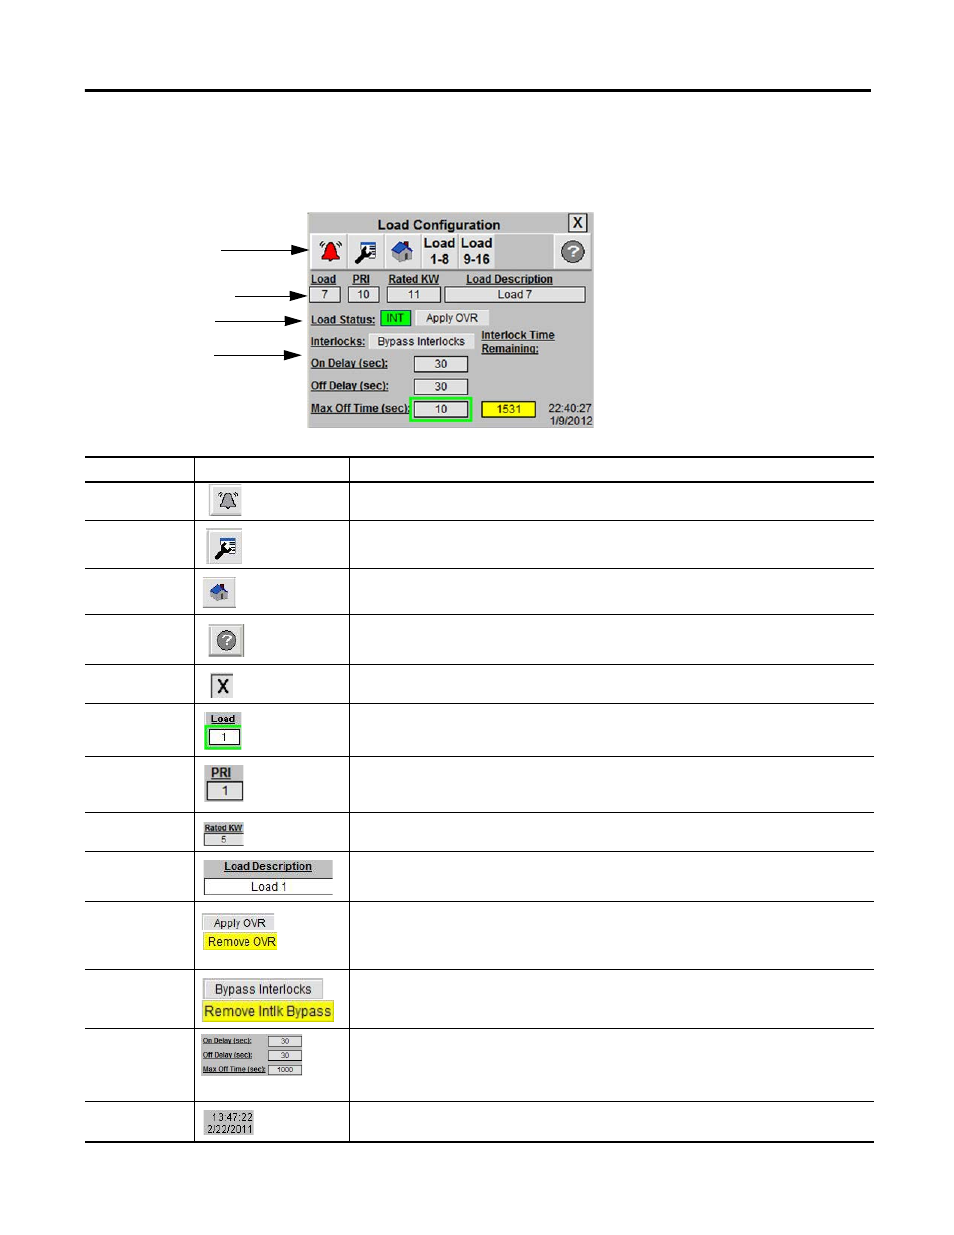
Load Configuration View
Click on the wrench button from the toolbar to display the load configuration view.
Faceplate Toolbar
Load Number to Configure
Load Status
Interlocks
Button
Icons
Description
Alarm
The alarm button indicates an alarm condition and activates alarm diagnostic views. A grey bell
indicates normal status, with no alarms. A red flashing bell indicates an alarm condition.
Configuration
The Configuration button displays the main demand control configuration screen.
Home
The Home button lets you view the status of all 16 loads.
Help
The Help button provides information for the existing view.
Close
Click the Close button to close the faceplate.
Load Number
The load currently being displayed/configured. To select a new load for configuration, click on the
load number to launch the numeric keypad input object. Enter a load number from 1…16, and then
click Enter.
Load Priority
The priority number for the load currently being displayed/configured. To change the priority, click on
the priority number to launch the numeric keypad input object. Valid priority numbers are from 1…16.
The loads with the highest priority numbers are shed first. Loads can share the same PRI values.
Load Rated KW
The rated kW for the load currently being displayed/configured. To change the rated kW, click on the
number to launch the numeric keypad input object.
Load Description
Click on the load description to launch the keypad input object and enter a description for the load.
Demand Control
Mode
Click on the Apply Override button to place the load in override mode. In override mode, the demand
controller will not attempt to shed the load. When the load is in override mode, the button text will
change to Remove OVR with a yellow background. Click on the Remove Override button to place the
load back in demand control mode.
Interlock Bypass
Click on the Bypass Interlocks button to ignore the interlocks for the load. When the interlocks are
bypassed, the button text will change to ‘Remove Intlk Bypass’ with a yellow background. Click the
Remove Intlk Bypass button to re-activate the interlocks.
Interlocks
On Delay (0…3600 s) = minimum time off before restarting
Off Delay (0…3600 s) = minimum time on before shedding
Max Off Time (0…3600 s) = Max time per hour shed If an interlock is active, the interlock time
remaining will appear to the right of the associated interlock.
Time and Date
The current time and date are displayed in the lower right corner of the faceplate.