Grass Valley EDIUS Pro v.7.4 Reference Manual User Manual
Page 396
Chapter 10 Export of Edited Contents — Exporting in File Formats
396
7)
Enter a file name, select the save destination and click [Save].
2
f
After step
6), the procedure differs according to the selected exporter. Perform operations according to the on-screen instructions.
[Print to File] (Detailed Settings) Dialog Box
If a preset exporter was selected in step
4), you will switch to the export format settings of that preset exporter.
r
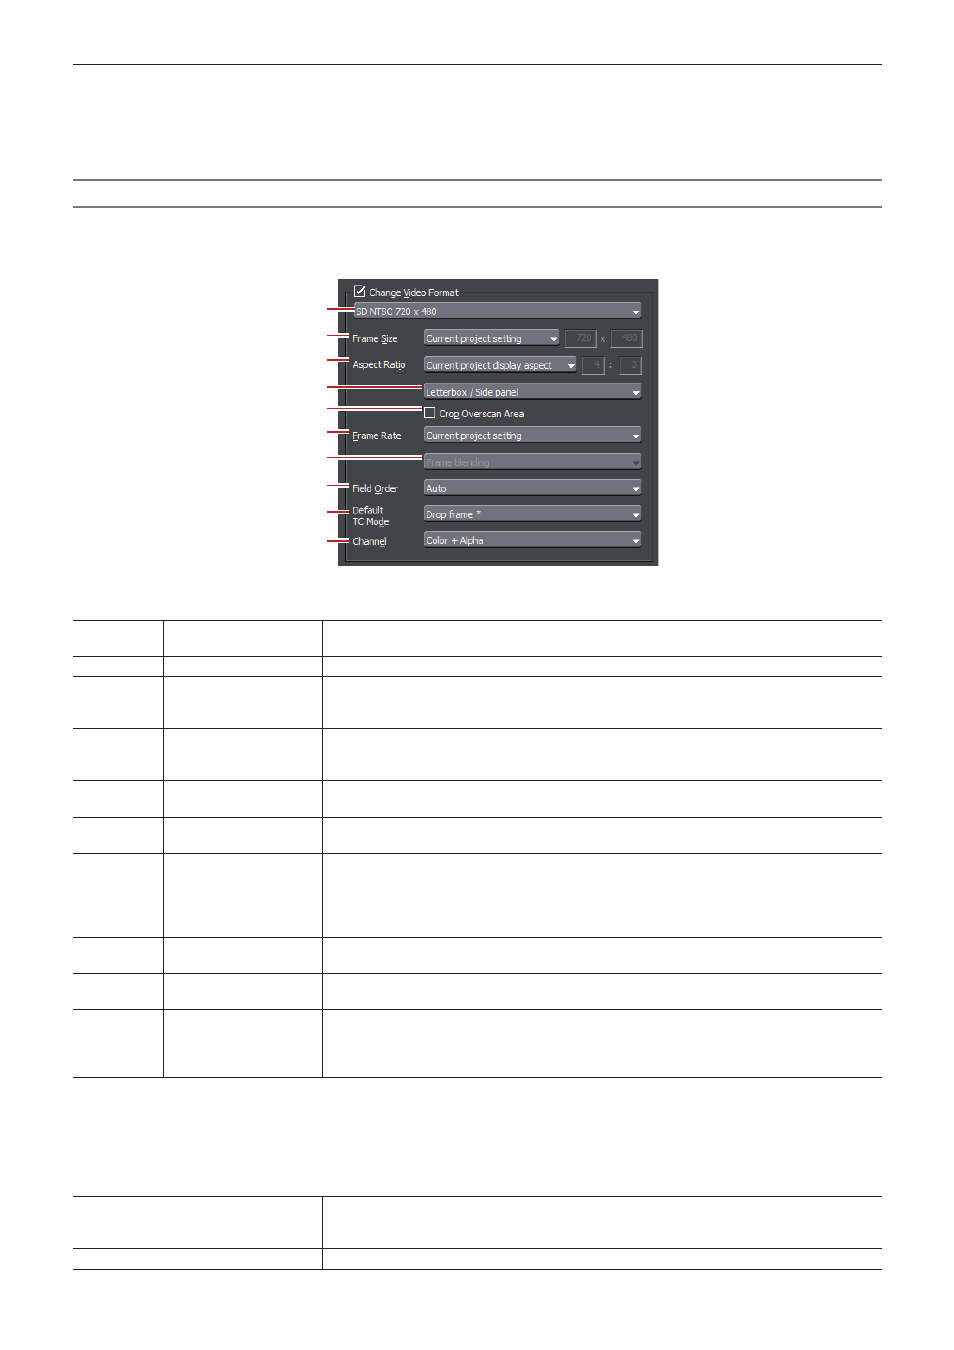
Setting [Change Video Format]
(1)
(2)
(3)
(4)
(5)
(6)
(7)
(8)
(9)
(10)
Checking [Change Video Format] exports files converting to the video format set in the following items.
“*” in the right field of a setting indicates that the setting agrees with the project settings.
(1)
Video profile list
Display a list of commonly used video formats. When you select a video format from the list,
[Frame Size] and other items will switch to the selected video format settings.
(2)
[Frame Size]
Select a frame size from the list. Select [Custom] to enter a setting value in pixels.
(3)
[Aspect Ratio]
Select an aspect ratio from the list. If you select [Custom Display Aspect] or [Custom Pixel
Aspect Ratio], you can set the aspect ratio by entering values. If you have set a customized
aspect ratio, make sure to select a conversion method from the aspect ratio conversion setting.
(4)
Aspect ratio conversion
settings
If the aspect ratio set in [Aspect Ratio] differs from the project settings, select which method to
use to convert the aspect ratio from the list.
“Setting the Aspect Ratio Conversion” (w page 397)
(5)
[Crop Overscan Area]
Check this item to convert the aspect ratio after cropping with the overscan size. The overscan
size differs according to the project settings.
(6)
[Frame Rate]
Select a frame rate from the list. If you have set a customized frame rate, be sure to select a
conversion method in the frame rate conversion settings.
(7)
Frame rate conversion
settings
If the frame rate set in [Frame Rate] differs from the project settings, select from the list which
conversion to perform.
If you select [Frame blending], supplemental frames will be interpolated by combining the
frame before and after each supplemental frame. If you select [Nearest frame], the nearest
frame will be used to make supplementary frames.
(8)
[Field Order]
Select a field order from the list. If you select [Auto], the optimum perceived field order will be
selected automatically.
(9)
[Default TC Mode]
Select whether the video to be exported displays the drop frame timecode or the non drop
frame timecode as default.
(10)
[Channel]
This can be set when an exporter to which the alpha channel is retained and can be output to
is selected.
Select whether to output only the color channel or to output the color channel and the alpha
channel.
r
Setting [Change Audio Format]
Checking [Change Audio Format] changes the audio format so it is exported with the below-described items. However, if [Export in
16bit/2ch] has been checked the [Channels] and [Sample Format] settings will be fixed.
“*” in the right field of a setting indicates that the setting agrees with the project settings.
[Channels]
Select the number of channels from the list. If the selected number of channels is fewer than
the project setting, the channels will be exported in order from 1ch. Select [2ch] to export a
multi-channel project to be used with software of another company.
[Sampling Rate]
Select a sampling rate from the list.