Formatting and partitioning the hard disks – Grass Valley Maestro Master Control Installation v.2.4.0 User Manual
Page 338
338
MAESTRO — Installation and Service Manual
Section 9 — Channel Branding Hardware Installation
Formatting and Partitioning the Hard Disks
You will need to start a Telnet session to the IP address of the Maestro Pro-
cessor board on which the hard disk that is to be formatted is mounted. The
commands that you will use are:
•
altaDiskPart
•
dosFsVolFormat
•
chkdsk (optional)
You will also need to un-mount and then mount the drive to complete the
formatting process.
Note
It would be best practice to shut down the Maestro Deployment Center appli-
cation and any Maestro Content Management servers to prevent any attempt
to transfer content while the hard disk is being formatted.
Follow these steps to format and partition the hard disks:
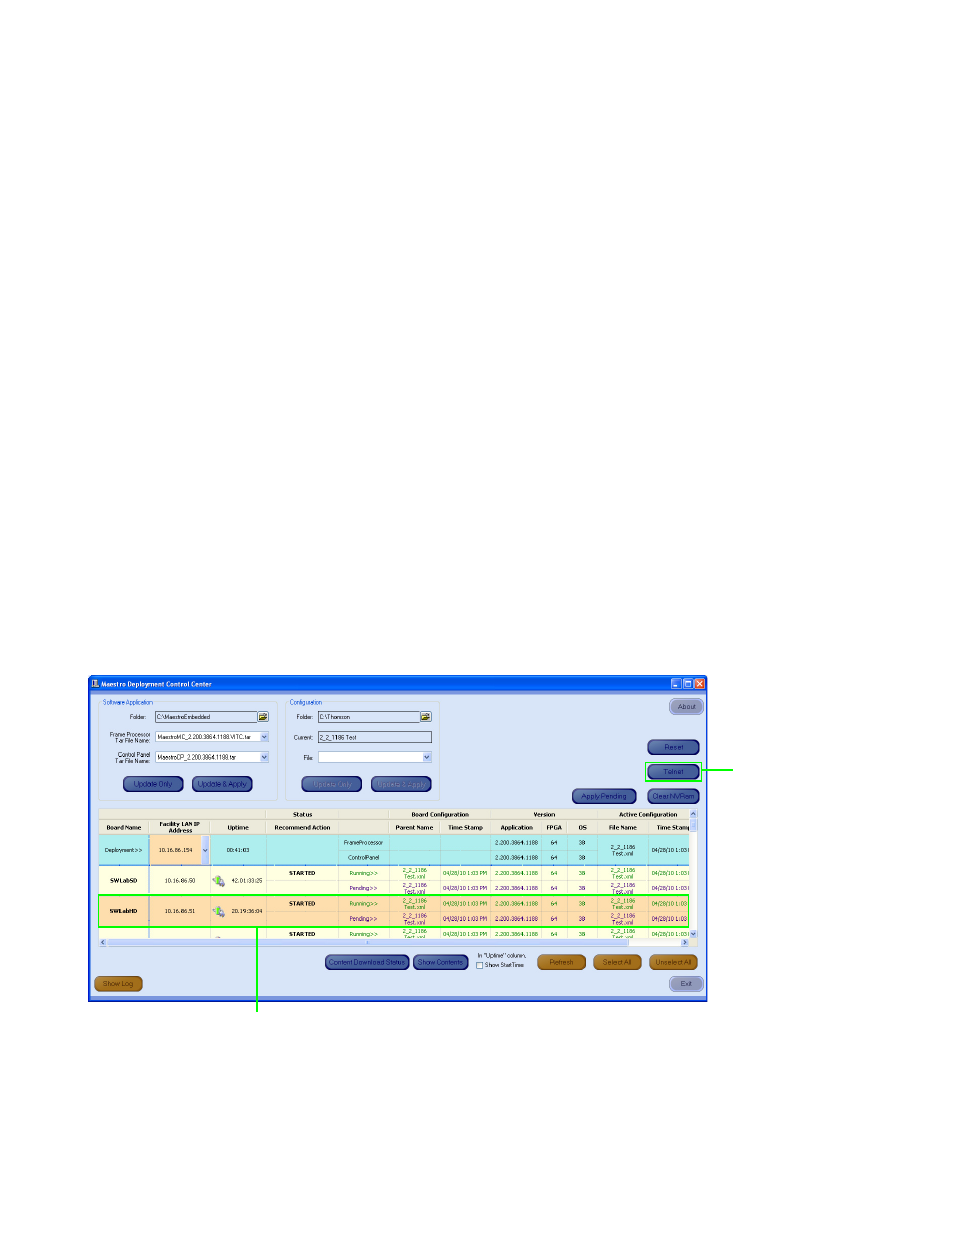
1.
Select the board with the hard disk that is to be formatted in the
Information section, which is below the Software Application and
Configuration sections. In the example shown below in
, the
SWLabHD board was selected.
2.
Click the Telnet button in the top right side of the interface (
A command window with the Telnet prompt will then appear
(
).
Figure 236. The Maestro Deployment Control Center Application
Telnet Button
Selected board
- Concerto Routing Matrix v.1.7.6.1 Concerto Routing Matrix v.1.8.1 Concerto Routing Matrix v.1.7.5 Kayenne Installation v.4.0 Kayenne Installation v.3.0 Kayenne K-Frame Installation v.6.0 Kayenne K-Frame Installation v.7.0 Kayenne K-Frame Installation v.8.0 Karrera K-Frame S-Series Installation v.8.0 Karrera Video Production Center Installation v.6.0 Karrera Video Production Center Installation v.7.0 Karrera Video Production Center Installation v.4.1 Karrera Video Production Center Installation v.4.0 7600REF v5.0 7600REF v3.0.0.8 7600REF v5.0 Installation 7600REF v3.0.0.8 Installation 7620PX-5 Installation 2012 7620PX Installation 2012 KayenneKayenne v.2.0 v.2.0 Maestro Master Control Installation v.2.3.0 Maestro Master Control Installation v.2.0.0 Maestro Master Control v.2.3.0 7620PX 2012 7620PX-5 2012 7620PX 2008 MVMC 3G VMCR 3G 8900F GeckoFlex Frames Concerto Compact Routing System GPIO-4848 Jupiter Maestro Master Control v.2.2.0 Maestro Master Control v.2.0.0 Maestro Master Control v.2.4.0 Maestro Master Control Installation v.2.2.0 Maestro Master Control Installation v.1.5.1 Maestro Master Control Installation v.1.7