Brocade Mobility 7131 Access Point Product Reference Guide (Supporting software release 4.4.0.0 and later) User Manual
Page 184
172
Brocade Mobility 7131 Access Point Product Reference Guide
53-1002517-01
5
Support Short
Preamble Interval
The preamble is approximately 8 bytes of packet header generated by the access point and
attached to a packet prior to transmission from the 802.11b radio. The preamble length for
802.11b transmissions is rate dependant. A short preamble is 50% shorter than a long
preamble. Leave the checkbox unselected if in a mixed MU/AP environment, as MUs and
the access point are required to have the same RF Preamble settings for interoperability.
The default is Disabled. The preamble length for 802.11a and 802.11g transmissions is
the same, with no long or short preamble lengths.
RTS Threshold
RTS allows the Mobility 7131 Access Point to use RTS (Request To Send) on frames longer
than the specified length.
The default is 2341bytes.
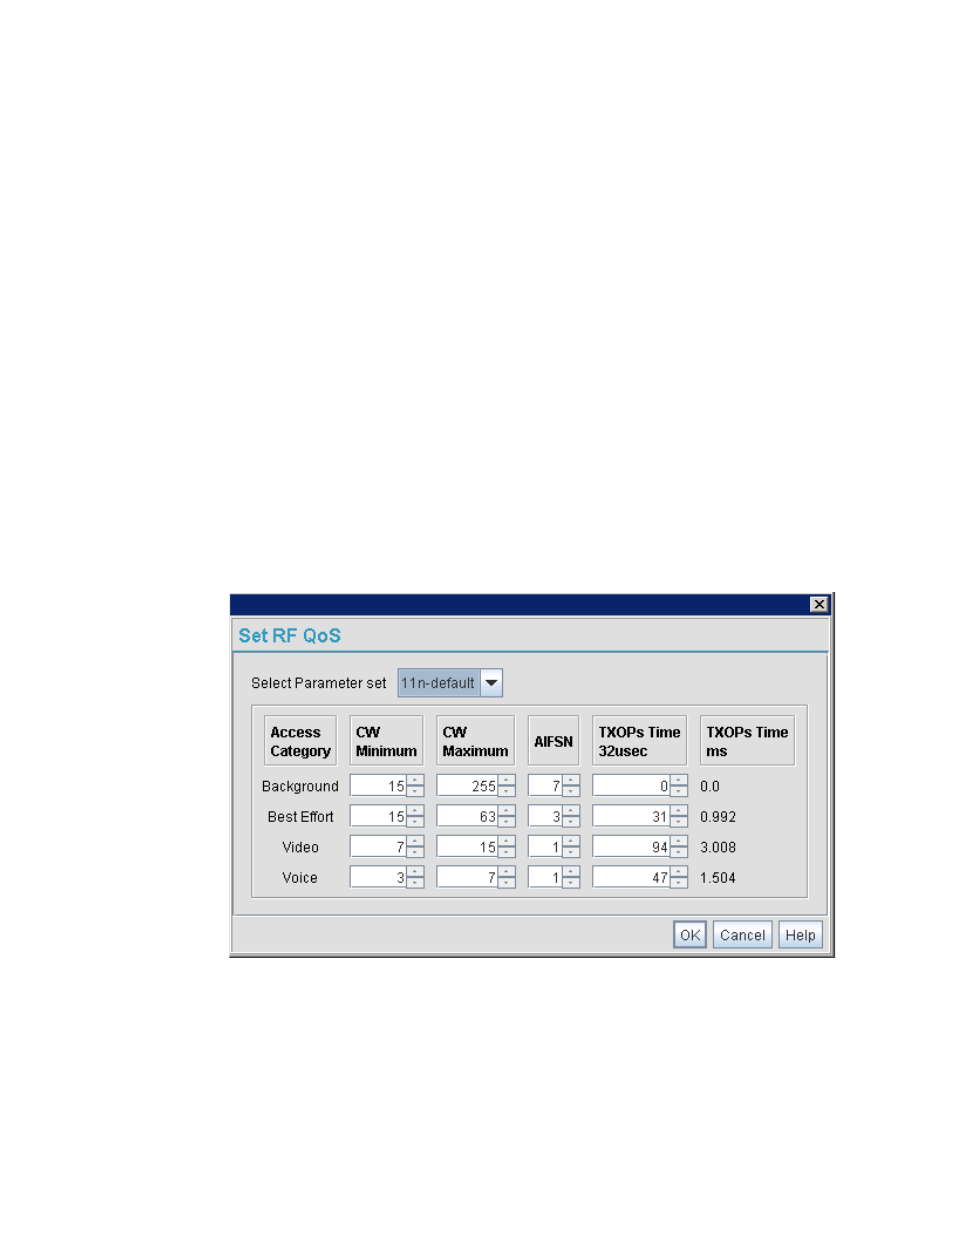
Set RF QoS
Click the
Set RF QoS
button to display the
Set RF QOS
screen to set QoS parameters for
the radio. Do not confuse with the QoS configuration screen used for a WLAN. The Set RF
QoS screen initially appears with default values displayed.
Select
manual
from the
Select Parameter set
drop-down menu to edit the
CW min
and
CW max
(contention window),
AIFSN
(Arbitrary Inter-Frame Space Number) and
TXOPs Time
for each Access Category. These are the QoS policies for the 802.11a/n or
802.11b/g/n radio, not the QoS policies configured for the WLAN (as created or edited from
the
Quality of Service Configuration
screen).
Brocade Mobility recommends only advanced users manually set these values. If the type
of data-traffic is known, use the drop-down menu to select an option representative of the
intended radio band support. Wifi represents multimedia traffic, default is typical data
traffic and voice is for “Voice-Over-IP” supported wireless devices.
Click
OK
to implement the selected QoS values and return to the 802.11a/n or
802.11b/g/n radio configuration screen. Clicking
Cancel
reverts the screen to the last
saved configuration.