Audio input, Figure 31 – Grass Valley Maestro Master Control v.2.4.0 User Manual
Page 78
MAESTRO User Manual
74
3rd Step: Audio Sets
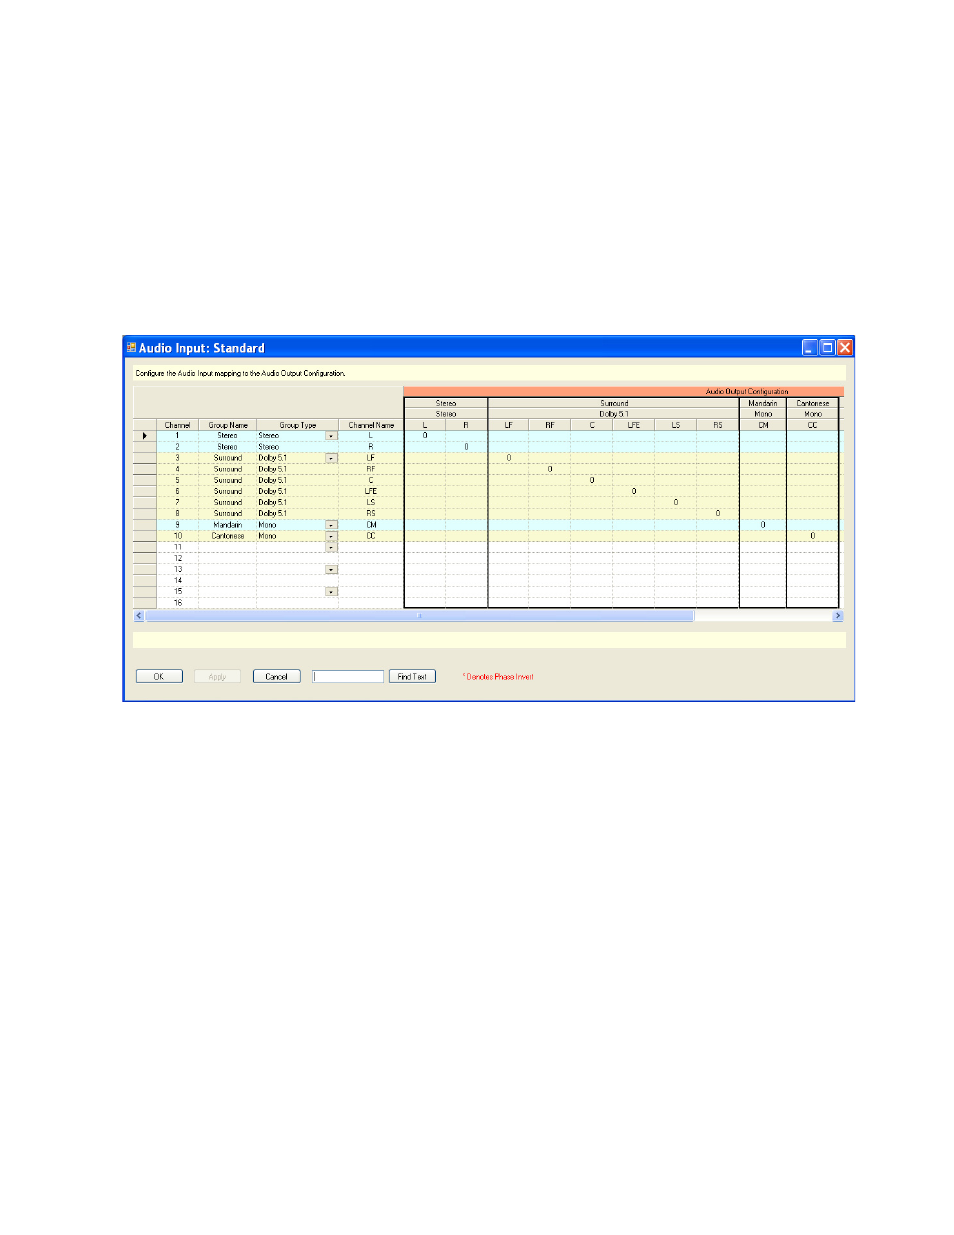
Audio Input
When this configuration item is selected, the editor will open a set manage-
ment window. The previously-defined Audio Input sets appear in the
Dependencies block.
When the Audio Input table is first opened, create a name for the set, then
select “New.” (Audio Input sets are assigned to inputs using the Input
table,
Figure 31. Audio Set - Audio Input Table (Example)
Channel
Assign a channel for each input. The numbers refer to the 16 audio channels
handled by the Maestro Processor.
Group Name
Create a name for the first audio input group, for example, “Main Stereo.”
These names should resemble the group names previously created for the
output table.
This manual is related to the following products:
- Maestro Master Control v.2.2.0 Maestro Master Control v.2.3.0 7600REF v5.0 Installation 7600REF v3.0.0.8 Installation 7600REF v3.0.0.8 7600REF v5.0 7620PX-5 Installation 2012 7620PX Installation 2012 Kayenne Installation v.3.0 Kayenne K-Frame Installation v.6.0 Kayenne K-Frame Installation v.7.0 Kayenne K-Frame Installation v.8.0 Karrera K-Frame S-Series Installation v.8.0 Karrera Video Production Center Installation v.6.0 Karrera Video Production Center Installation v.7.0 Karrera Video Production Center Installation v.4.1 Karrera Video Production Center Installation v.4.0 Kayenne Installation v.4.0 7620PX 2012 7620PX-5 2012 7620PX 2008 MVMC 3G VMCR 3G 8900F GeckoFlex Frames Concerto Compact Routing System Concerto Routing Matrix v.1.8.1 Concerto Routing Matrix v.1.7.6.1 Concerto Routing Matrix v.1.7.5 GPIO-4848 Jupiter Maestro Master Control v.2.0.0 Maestro Master Control Installation v.2.0.0 Maestro Master Control Installation v.2.3.0 Maestro Master Control Installation v.2.4.0 KayenneKayenne v.2.0 v.2.0 Maestro Master Control Installation v.1.5.1