Spectra Precision FAST Survey Reference Manual User Manual
Page 223
p221
selected for traversing, the backsight point number will become inactive. Only an occupied point is required to
traverse forward by bearing or azimuth. All other turned-angle methods will require a backsight point number. The
stored descriptions for the occupied point and backsight point will display as shown above (TRV MAG and TRV N
in this case). Occupied points and backsight points can be selected from the list or the map using the appropriate
icons. You can also enter point-defined angles, as in 6,7 for the direction from 6 to 7, or 6,7+90 for 90 degrees to
the right of the direction of 6 to 7.
Elevation/Vertical Angle Method
: There are many ways to calculate a vertical differential between the occupied
point and target point. The most common method is zenith angle (ZE). Manual Traverse also offers vertical angle,
delta Z (elevation difference), slope by percent (SP), slope by ratio (SR), and known elevation (Z). To get the slope
from point 6 to point 7, switch to SP mode and enter 6,7 for the slope.
Distance Method
: There are four methods of distance entry: Horizontal Distance (in which case the elevation
line is inactive), Slope Distance; Slope Distance, No Elevation; and Horizontal Distance, No Elevation.. Both
Slope Distance methods will prompt for vertical angle/zenith angle, etc., but Slope Distance, No Elevation will
calculate a zero-elevation for the target point number and will reduce the slope distance by the effect of the vertical
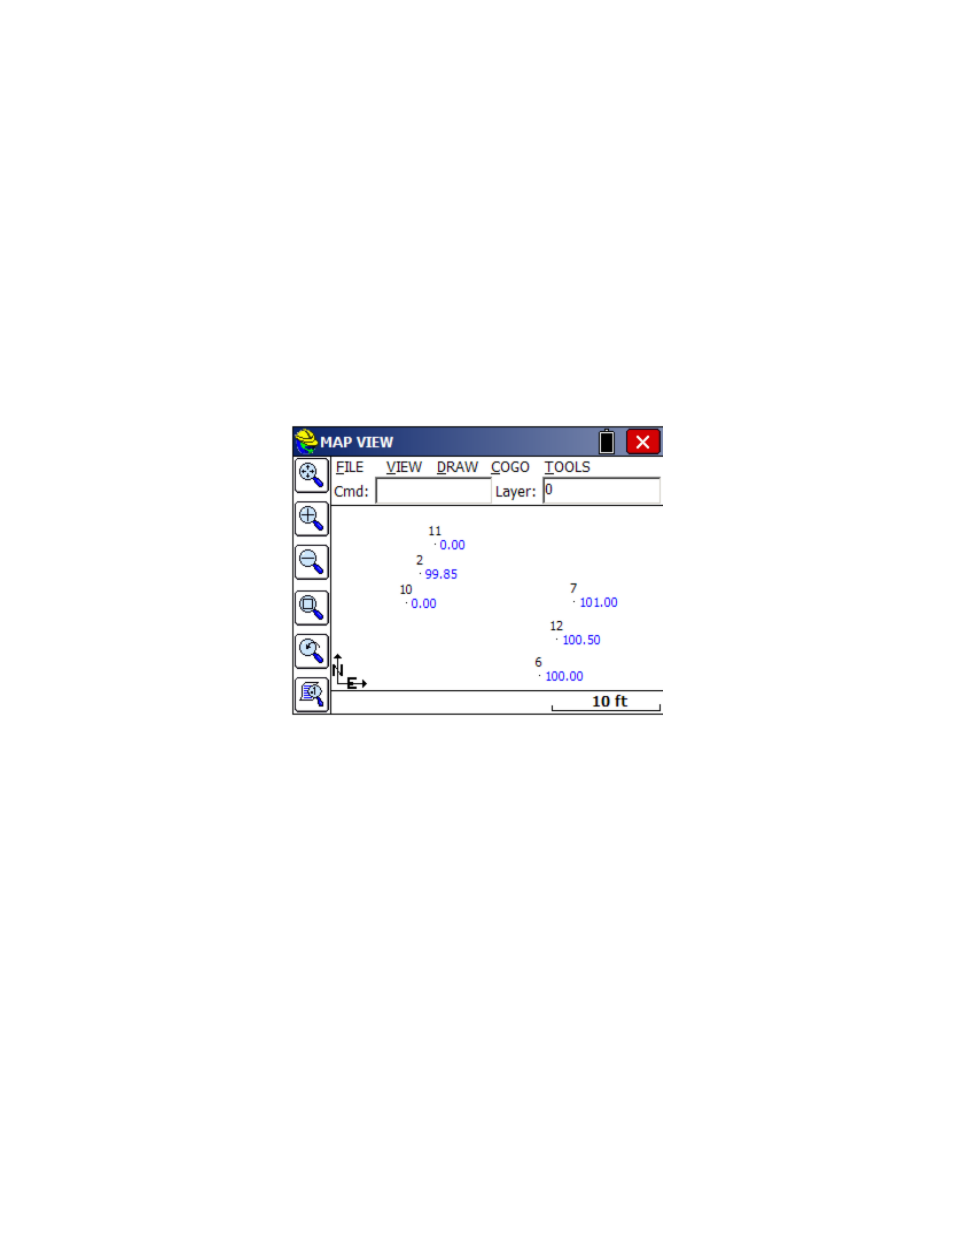
angle/zenith angle. You can also enter the distance in the form of 6,7 for the distance from 6 to 7, or as 6,7/2 as
half the distance from 6 to 7. Note that if you wanted to interpolate a point 12 midway between 6 and 7, you can
use all 3 edit boxes to accomplish this. The azimuth or bearing could be entered as 6,7. The slope would be
entered as 6,7, and the distance would be entered as 6,7/2. So if point 6 is elevation 100 and point 7 is elevation
101, point 12 will have elevation 100.5.
Enter Elevation:
If Enter Elevation is enabled, a check screen is activated to display the calculated elevation.
From here you can override the calculated elevation with a new elevation. This option is useful in combination with
Horizontal Distance for calculating points at a known distance and fixed elevation.
TR Mode
: Enabling Traverse Mode will cause the routine to “traverse up” to the target point number, so that the
new occupied point number will automatically change to the last target point number, and the new backsight will
change to the last occupied point. You can always manually change the fields for occupied point and backsight
point and “force” a traverse, but enabling Traverse Mode will update these fields automatically, so that you
immediately “move up”, and are awaiting the next angle and distance entries. With TR Mode disabled, Manual
Traverse
defaults to sideshot mode.
When you are entering in the horizontal angle, distance, or elevation/vertical angle information, the program displays
the current mode as an extra confirmation at the bottom of the screen. Hitting Enter from the last entry line, or tapping
Calculate
, or entering a C for calculate, will solve for the coordinates and display them at the bottom of the screen.
Hitting Enter again, tapping Store, or entering S will store the points. Before storing, you can also tap the Map icon to
see the location of the calculated point, in reference to the occupied point and backsight point.