Cub Cadet 4 x 4 Volunteer User Manual
Page 201
Chapter 7 - Kohler Engine Service Access and Fuel System
197
To Change the oil and filter:
5a. Lift and safely support the vehicle.
5b. Position a drain pan beneath the oil filter
and drain.
5c. Open the drain valve using a 10mm
wrench.
5d. Clean thoroughly around the filter before
removing it.
5e. “Prime” the replacement filter with oil by
pouring the oil into the threaded hole in
the filter base. Fill the filter once, and
allow the oil to be absorbed into the filter
media. Adding more oil after this point will
just make installation messy. Lubricate
the filter gasket with fresh motor oil.
5f. Close the drain valve and install the new
filter. Tighten the filter 3/4 to 1 turn past
the point where the filter gasket contacts
the filter housing.
5g. Fill the engine with the correct grade of oil
through the filler cap in the #2 valve cover.
Actual oil volume should be roughly 1.7-
1.9 U.S. Qts. (1.6-1.8L) with filter. The oil
level should be at the top of the cross-
hatched range on the dip-stick, noted by
the letter “F”. Install the dipstick fully into
the tube to get a correct reading.
NOTE: 10W-30 engine oil having an API rating
of SG, SH, SJ, or better is suitable for most oper-
ating conditions above 0 deg. f. (-18 deg. c.).
Synthetic oil of 5W-20 or 5W-30 viscosity is suit-
able up to 40 deg. f. (4 deg. c.), and may provide
easier starting in low ambient temperatures.
Synthetic oil meeting the recommended specifi-
cations may be used in place of petroleum base
oil. New engines should be run on petroleum
base oil for the first 50 hrs. of normal use for
proper piston ring seating.
5h. After changing the oil and filter, test-run
the vehicle and look for leaks.
•
Re-tighten the filter, if necessary, after the
engine has been warmed-up and allowed to
cool.
•
Allow several minutes for the oil to drain back
into the sump of the engine, and re-check the oil
level. Add or drain oil as necessary to achieve
the correct level.
6.
The Spark plugs should be checked and
gapped at 200 hour intervals. They will normally
need to be replaced at 500 hour intervals.
NOTE: The spark plug is a Champion RC12YC
or equivalent, gapped to .030” (.76mm).
NOTE: Clean the area surrounding a spark plug
before removing it to prevent debris from enter-
ing the engine when the plug is removed.
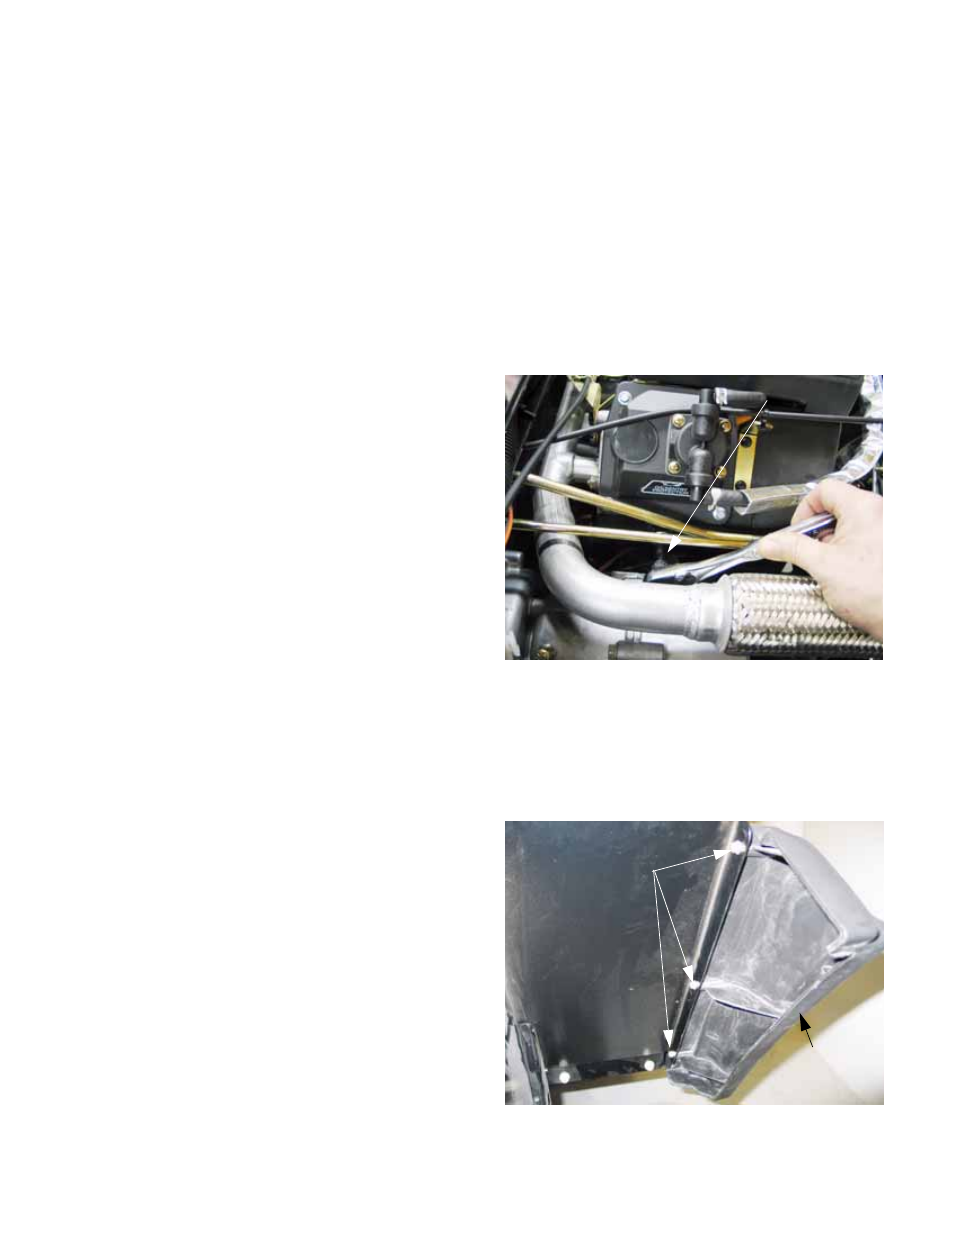
6a. Cylinder #1 spark plug can be easily
reached after disconnecting the high ten-
sion lead. Use a 5/8” socket and exten-
sion. See Figure 7.7.
6b. The Right rear fender must be taken-off for
access to the #2 spark plug.
6c. Remove the 3 screws that hold the fender
to the splash shield using a 5/16” wrench.
See Figure 7.8.
Figure 7.7
#1 spark
plug access
Figure 7.8
Mounting screws
Right rear
fender