Chapter 4 - front suspension and steering – Cub Cadet 4 x 4 Volunteer User Manual
Page 132
Chapter 4 - Front Suspension and steering
128
2.
Grasp the tire as described in the FRONT SUS-
PENSION INSPECTION: WHEEL BEARINGS
portion of this section of the manual.
3.
Apply a lifting/tilting force of 50-75 lbs. (22.7-
34kg.)
4.
If the wheel rocks more than 1/8” (.32cm)
beyond the wheel bearing play, one or both ball
joints are worn.
5.
To determine which ball joint is worn, it may be
necessary to have an assistant watch the move-
ment of the ball joints while force is applied to
them.
5a. If the brake rotor moves relative to the hub
carrier, the problem lies in the wheel bear-
ing.
5b. If the hub carrier moves relative to the
upper control arm, the upper ball joint is
worn.
5c. If the hub carrier moves relative to the
lower control arm, the lower ball joint is
worn.
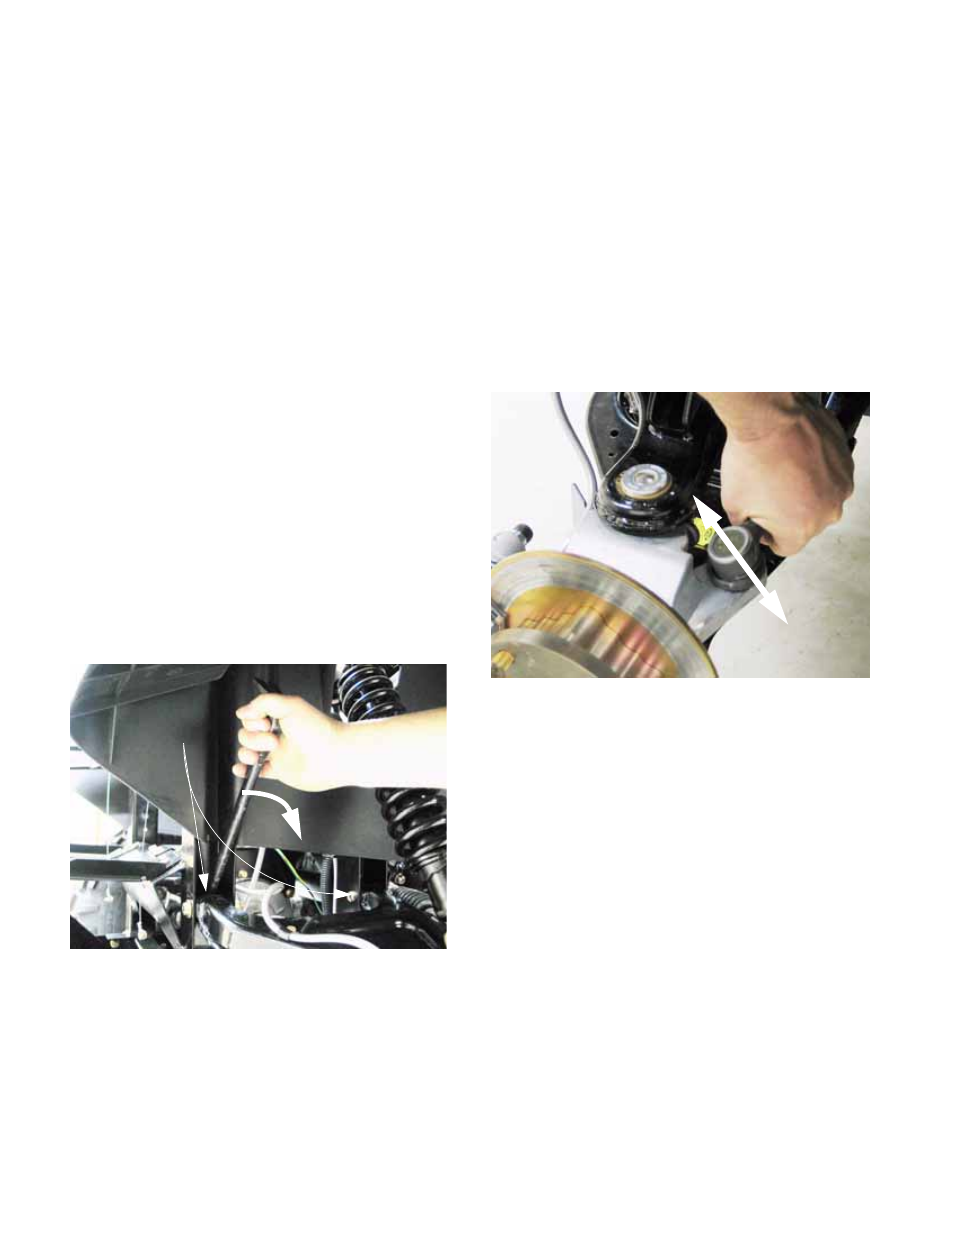
Control arm busings
Each control arm is connected to the frame through
two control arm bushings that allow the arms to swing
up and down to accommodate suspension travel.
NOTE: The upper control arm bushings are
more prone to wear than the lower control arm
busings, but the technique for checking them is
the same.
Symptoms of a bad control arm bushing:
Worn control arm bushings will produce a heavy clunk
as the vehicle goes over bumps.
To check the control arm bushings: See Figure 4.10.
1.
With the weight of the vehicle resting on the sus-
pension, pry outward on the control arm, from
the point where it mounts to the frame.
2.
Repeat for each control arm bushing: upper.
lower, front, rear.
3.
If the control arm moves easily, the control arm
busings are worn.
Tie rod ends
Tie rod ends are spherical joints that connect the tie
rods from the steering gear to the steering arm on each
hub carrier. See Figure 4.11.
1.
Lift and safely support the front of the vehicle as
described in the INTRODUCTION section of this
manual.
2.
Remove the front wheel using a 3/4” wrench.
3.
Make a visual inspection of the tie rod end. If the
boot is broken, the tie rod end should be
replaced.
4.
Grip the joint firmly, and apply up/down force to
it.
5.
If significant play (1/16” or .16cm) is felt, the
joint should be replaced.
Symptoms of a bad tie rod end:
As a tie rod end goes bad, the vehicle may develop a
clunking noise when it goes over bumps, or a shimmy
at high speeds that is noticeable through the steering
wheel, particularly after hitting a bump.
A worn tie rod end may also clunk under braking, or
under acceleration when four-wheel-drive is engaged.
Figure 4.10
Upper control
arm bushings
Figure 4.11