5 windshield/skylight washer switch, Windshield/skylight washer switch – SkyTrak 8042 Service Manual User Manual
Page 808
9.217
Model 8042, 10042, 10054 Legacy
Rev. 10/03
Electrical System
3. Install the wiper arm (3) onto the wiper motor
shaft (4).
4. Install the screws (6) through the plastic motor
cover (7) and into the top locknut plate (9), and
tighten.
5. Connect washer hose to top hose fitting (5).
6. If the vehicle has one battery, connect the
negative (-) battery cable to the negative (-) battery
terminal (1).
If the vehicle has dual batteries, connect both
negative battery cables to both negative (-) battery
terminals (2).
7. Turn ignition key switch to the RUN position and turn
skylight wiper switch to the ON position. Ensure
wiper stays on the window through a full stroke. Turn
the skylight wiper switch to the OFF position.
8. Engage the washer switch and ensure washer fluid
is sprayed on the skylight window. Turn the ignition
key switch to the OFF position.
9.12.5
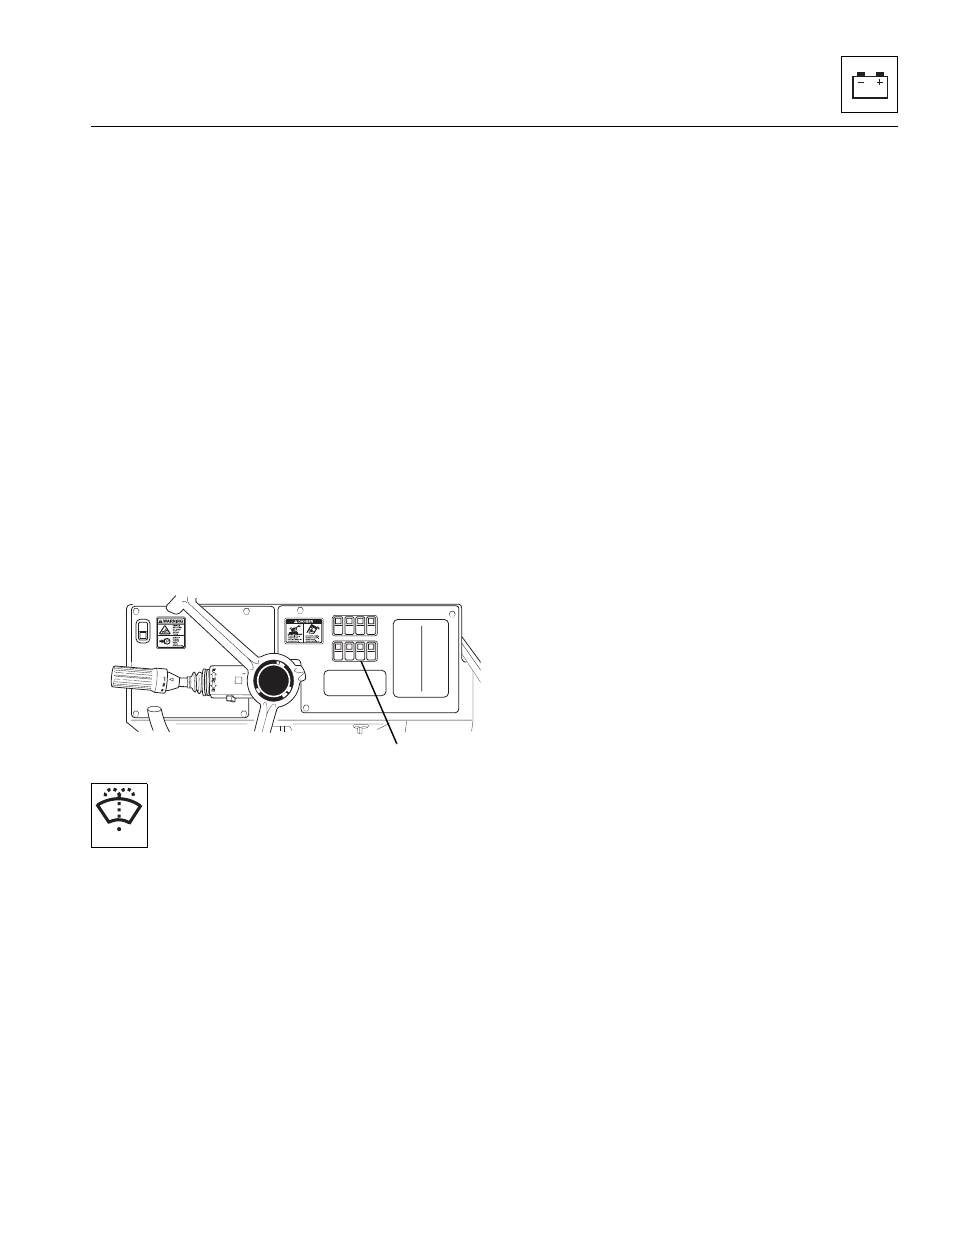
Windshield/Skylight Washer Switch
The windshield washer switch (10) is supplied
on enclosed cab models only. The switch is
located on the dash to the right of the steering
column and is pressed or “snapped” into a
rectangular switch bezel. It is a spring-loaded
momentary, two-position switch providing OFF (upper)
and ON (lower). The switch will return to the OFF position
when released. When pressed, washer fluid is sprayed
on both the front windshield and roof glass.
a. Removal
1. If the vehicle has one battery, disconnect the
negative (-) battery cable at the negative (-) battery
terminal (1).
If the vehicle has dual batteries, disconnect both
negative battery cables from both negative (-) battery
terminals (2).
2. Carefully pry the windshield washer switch (10),
bezel and wiring out of the mounting hole.
3. Disconnect the switch from the cab harness
connector.
b. Disassembly
DO NOT disassemble the switch. The switch is not
serviceable. Replace switch if found to be defective.
c. Cleaning and Drying
Without submerging the switch, clean the switch with an
approved solvent and dry with a clean, lint-free cloth.
d. Inspection and Replacement
1. Inspect the switch terminals for continuity with the
switch in the OFF and ON positions. For additional
information, refer to Section 9.7.46, “Front
Windshield & Skylight Washer Circuit and
Troubleshooting (Option).”
2. Replace the switch if it fails any of the tests in Step 1.
e. Installation and Testing
1. Connect the windshield washer switch to the cab
harness connector.
2. Position the switch over the rectangular switch bezel
and snap into position.
3. If the vehicle has one battery, connect the
negative (-) battery cable to the negative (-) battery
terminal (1).
If the vehicle has dual batteries, connect both
negative battery cables to both negative (-) battery
terminals (2).
4. Check the washer reservoir for fluid; fill if needed.
5. Turn the ignition key switch to the RUN position and
test the windshield washer functions. Verify that fluid
is being pumped to both the front and top
windshields.
OH18502
10
OS19402