SkyTrak 8042 Service Manual User Manual
Page 176
3.115
Model 8042, 10042, 10054 Legacy
Rev. 03/04
Boom
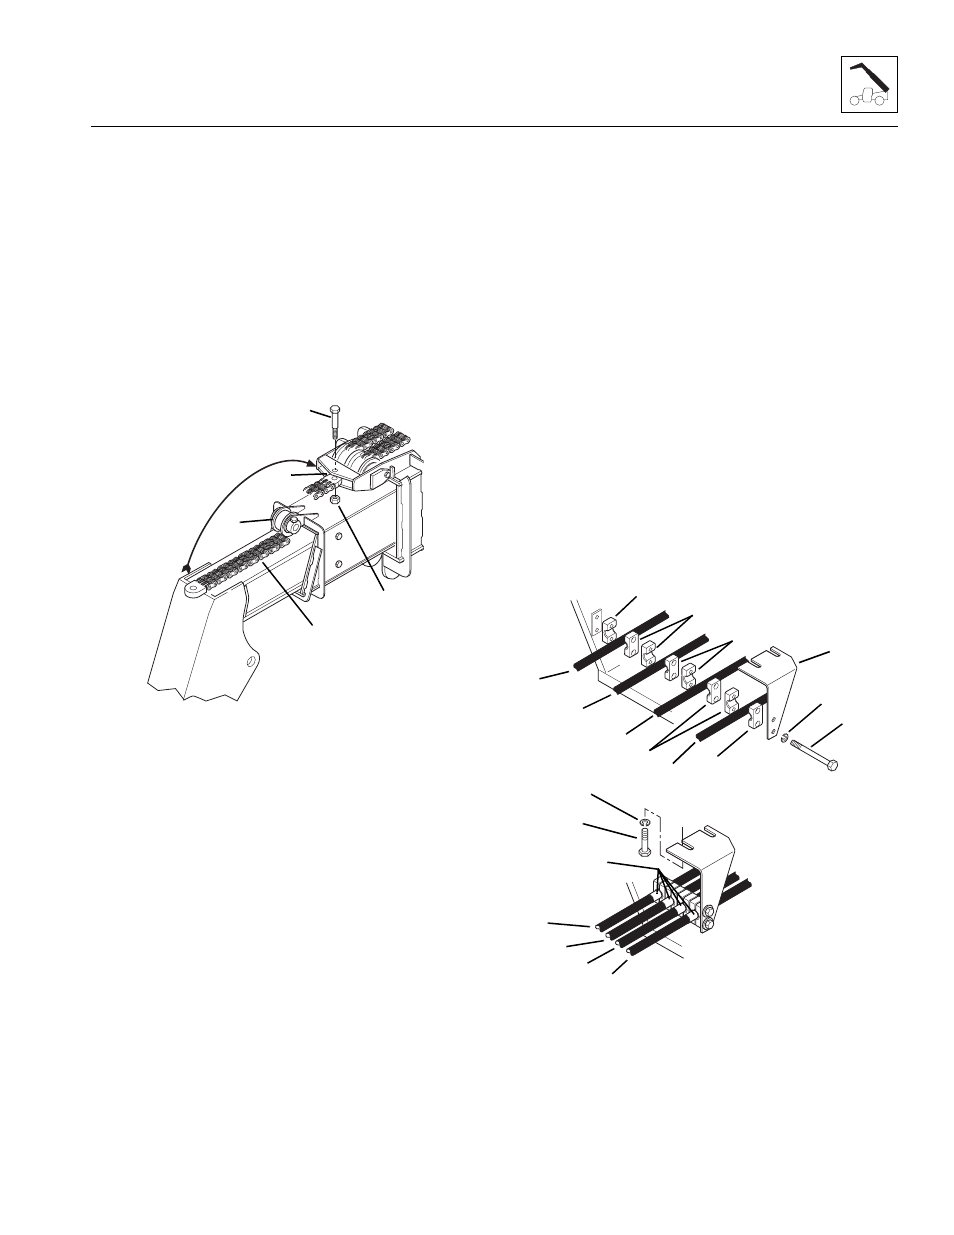
38. Place the inner boom extend chain (17) up and
around the sheave (18) at the front of the secondary
intermediate boom.
Note: ALWAYS replace elastic locknuts with new elastic
locknuts to help ensure proper fastening.
39. Place the extend chain clevis (19) between the
mounting plates at the front of the secondary
intermediate boom. Coat the shoulder bolt (20),
saved, with anti-seize compound and insert through
the plates and clevis. Secure the shoulder bolt in
place with a new elastic locknut (21). Tighten
securely, but the chain clevis should pivot freely.
IMPORTANT: Keep the four hoses in line (left to right)
as they come out of the hose carrier assembly at the rear
of the secondary intermediate boom. DO NOT allow the
hoses to cross.
40. Place a lockwasher (22), saved, onto each
capscrew (23), saved. Insert the capscrews through
the hose clamp support bracket (24), saved. Insert
the capscrews from the side as shown.
41. Place a hose clamp half (25), saved, onto the
capscrews. Place the right auxiliary hydraulic
hose (26) and another hose clamp half (25) onto the
capscrews.
42. Place another hose clamp half (25), saved, the right
Attachment Tilt hose (27) and another hose clamp
half (25) onto the capscrews.
43. Place two more hose clamp halves (25), the left
Attachment Tilt hose (28) and another hose clamp
half onto the capscrews.
44. Place another hose clamp half (25), saved, the left
auxiliary hydraulic hose (29) and another hose
clamp half (25) onto the capscrews. Assemble the
capscrews to the left side of the inner boom. Tighten
the capscrews only enough to hold the hoses in
place.
45. Remove the capscrews (30) and lockwashers (31)
holding the upper left side wear pad to the
secondary intermediate boom.
46. Apply Loctite
®
242 threadlocker to the threads of the
capscrews (30), and insert the capscrews with
lockwashers through the notches in the hose clamp
support bracket (24) and into the wear pad inserts.
Be careful not to push the wear pad inserts out of the
wear pads.
47. Torque all wear pad mounting capscrews to 31 ±3 lb-ft
(42 ±4 Nm).
48. Position each of the four hoses with the edge of the
tape (32) at the hose clamps. Hold the hoses in this
position, and tighten the two capscrews securely to
hold the hoses.
MH2520
17
18
19
20
21
MH2530
22
23
24
25
26
27
28
29
30
32
31