Rotation settings virtual image cancelation, Rotation settings, Virtual image cancelation – Sony GP-X1EM Grip Extension User Manual
Page 133
133
4
Select the function to be set.
To change the aspect ratio of the key:
Press the [ASP
PERS] button, turning it on.
To reduce/enlarge or move the key:
Press the [LOC
SIZE] button, turning it on.
To rotate or change the perspective of the key:
Press the [ROT] button, turning it on. To specify
the direction of rotation, press the [X] button or
[Y] button. To adjust perspective, press the [Z]
button.
5
Use the trackball or Z-ring for the operation.
Pressing the [FINE] button, turning it on, enables fine
adjustment of setting values (fine mode).
Pressing the [X], [Y], or [Z] button, turning it on,
restricts operation to the selected axis or item.
The target bank and resizer, and the current parameter
and its value, are displayed in the display of the device
control block.
The functions assignable to trackball and Z-ring
operations are shown in the following table.
To enter parameters
Operates identically to DME three-dimensional parameter
input.
For details, see “Three-Dimensional Parameter Entry”
(page 229).
To reset parameters
Operates identically to DME three-dimensional parameter
reset.
For details, see “Resetting three-dimensional
parameters” (page 229).
To return the resizer to default state (clear work
buffer)
To clear and reset to default state only the two-dimensional
transform and rotation parameters contained in the work
buffer, depending on the resizer operation, press the [CLR
WORK BUFR] button in the device control block.
To clear all of the parameters in the work buffer and reset
the resizer, press the [CLR WORK BUFR] button twice in
rapid succession.
For the default state, you can select either the factory
default settings or user settings.
For details, see “Power-On (Startup) State Selection”
(page 399).
To reset the bank to the default state
Press the [M/E DEF RCALL] button twice in rapid
succession to return the currently selected bank (M/E or
PGM/PST) to the default state.
Rotation Settings
Select either X or Y direction for rotation. You cannot
make rotation by combining both directions.
1
In the M/E-1 >Key1 >Resizer menu (1115), press
[Resizer], turning it on.
2
In the
[Rotation].
The Rotation menu (1115.5) appears.
3
In the
rotation.
X:
Horizontal rotation
Y:
Vertical rotation
4
Set the following parameters.
When [X] is selected
When [Y] is selected
Virtual Image Cancelation
If an extreme degree of perspective is set for an image, the
part of the image exceeding the virtual view point is
displayed wrapped around on the monitor screen. This is
referred to as a virtual image.
You can make a setting so as not to show the virtual
images.
Operation
buttons
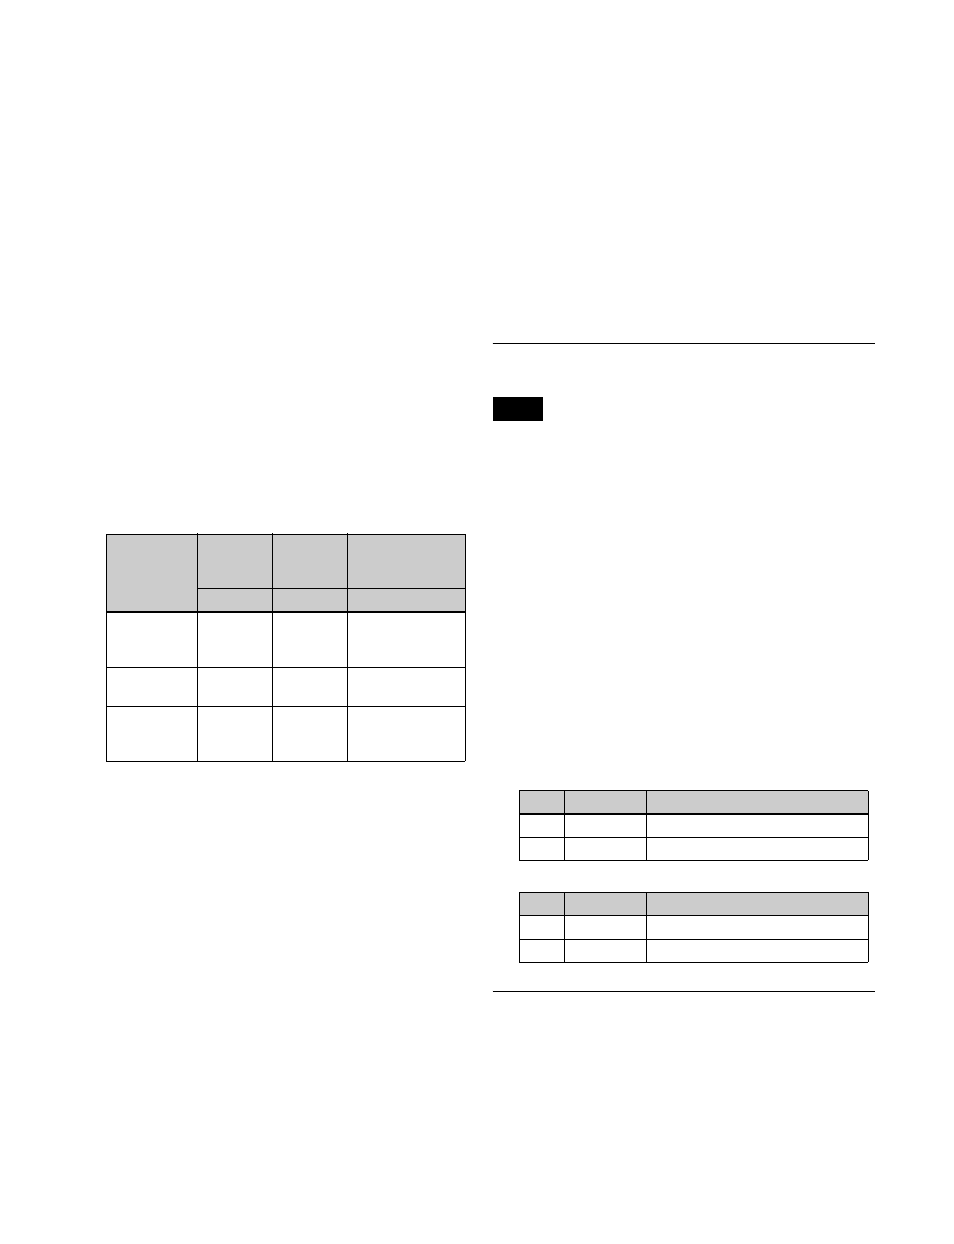
(Parameter)
Trackball
(horizontal
rotation)
Trackball
(vertical
rotation)
Z-ring
[X] button
[Y] button
[Z] button
ASP PERS
(ASP)
Change
aspect ratio
on X-axis
Change
aspect ratio
on Y-axis
Change aspect ratio
on X- and Y-axes
simultaneously
LOC SIZE
(LOC SIZE)
Move image
on X-axis
Move image
on Y-axis
Magnify and shrink
image
ROT
(ROT PERS)
Rotate
image on Y-
axis
Rotate
image on X-
axis
Change distance of
viewpoint position
Note
No.
Parameter
Adjustment
1
Rotation X
Horizontal key rotation
4
Perspective Perspective
No.
Parameter
Adjustment
2
Rotation Y
Vertical key rotation
4
Perspective Perspective