Set an unlock/lock time zone – Keri Systems Doors16 User Manual
Page 70
Doors™ Users Guide
Keri Systems, Inc.
October 1998
01821-001
Page 70
Revision 2.1
NOTE: If you double-click in the cell, a
spinner icon will appear. If you click on the
spinner icon, you can use the spinner to advance the time forward or backward and select the
desired time. You may decide to use this method to set the time instead of directly typing the
information into the cell.
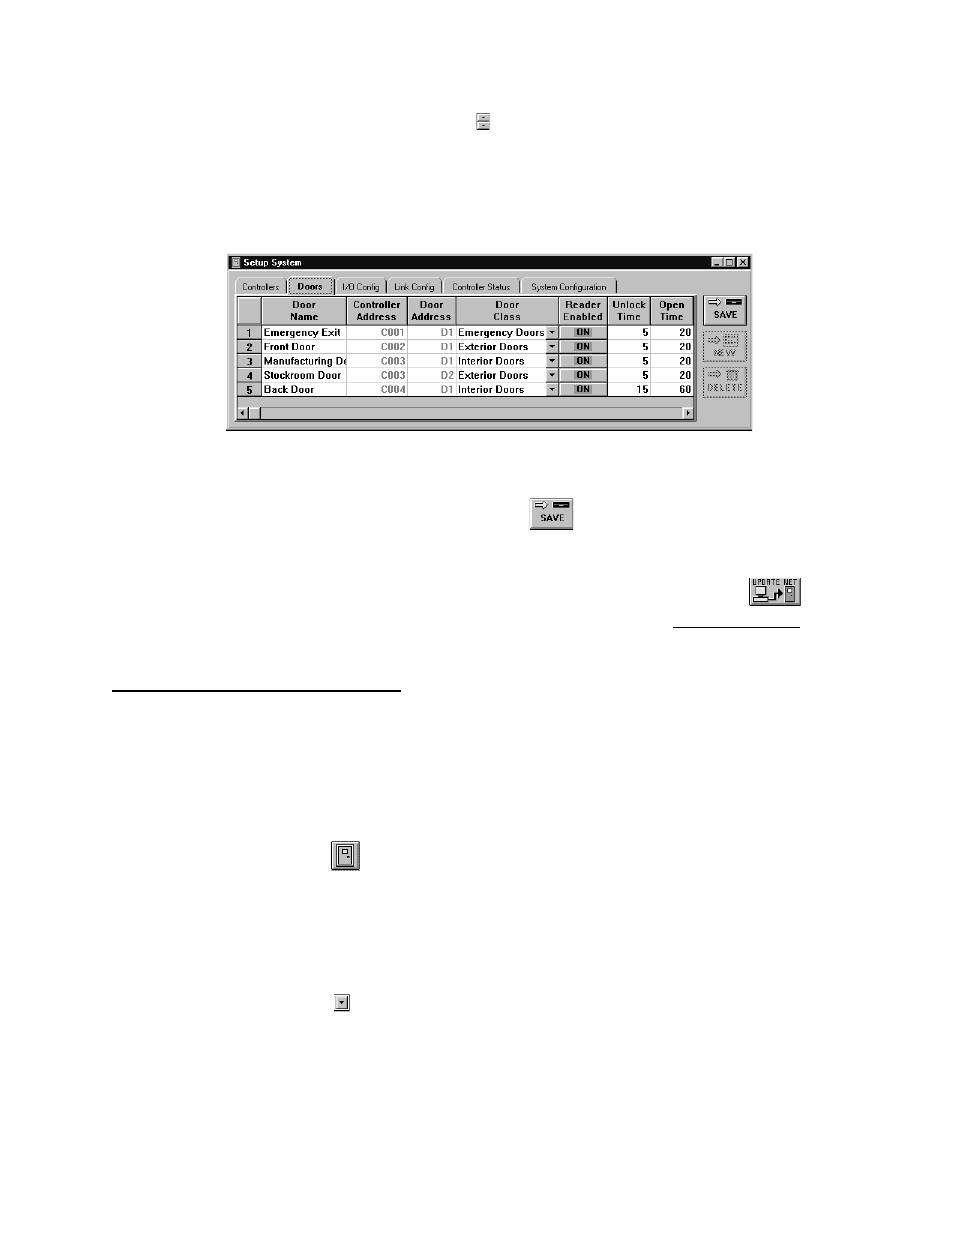
4.
The resulting window should look similar to Figure 38.
Figure 38 – Set the Door Open Time
5.
Once changes have been made, click on the
button. If the changes are not saved
before clicking any other button or exiting the system setup window, the data entered is
lost and must be re-entered.
6.
Now update the access control network with the new information. Click on the
button on the tool bar (for details on the update process refer to the Update the Network
section found later in this users guide).
Set an Unlock/Lock Time Zone
The unlock/lock time zone allows an operator to assign a time zone to a door for the
automatic unlocking and locking of that door based on the time zone. For example, a time
zone can be created for use by a front door used by customers. The unlock/lock time zone
would unlock the front door at the beginning of the time zone and lock it at the end of the
time zone.
1.
To set a door’s unlock/lock time zone, click on the Setup
⇒
System pull-down menu or
click on the
tool bar button. Then click on the Doors tab. Building off the previous
section, the window found in Figure 38 appears.
2.
Scan down the door name and controller/door address columns and locate the door to
have an unlock/lock time zone assigned.
3.
Locate the "Unlock/Lock Time Zone" column and click on the cell corresponding to the
selected controller/door (depending upon the size of the window displayed on the screen,
you might need to use the scroll bar to bring the remaining columns into view).
4.
Click on the
arrow and a list of available time zones will appear. Scroll up and down
this list and locate the desired time zone. For example, if a "Customers" time zone has
been created allowing access between 08:00 and 17:00 (8 A.M. and 5 P.M.), click on the
Customers time zone.
5.
The resulting window should look similar to Figure 39.