Disable/enable a reader – Keri Systems Doors16 User Manual
Page 67
Keri Systems, Inc.
Doors™ Users Guide
01821-001
October 1998
Revision 2.1
Page 67
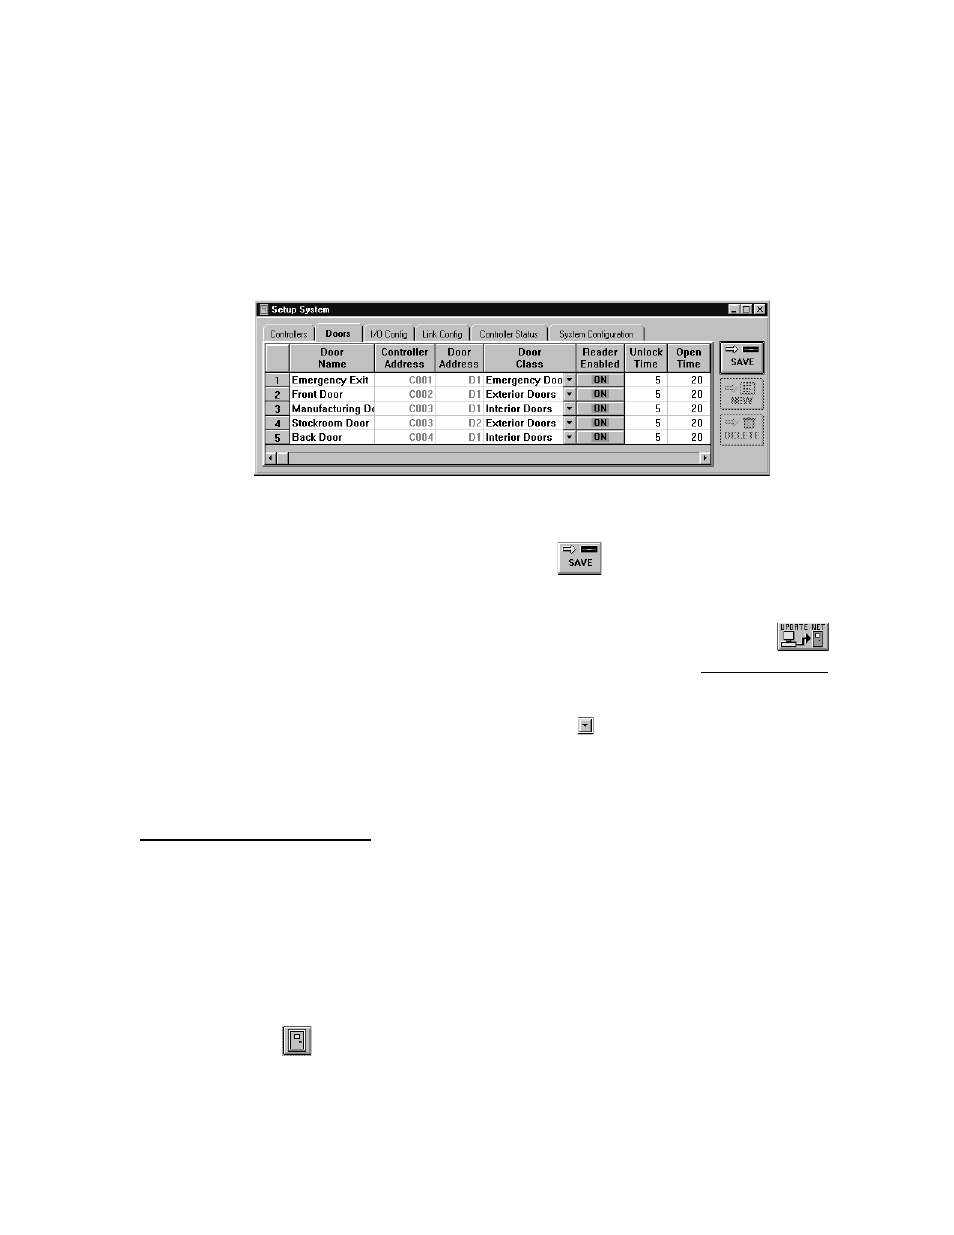
5.
Based on the remaining information in Figure 1, the following information can be
entered.
•
C002/D1-Front Door – Exterior Doors
•
C003/D1-Manufacturing Door – Interior Doors
•
C003/D2-Stockroom Door – Interior Doors
•
C004/D1-Back Door– Exterior Doors
6.
The resulting window should look similar to Figure 35.
Figure 35 – Assigning Door Classes
7.
Once changes have been made, click on the
button. If the changes are not saved
before clicking any other button or exiting the system setup window, the data entered is
lost and must be re-entered.
8.
Now update the access control network with the new information. Click on the
button on the tool bar (for details on the update process refer to the Update the Network
section found later in this users guide).
NOTE: In the door class cell is a drop-down arrow
. If you click on the arrow, a list with
all available selections will appear. Once a number of selections has been entered, you may
decide to use this method to make a selection instead of directly typing the information into
the cell.
Disable/Enable a Reader
The reader enabled button allows an operator to disable/enable a reader. In normal operation,
a reader is enabled to allow cards to be read and processed by the controller. However, there
may be times when a reader must be disabled. For example, to temporarily disable a door to
prevent access.
NOTE: Even if a reader is disabled, egress is still allowed through Request to Exit commands,
and the door is still monitored for forced openings.
1.
To enable/disable a reader, click on the Setup
⇒
System pull-down menu or click on the
tool bar button. Then click on the Doors tab. Building off the previous section, the
window found in Figure 35 appears.
2.
Scan down the door name and controller/door address columns and locate the reader to be
disabled.