2 how to move the embosser daisy wheel, 2 - introduction – MagTek EC2000 99875607 User Manual
Page 18
2 - Introduction
ExpressCard 2000| Instant Issuance Card Personalization System | Hardware Service Manual
Page 18
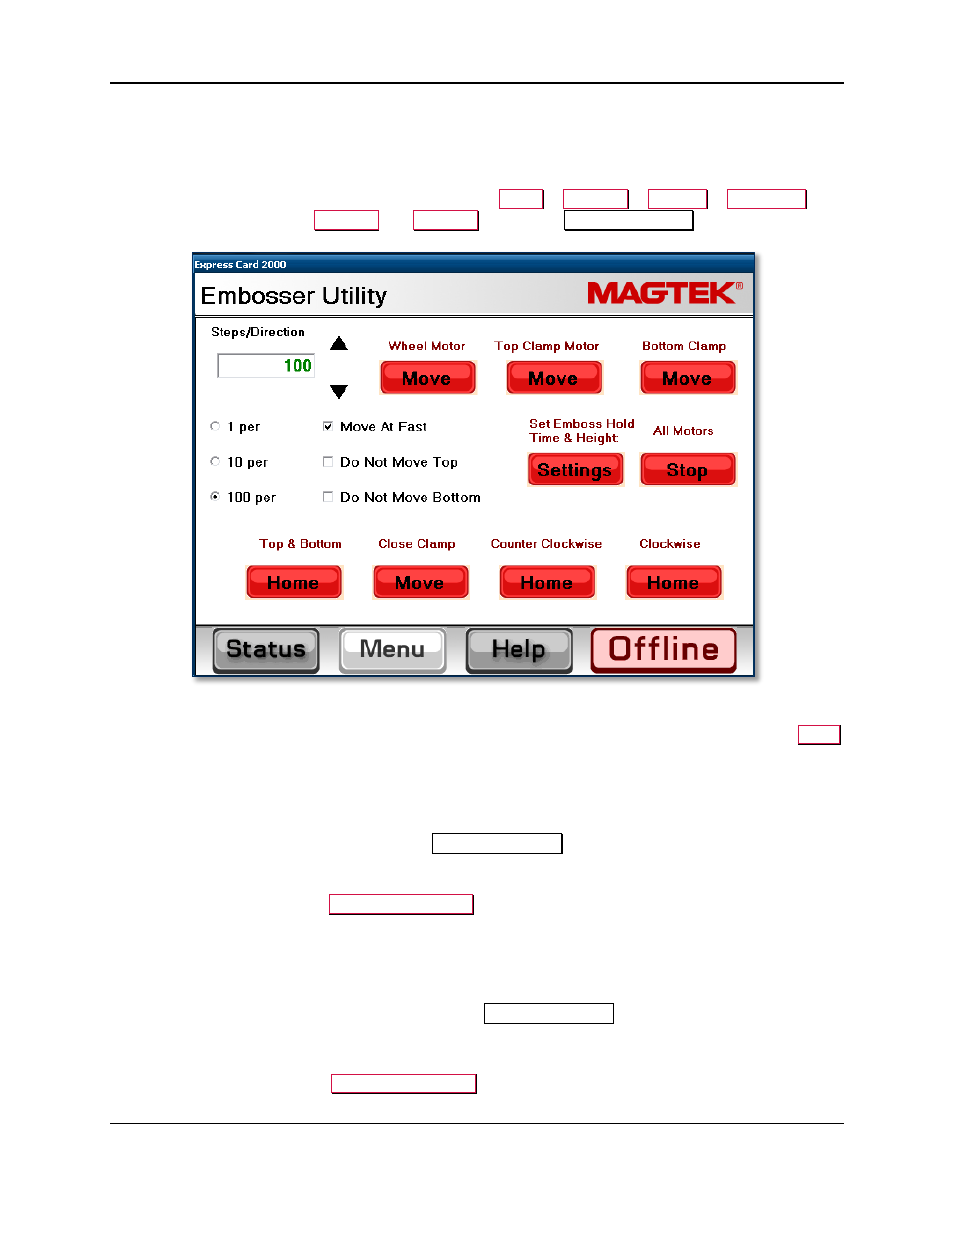
2.9.3 How to Use the Embosser Utility Page
2.9.3.1 About the Embosser Utility Page
To manually move the embosser daisy wheel or hammer cam motors, or to adjust the depth of individual
embossed characters, use the touchscreen to navigate to
Menu
>
Settings
>
Service
>
Embosser
,
then enter service passwords
4567890
and
0987654
to open the
Embosser Utility
page.
Figure 2-5 - Embosser Utility Page
The “Steps/Direction” box specifies how many steps the motor will take when you press any of the
Move
buttons in the top row. Adjust the “Steps/Direction” value by typing a new value on the keyboard, or by
pressing the up and down arrows. Change how quickly the arrow buttons change the value by selecting
the 1 per, 10 per, or 100 per radio buttons; the default is 100 steps.
The following sections specify how to use the
Embosser Utility
page to perform specific operations.
2.9.3.2 How to Move the Embosser Daisy Wheel
The daisy wheel, driven by the
Wheel Motor Move
button, contains the set of characters the embosser
can press into cards. Each character is mounted to one of 80 tines numbered 1 through 80. The motor
takes 20 steps to advance from one tine to the next. To move the daisy wheel a full 360 degrees, move it
(80 characters) x (20 steps per character) = 1600 steps.
To move the daisy wheel, follow these steps from the
Embosser Utility
page:
1) Turn on the Move At Fast checkbox. The daisy wheel is designed and tested to operate at fast speed.
2) Set the number of steps you want the daisy wheel to take (see section 2.9.3.1 About the Embosser
Utility Page) and press the
Wheel Motor Move
button.
3) Repeat the moves as necessary to complete the test.