Modify keyframe values – Adobe Premiere Pro CS6 User Manual
Page 451
If you want to modify or copy a keyframe, first select it in a Timeline panel. Unselected keyframes appear hollow; selected keyframes appear solid.
You don’t need to select segments between keyframes because you can drag segments directly. Also, segments automatically adjust when you
change the keyframes that define their end points.
Do any of the following:
To select a keyframe, use the Selection tool or the Pen tool to click the Keyframe icon in the Timeline panel.
To select multiple keyframes, Shift-click with the Selection tool or the Pen tool to select multiple contiguous or noncontiguous keyframes in a
Timeline panel.
Note: When you position the Selection or Pen tool over a keyframe, the pointer appears with a Keyframe icon .
To select multiple keyframes by dragging in the Timeline panel, use the Pen tool to draw a marquee selection box around the keyframes.
Shift-drag to add more keyframes to an existing selection.
In the Effect Controls panel, you can also use the Selection tool to drag and select multiple keyframes.
To select all keyframes for a property in the Effect Controls panel, click the layer property name. For example, click Position to select all the
Position keyframes for a layer.
Delete keyframes
If you no longer need a keyframe, you can easily delete it from an effect property in either the Effect Controls or a Timeline panel. You can remove
all keyframes at once or deactivate keyframes for the effect property. In the Effect Controls, when you deactivate keyframes with the Toggle
Animation button, existing keyframes are deleted and no new keyframes can be created until you reactivate keyframes.
1. Make sure that the effect property’s graphs are visible in the Effect Controls panel or Timeline panel.
2. Do one of the following:
Select one or more keyframes and choose Edit > Clear. You can also press Delete.
Navigate the current-time indicator to the keyframe and click the Add/Remove Keyframe button.
(Effect Controls panel only) To delete all keyframes for an effect property, click the Toggle Animation button to the left of the name of the
effect or property. When prompted to confirm your decision, click OK.
Note: When you deactivate the Toggle Animation button, keyframes for that property are permanently removed and the value of that
property becomes the value at the current time. You cannot restore deleted keyframes by reactivating the Toggle Animation button. If you
accidentally delete keyframes, choose Edit > Undo.
Modify keyframe values
Edit keyframe graphs in the Effect Controls panel
Once you activate keyframing for an effect’s property, you can display the effect’s Value and Velocity graphs. Value graphs provide information
about the value of nonspatial keyframes (such as the Scale property of the Motion effect) at any point in time. They also display and let you adjust
the interpolation between keyframes. You can use the Velocity graph to fine-tune the rate of change between keyframes.
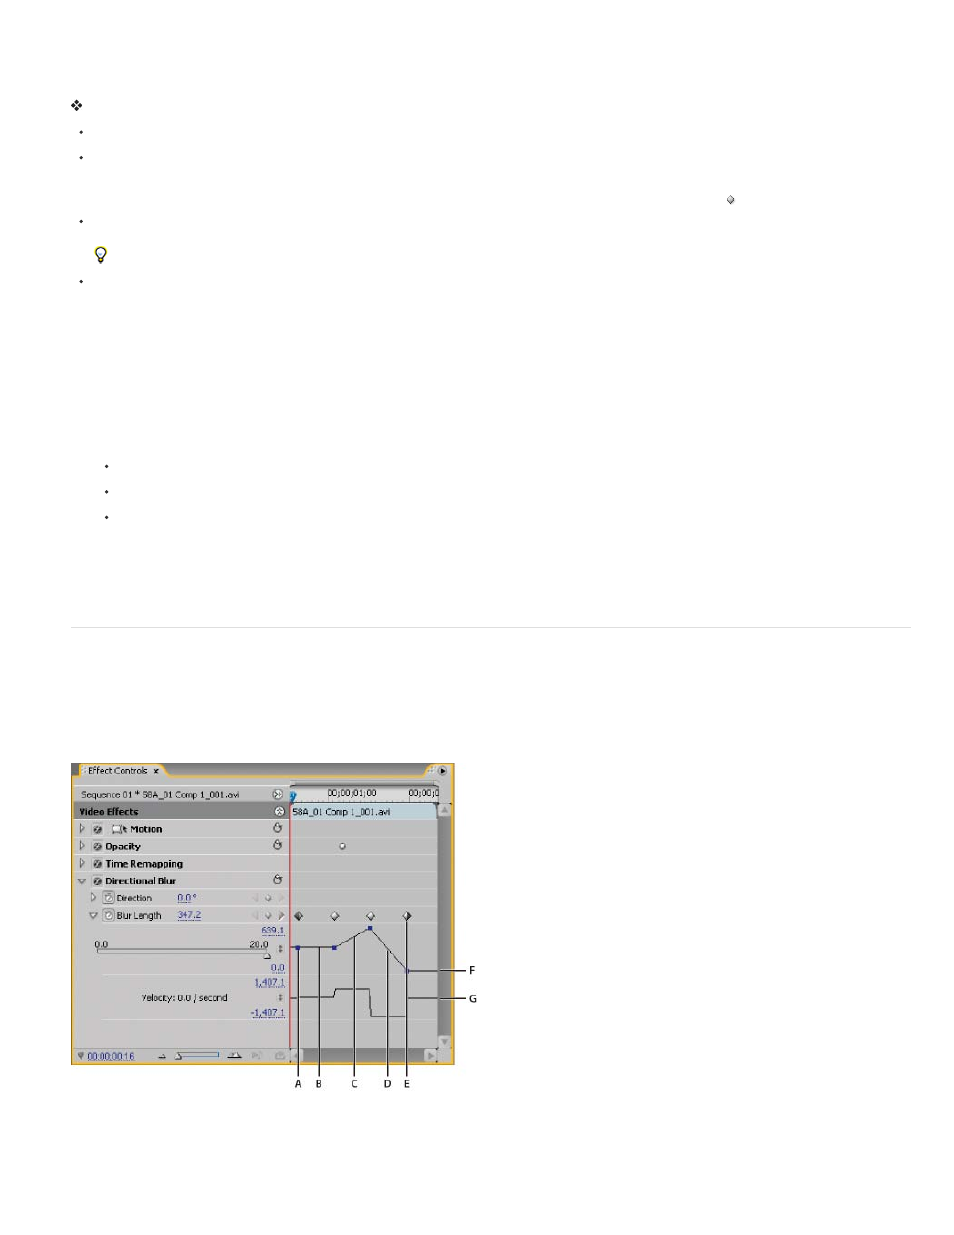
Effect property’s value and velocity graphs
A. Keyframe marker B. Level graph indicating unchanged value C. Rising graph indicating increasing value D. Falling graph indicating
decreasing value E. Keyframe F. Value graph G. Velocity graph
1. In a Timeline panel, select a clip containing an effect containing keyframes you want to adjust.
447