Adobe Premiere Pro CS6 User Manual
Page 220
Note:
Note:
Timeline trimming has been enhanced in Premiere Pro CS6 with the ability to select edit points and adjust them using the mouse, keyboard
shortcuts, or the numeric keypad.
Regular, ripple, and rolling trim functions have been enhanced as part of the improved Timeline trimming feature in Premiere Pro CS6. Though
these trim functions have improved, they still react the way trims did in Premiere Pro CS5.5, and earlier. For example, rolling trims still affect both
sides of the edit point. If you trim with the Selection tool, a gap is still left behind. The trim tools operate much in the same way in Premiere Pro
CS6, as well. There are new icons for trim tools, but the significant advantage for timeline trimming in Premiere Pro CS6 is that you can select edit
points, and use shortcuts to trim them.
Video tutorial: Trimming in Premiere Pro CS6
by Todd Kopriva and video2brain shows you how to edit quickly and precisely with the keyboard, including the new trim mode,
dynamic trimming commands, and J-K-L trimming commands. Learn how to apply these techniques to your work in this video.
by Maxim Jago and video2brain shows you how to trim faster and easier in the Timeline in Premiere Pro CS6.
Selecting edit points
Before you can use timeline trimming techniques in Premiere Pro CS6, it is important to select edit points for clips in the Timeline first. You can
select edit points with the mouse, or by using keyboard shortcuts.
Selecting edit points with the mouse
Clicking with the mouse to select an edit point in the Timeline uses the location of the mouse cursor, the active trim tool, and the modifier keys.
Dragging, as opposed to clicking and releasing the mouse to select an edit point, both selects an edit point and performs the trim.
Selection tool: Clicking the edit point with the Selection tool chooses a Trim In or Trim Out edit point selection, depending on which side of
the edit point you click. If you Ctrl-click (Windows) or Command-click (Mac OS) on the edit point with the Selection tool, the cursor displays a
Ripple Edit or Rolling Edit tool. Moving the Trim In or Trim Out points is called a regular edit.
Ripple Edit tool: Clicking the edit point with the Ripple Edit tool chooses a Ripple In or Ripple Out edit point selection, depending on the
side of the edit point you click. If you use Ctrl-click (Windows) or Command-click (Mac OS) on the edit point with the Ripple Edit tool, the
cursor shows the Ripple Edit or Rolling Edit tool and chooses Trim Out, Rolling, or Trim In depending on which side of the edit point you
click.
Rolling Edit tool: Clicking the edit point with the Rolling Edit tool selects both sides of the edit point. If the Ctrl-click (Windows) or
Command-click (Mac OS) modifier is held with the Rolling Edit tool, the cursor shows the Ripple Edit or Rolling Edit tool and chooses Ripple
Out, Rolling, or Ripple In, depending on which side of the edit point you click.
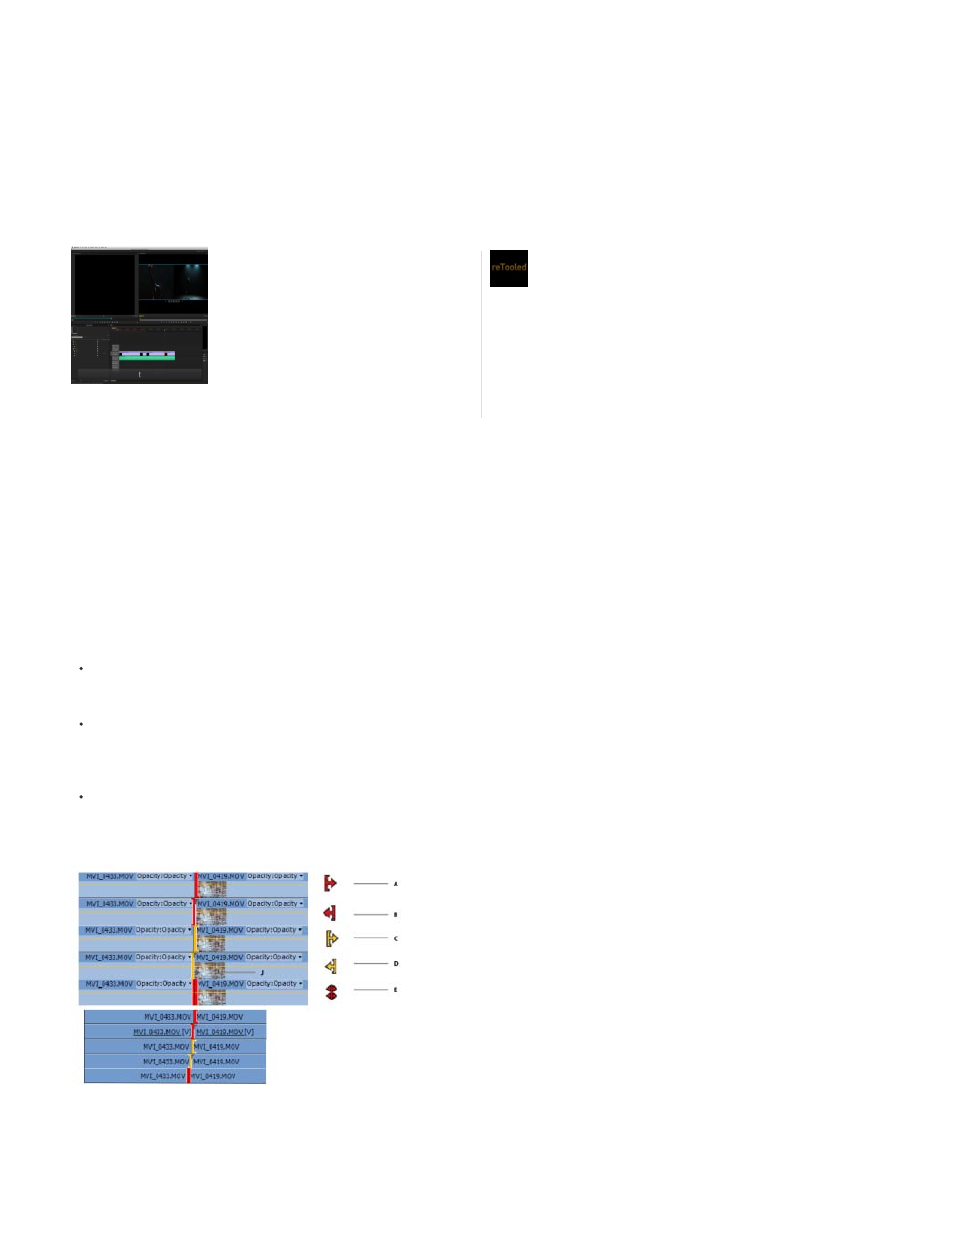
Edit cursors for the various edit types
A. Regular Edit cursor B. Regular Edit cursor C. Ripple Edit cursor D. Ripple Edit Cursor E. Rolling Edit Cursor
Track targeting does not affect selection of edit points when using the mouse.
Trimming has seen a total overhaul in
Premiere Pro CS6, and with its new
features, Premiere's timeline editing tools
are among the best in the industry....
by
reTooled.net provides tutorials in editorial,
design compositing, and innovative tools
to maximize standard desktop
applications and streamline everyday
tasks.
216