Adobe Premiere Pro CS6 User Manual
Page 416
1. Find a frame of your foreground clip that consists only of the static background. You will use this frame as a matte. Save this frame as an
image file. It will appear in the Project panel.
2. Drag the matte frame from the Project panel to a video track in a Timeline panel.
3. Drag the clip you want to use as the background to a track in a Timeline panel above the matte frame.
4. Place the video clip you wish to use in the foreground on a track in a Timeline panel above the background clip.
5. (Optional) If you’re animating the Difference Matte over time, make sure that the current-time indicator is in the position you want. Click the
Toggle Animation icons for the settings you adjust.
6. In the Effects panel, expand the Video Effects bin and then the Keying bin.
7. Drag the Difference Matte effect onto the foreground video clip.
8. In the Effect Controls panel, click the triangle next to Difference Matte to expose its controls.
9. From the Difference Layer drop-down menu, select the track that contains the matte frame.
10. Adjust the other settings as needed to achieve the desired effect.
11. (Optional) If you’re animating the Difference Matte, move the current-time indicator either in the Effect Controls panel or Timeline panel and
change the Image Matte settings.
A new keyframe appears in the Effect Controls timeline when you change the settings. You can also adjust the interpolation between
keyframes by editing the keyframe graph. Repeat this step as needed.
Eight-Point, Four-Point, and Sixteen-Point Garbage Matte effects
The three Garbage Matte effects aid in cropping out extraneous portions of a shot so that you can apply and adjust a key effect more effectively.
The mattes are applied with either four, eight, or 16 adjustment points for more detailed keying. Once you apply the effect, click the Transform
icon
next to the effect name in the Effect Controls panel. This displays the garbage matte handles in the Program Monitor. To adjust the matte,
drag the handles in the Program Monitor or drag the controls in the Effect Controls panel.
Maxim Jago demonstrates
the video2brain website.
Mask out objects with garbage mattes
Sometimes the subject of a scene is properly keyed except for undesired objects. Use a garbage matte to mask out those objects. Depending on
the shape of the mask, you can use the Four-Point Garbage Matte, Eight-Point Garbage Matte, or Sixteen-Point Garbage Matte. More points let
you define more complex mask shapes.
The Garbage Matte keying effect provides settings that represent the x and y pixel coordinates of each point of the garbage matte, measured from
the top left corner of the frame. Changes appear in the Preview view of the Program Monitor.
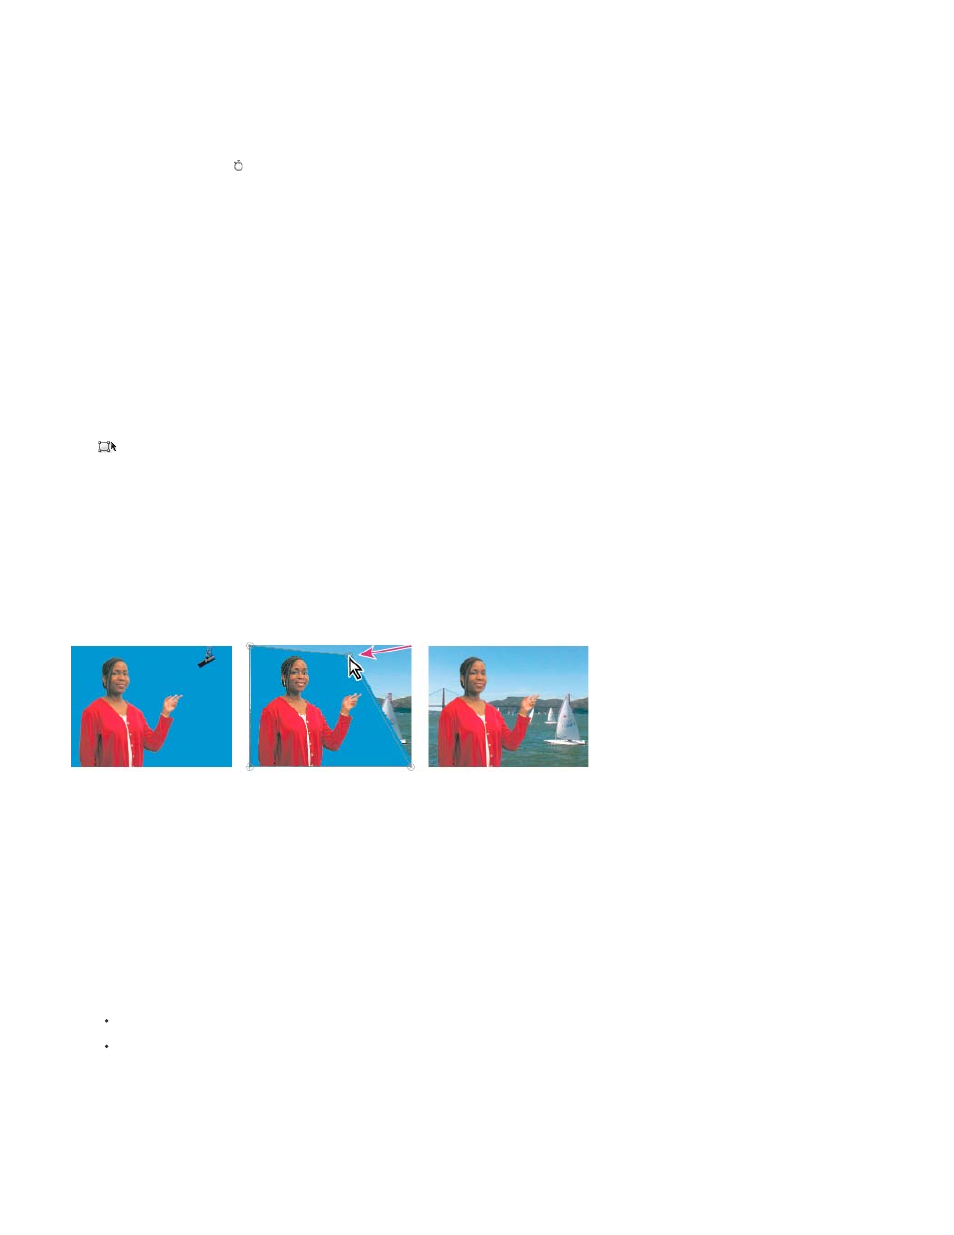
The microphone (left) is masked out by repositioning image handles in the Preview view of the Program Monitor (center), creating a garbage matte
that is then keyed and superimposed over a background (right).
1. In a Timeline panel, place the clip you want to superimpose in a track above the one containing the background clip.
2. In the Effects panel, click the triangle to expand the Video Effects bin and then click the triangle to expand the Keying bin.
3. Drag either the Eight-Point Garbage Matte, the Four-Point Garbage Matte, or the Sixteen-Point Garbage Matte effect to the superimposed
clip.
Your choice of garbage matte depends on the number of points needed for mask shape.
4. In the Effect Controls panel, click the triangle next to the Garbage Matte name to expand the settings.
5. (Optional) If you’re animating the Garbage Matte Key over time, make sure that the current-time indicator is in the position you want. Click
the Toggle Animation icons for the position settings you plan to adjust.
6. Do any of the following to adjust the mask shape:
With the Garbage Matte effect selected in the Effect Controls panel, drag the Garbage Matte handles in the Program Monitor.
Adjust the Garbage Matte point settings in the Effect Controls panel to specify the size and position of the garbage matte.
7. (Optional) If you’re animating the Garbage Matte Key, move the current-time indicator either in the Effect Controls panel or a Timeline panel
and then change the Garbage Matte handle positions in the Program Monitor or adjust the settings in the Effect Controls panel.
A new keyframe appears in the Effect Controls timeline when you move the handles in the Program monitor or change the settings in the
Effect Controls panel. You can also adjust the interpolation between keyframes by editing the keyframe graph. Repeat this step as needed.
412