Making ripple and rolling edits in the timeline – Adobe Premiere Pro CS6 User Manual
Page 223
Ripple Trim Previous Edit to Playhead and Ripple Trim Next Edit to Playhead
Note:
Note:
Ripple trims the previous or next edit point to the Playhead.
You do not need to select an edit point to perform a ripple trim to playhead edit. Like the Extract command, a ripple trim to playhead edit does not
affect clips on other tracks that are locked or not sync-locked, but all other tracks will have the region ripple-deleted. Sequence In and Out points
are not affected.
A ripple trim to the playhead at the beginning or ending of a clip is sometimes called "Top and Tail" in editing terminology. It is considered
an important technique for quickly rough cutting sequences.
from the Editor's Guild magazine for more information about Top and
Tail.
Trim with numeric keypad entry
You can specify a numeric offset using the numeric keypad whenever there is an active edit point selection, even if you are not in trim mode.
When the Timeline is active, the current timecode indicator on the left becomes a text box that shows the numbers that are typed on the numeric
keypad. The "+" key moves the trim forward to the right, increasing in time (you can omit the "+" key, and type a number). The "
trim backward to the left, decreasing in time. The numeric offset is typically a small number of frames, so any number from 1 to 99 is treated as
frames. If you want to specify a timecode, then use the numeric period key "." to separate the minute:second:frame parts for timecode entry. Press
the numeric keypad Enter key to perform the trim using all of the currently selected edit points.
When the Program Monitor is in trim mode, then you can also use the numeric keypad to perform a trim when the Program Monitor is active.
using the Play Around button and Loop button to assist dynamic trimming in
the Timeline.
Trim with the selection tool
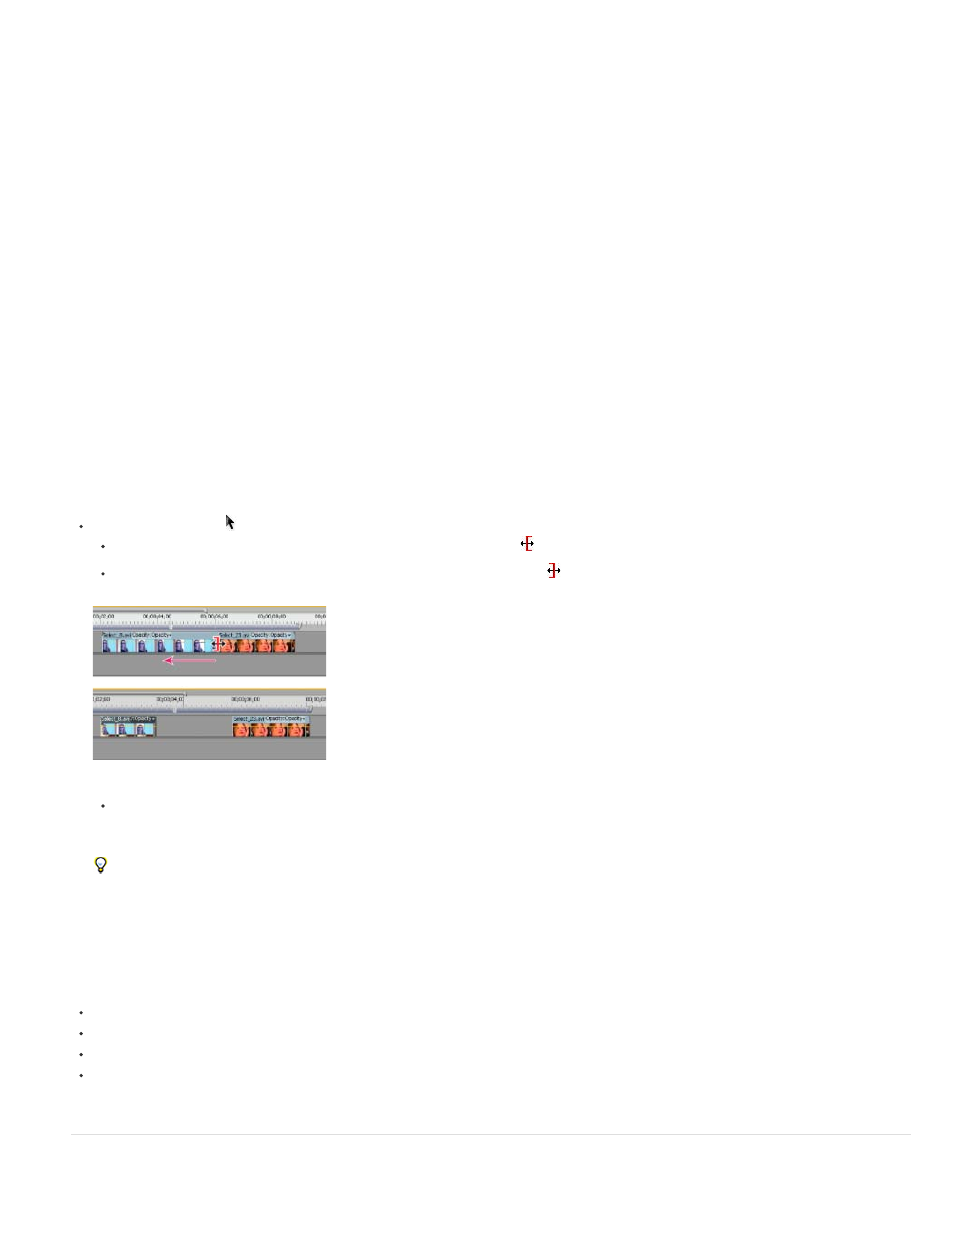
You can change a clip’s In point or Out point by dragging its edit point with the selection tool in a Timeline panel. As you drag, the current In or Out
point appears in the Program Monitor. A tool tip displays the number of frames that you are trimming: a negative value if you are dragging the
edge toward the beginning of the sequence and a positive number if you are dragging toward the end of the sequence. You cannot trim past the
original In and Out points of the source footage.
Click the selection tool and do one of the following:
To edit the In point, drag the left edge of the clip once the Trim-in icon
appears.
To edit the Out point, drag the right edge of the clip once the Trim-out icon
appears.
Trimming a clip
Trimming in this way affects only a single clip's edit point and doesn’t affect adjacent clips. As you trim with the Selection tool, a gap in
the Timeline is left behind. To trim multiple edit points at once or to shift adjacent clips, see
Making ripple and rolling edits in the Timeline
.
Press Ctrl (Windows) or Command (Mac OS) as you drag using the Selection tool to switch to the Ripple Edit tool.
To trim only one track of a linked clip, press Alt (Windows) or Option (Mac OS) as you click with a Trim icon. You do not need to hold
down the Alt (Windows) or Option (Mac OS) key once you initiate the trim.
Trim with the playhead
You can trim a clip in a sequence to the location of the playhead. However, set up these keyboard shortcuts to do so first:
Trim In Point To Playhead
Trim Out Point To Playhead
Select Nearest Edit Point as Trim In
Select Nearest Edit Point as Trim Out
To set keyboard commands for trimming, see Customize or load keyboard shortcuts.
Making ripple and rolling edits in the Timeline
219