Adobe Premiere Pro CS6 User Manual
Page 173

Note:
Note:
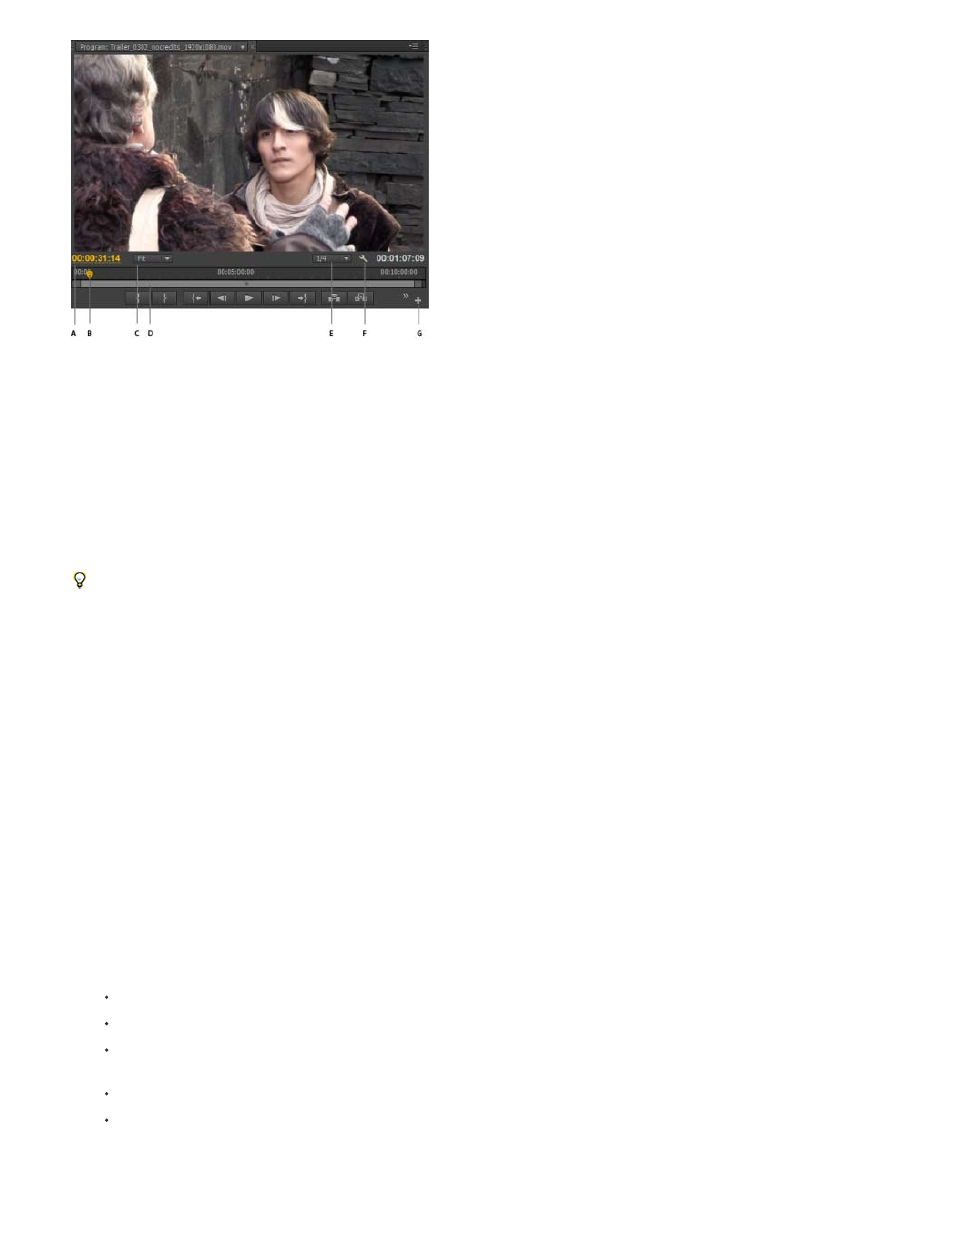
The program monitor
A. Timecode B. Playhead C. Scaling options D. Zoom scroll bar E. Resolution F. Settings button G. Button editor
For details about changes to the Source monitor, Program monitor, Timecode, and Timeline panels, see
by Todd Kopriva and
video2brain.
Customizing the monitor panel button bar (CS6)
By default, the most useful buttons are displayed along the bottom of the Source and Program Monitors. However, you can add more. Click "+" at
the lower right of a monitor to open the button editor. Add buttons to the button bar by dragging them from the button editor. Up to 2 rows of
buttons can be added. Spaces to separate groups of buttons can also be dragged to the button bar. To remove a button, drag it away from the
button bar. To turn off all buttons, go to the panel menu and deselect "Show Transport Controls."
Roll over any button with the mouse to see its keyboard shortcut.
Setting display quality for the Source and Program Monitors
Some formats are difficult to display in full-motion playback, due to their high compression or high data rate. A lower resolution permits faster
motion playback, but at the expense of display image quality. This tradeoff is most visible when viewing AVCHD and other H.264 -codec based
media. Below full resolution, these formats have error correction turned off, and artifacts are common during playback. These artifacts, however,
do not show up in exported media.
Providing separate playback and pause resolutions gives you more control over your monitoring experience. With high-resolution footage, you can
set playback resolution to a lower value (for example, 1/4) for smooth playback, and set the pause resolution to Full. These settings allow you to
check the quality of focus or edge details when playback is paused. Scrubbing puts the monitor in playback resolution, not pause resolution.
Not all resolutions are available for all sequence types. For Standard Definition sequences, such as DV, only Full and 1/2 are available. For many
HD sequences up to 1080 frame size, Full, 1/2, and 1/4 are available. For sequences with frame sizes larger than 1080, such as RED, more
fractional resolutions are available.
If your previews are rendered at a resolution below the sequence resolution, the playback resolution is actually a fraction of the preview
resolution. For example, you can set your preview files to render at 1/2 the sequence frame size (1/2 resolution) and your playback resolution to
1/2 resolution. The rendered previews play back at 1/4 of original resolution (assuming that the resolution of the original media matched the
sequence resolution).
Set the display quality for the Source Monitor and Program Monitor
You can assign keyboard shortcuts to playback resolutions.
1. Do one of the following:
Right click the image in the Source Monitor or Program Monitor.
Click the Panel Menu icon in the Source Monitor or Program Monitor.
Click the Settings button in the Source Monitor or Program Monitor.
2. Do one of the following:
To set playback resolution, select Playback Resolution.
To set paused resolution, select Paused Resolution.
3. From the menu, select the resolution desired.
For an explanation and tips on speeding up previews in Premiere Pro,
on the video2brain website.
169
