Adobe Premiere Pro CS6 User Manual
Page 403
Show Split View Displays one part of the image as the corrected view and the other part of the image as the uncorrected view.
Layout Determines whether the Split View images are side by side (Horizontal) or above and below (Vertical).
Split View Percent Adjusts the size of the corrected view. The default is 50%.
Master Alters the brightness and contrast of all channels when you change the shape of the curve. Bowing the curve upward lightens the clip and
bowing the curve downward darkens the clip. The steeper sections of the curve represent portions of the image with greater contrast. Click to add
a point to the curve and drag to manipulate the shape. You can add a maximum of 16 points to the curve. To delete a point, drag it off the graph.
Red, Green, and Blue Alters the brightness and contrast of the red, green, or blue channel when you change the shape of the curve. Bowing the
curve upward lightens the channel and bowing the curve downward darkens the channel. The steeper sections of the curve represent portions of
the channel with greater contrast. Click to add a point to the curve and drag to manipulate the shape. You can adjust up to a maximum of 16
points on the curve. To delete a point, drag it off the graph.
Secondary Color Correction Specifies the color range to be corrected by the effect. You can define the color by hue, saturation, and luminance.
Click the triangle to access the controls.
Note: Choose Mask from the Output menu to view the areas of the image that are selected as you define the color range.
Center Defines the central color in the range that you’re specifying. Select the Eyedropper tool and click anywhere on your screen to specify a
color, which is displayed in the color swatch. Use the + Eyedropper tool to extend the color range, and use the – Eyedropper tool to subtract from
the color range. You can also click the swatch to open the Adobe Color Picker and select the center color.
Hue, Saturation, and Luma Specify the color range to be corrected by hue, saturation, or luminance. Click the triangle next to the option name to
access the threshold and softness (feathering) controls to define the hue, saturation, or luminance range.
End Softness Makes boundaries of the specified area more diffuse, blending the correction more with the original image. A higher value
increases the softness.
Edge Thinning Makes the specified area more sharply defined. The correction becomes more pronounced. A higher value increases the edge
definition of the specified area.
Invert Limit Color Corrects all colors except for the color range that you specified with the Secondary Color Correction settings.
A user on the Premiere Pro user-to-user forum
mimicking Canon Technicolor custom camera profile.
Three-Way Color Corrector effect
The Three-Way Color Corrector effect lets you make subtle corrections by adjusting a clip’s hue, saturation, and brightness for the shadow,
midtones, and highlights. You can further refine your adjustments by specifying the color range to be corrected by using the Secondary Color
Correction controls.
Output Lets you view adjustments in the Program monitor as the final results (Composite), tonal value adjustments (Luma), display of the alpha
matte (Mask), or a tritone representation of the shadows, midtones, and highlights (Tonal Range).
Show Split View Displays one part of the image as the corrected view and the other part of the image as the uncorrected view.
Layout Determines whether the Split View images are side by side (Horizontal) or above and below (Vertical).
Split View Percent Adjusts the size of the corrected view. The default is 50%.
Black Balance, Gray Balance, White Balance Assigns a black, midtone gray, or white balance to a clip. Use the different Eyedropper tools to
sample a target color in the image, or choosing a color from the Adobe Color Picker.
Tonal Range Definition Defines the tonal range of the shadows, midtones, and highlights in a clip. Drag the square sliders to adjust the threshold
values. Drag the triangle sliders to adjust the amount of softness (feathering).
Choose Tonal Range from the Output menu to view the highlights, midtones, and shadows as you adjust the Tonal Range Definition controls.
Shadow Threshold, Shadow Softness, Highlight Threshold, Highlight Softness Determine the threshold and softness of the shadows,
midtones, and highlights in a clip. Enter values or click the triangle next to the option name and drag the slider.
Tonal Range Chooses the tonal range adjusted by the Hue Angle, Balance Magnitude, Balance Gain, Balance Angle, Saturation, and Levels
controls. Highlights is the default. Other options in the menu are Master, Shadows, and Midtones.
Note: You can still adjust all three tonal ranges using the three color wheels even after you choose from the Tonal Range menu.
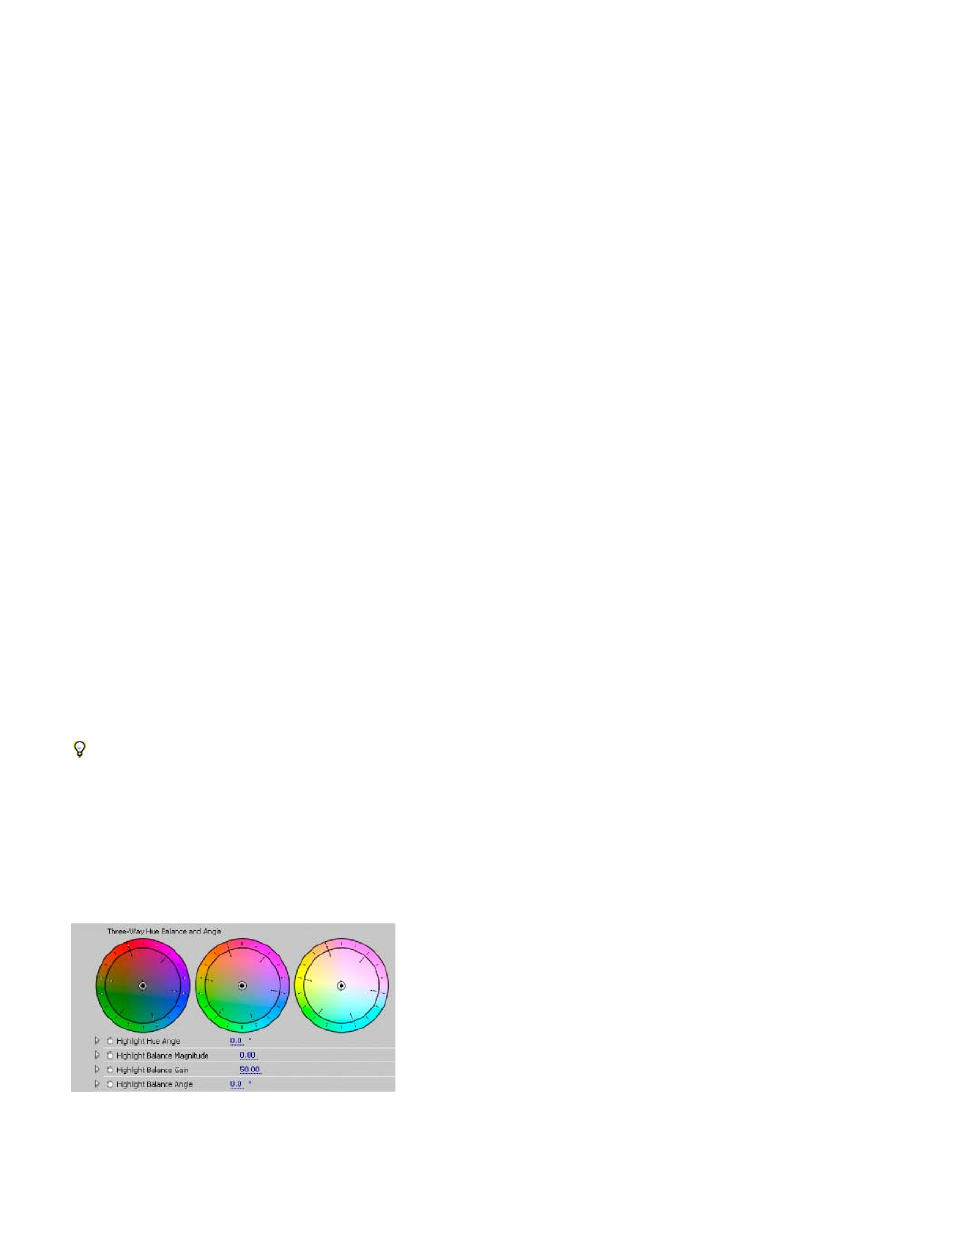
Three-Way Hue Balance and Angle Controls hue and saturation adjustments using three color wheels for the shadows (left wheel), midtones
(middle wheel), and highlights (right wheel). A single master wheel appears when Master is chosen from the Tonal Range menu. A circular thumb
moves about the center of the wheel and controls the hue (UV) translation. A perpendicular handle on the thumb controls the balance magnitude,
which affects the relative coarseness or fineness of the control. The outer ring of the wheel controls hue rotation.
Three-Way Hue Balance And Angle color wheels
Highlights/Midtones/Shadows Hue Angle Controls the hue rotation in the highlights, midtones, or shadows. The default value is 0. Negative
values rotate the color wheel to the left and positive values rotate the color wheel to the right.
Highlights/Midtones/Shadows Balance Magnitude Controls the amount of color balance correction as determined by the Balance Angle. The
399