Adobe Premiere Pro CS6 User Manual
Page 192

3. Click OK.
Note: An audio track can accept only audio clips that use the matching channel type—mono, stereo, or 5.1. If you’re not sure what kind of
audio your clips use, select the clip in the Project panel and read its information in the preview area.
You can add a track as you add a clip to the sequence. See Add a track while adding a clip.
Andrew Devis shows how to add and remove tracks
on the Creative Cow web site.
Delete tracks
You can delete one or more tracks at a time, whether video or audio.
1. With a Timeline panel active, choose Sequence > Delete Tracks.
2. In the Delete Tracks dialog box, check the box for each type of track you want to delete.
3. For each checked item, specify which tracks you want to delete in its menu.
Rename a track
1. Right-click (Windows) or Ctrl-click (Mac OS) the track's name and choose Rename.
2. Type a new name for the track, and press Enter (Windows) or Return (Mac OS).
Specify the tracks to change with Sync Lock
You can determine which tracks will be affected when your perform an insert, ripple delete, or ripple trim operation by enabling Sync Lock on
those tracks. Tracks which have a clip that is part of the operation will always shift regardless of their sync-lock state, but the other tracks will shift
their clip content only if their sync lock is enabled. With an insert edit, for example, if you want all the clips to the right of the edit on Video 1 and
Audio 1 to shift to the right while leaving all the clips on Audio 2 in place, enable Sync Lock on Video 1 and Audio 1.
Do one of the following:
To enable Sync Lock for selected tracks, click the Toggle Sync Lock box at the head of each video and audio track you want to be affected
by the edit.
To enable Sync Lock for all tracks of a particular type, video or audio, Shift-click the Toggle Sync Lock box at the head of any track of that
type.
The Sync Lock icon
will appear in the box, and Sync Lock will be enabled for those tracks.
Note: To disable Sync Lock on one or more tracks, click, or Shift-click for all tracks of a type, the Toggle Sync Lock box again so that it contains
no Sync Lock icon.
Andrew Devis shows how to use Sync Lock and track targeting
on the Creative Cow web site.
Franklin McMahon shows a good application of Sync Lock
on the Layers Magazine web site.
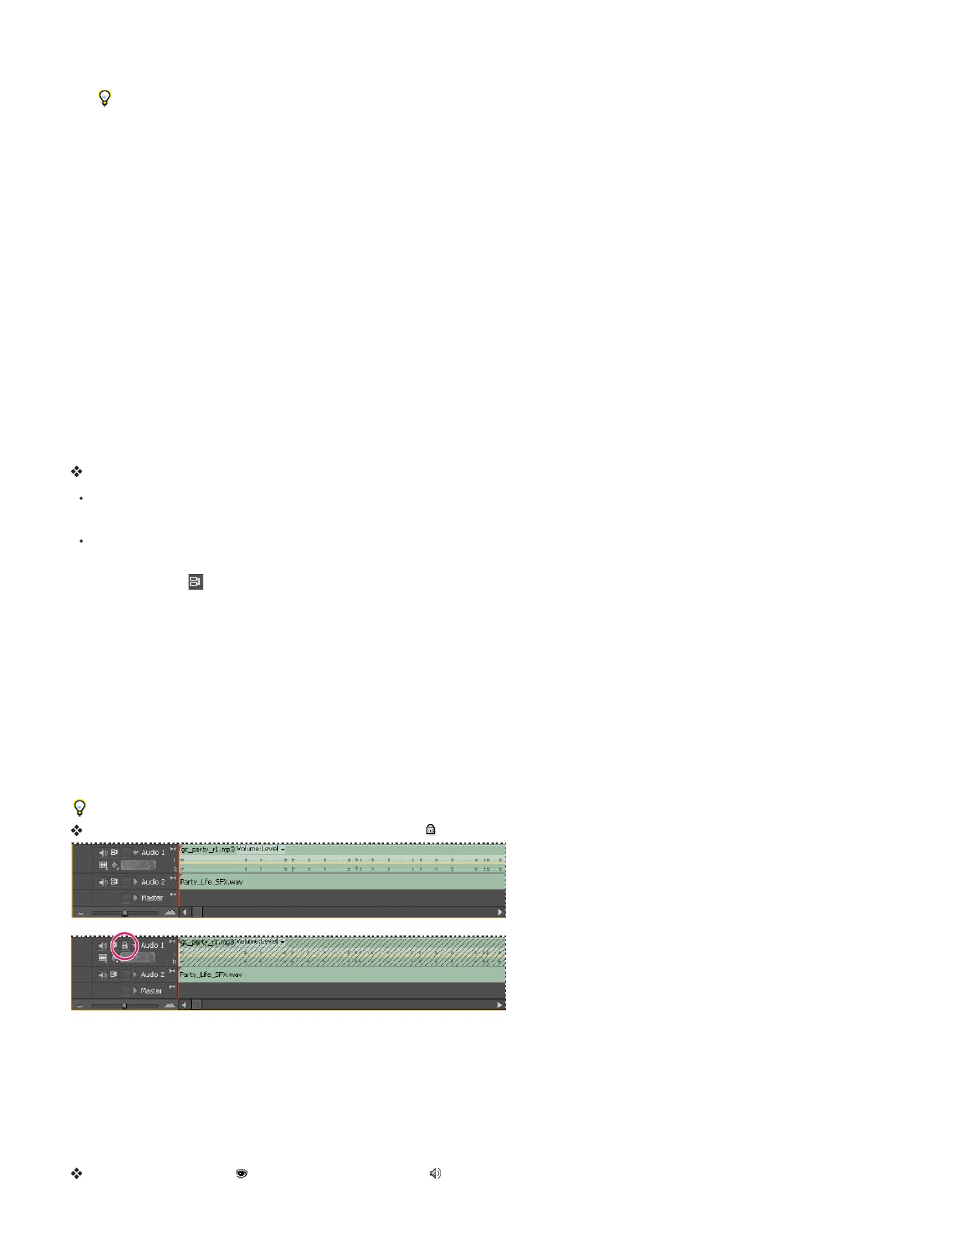
Prevent changes with Track Lock
Locking an entire track is useful for preventing changes to any clips on that track while you work on other parts of the sequence. In a Timeline
panel, a pattern of slashes appears over a locked track. Although clips in a locked track cannot be modified in any way, they are included when
you preview or export the sequence. If you want to lock both a video track and a track with corresponding audio, lock each track separately. When
you lock a target track, it is no longer the target; source clips cannot be added to the track until you unlock it and target it again.
You can lock a track to prevent it from shifting when you perform insert edits.
Click in the Toggle Track Lock box to display the Lock icon next to the track name.
An unlocked track (top) and locked track (bottom)
Exclude tracks in a sequence
You can exclude video or audio clips in any track from previews and export. Clips in excluded video tracks appear as black video in the Program
Monitor and in output files. Clips in excluded audio tracks are not output to the Audio Mixer, to the speakers, or to output files.
Note: Excluding a track with the Eye icon does not exclude it from outputs. If excluded tracks hold clips that run before or after clips on non-
excluded tracks, black video will appear before or after the last clips in the non-excluded tracks. To trim this ending black video from the output
files, set the In point and Out point as desired in the Export Settings dialog box.
188
