Measuring workpiece dimensions -21 – HEIDENHAIN TNC 407 (280 580) ISO Programming User Manual
Page 82

TNC 426/TNC 425/TNC 415 B/TNC 407
2 - 2 1
2
Manual Operation and Setup
Measuring with a 3D Touch Probe
1
Y
X
Z
l
2
I
or
0
ENT
END
.
.
.
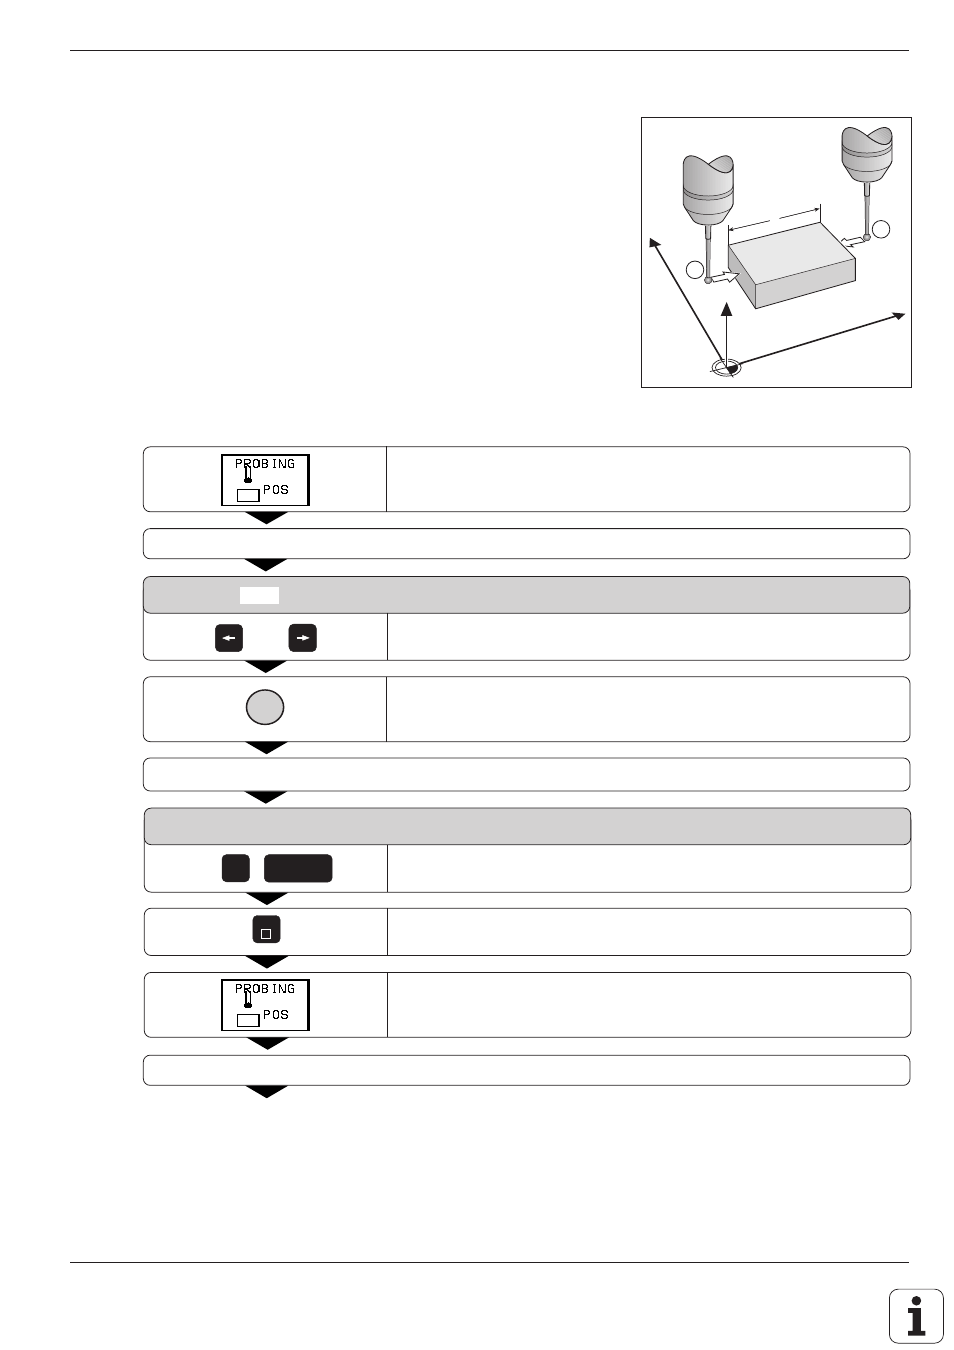
Measuring workpiece dimensions
Select the probing function with the soft key PROBING POS.
Move the touch probe to a position near the first touch point
(1).
X + X – Y + Y – Z + Z –
Select the probing direction with the cursor keys.
Probe the workpiece.
If you will need the current datum later, write down the value that appears in the DATUM display.
DATUM
Set the DATUM to 0.
Terminate the dialog.
Select the probe function again with the soft key PROBING POS.
Move the touch probe to a position near the second touch point
(2).
Fig. 2.19:
Measuring lengths with the 3D
touch probe
See also other documents in the category HEIDENHAIN Equipment:
- TNC 122 User Manual (63 pages)
- TNC 122 Technical Manual (70 pages)
- TNC 360 Service Manual (157 pages)
- TNC 416 Technical Manual (510 pages)
- TNC 335 Technical Manual (581 pages)
- TNC 360 User Manual (237 pages)
- TNC 360 ISO-Programmierung (2 pages)
- TNC 415 (280 540) User Manual (227 pages)
- TNC 370D (92 pages)
- TNC 416 (289 pages)
- TNC 415 (280 540) Technical Manual (752 pages)
- TNC 415 (259 96x) Service Manual (195 pages)
- TNC 407 (280 580) User Manual (376 pages)
- iTNC 530 (340 420) Pilot (104 pages)
- TNC 415 (280 540) Service Manual (252 pages)
- PT 880 Installation (112 pages)
- ND 100 User Manual (116 pages)
- ND 287 User Manual (147 pages)
- ND 280 Quick Start (12 pages)
- ND 200 (156 pages)
- ND 282 (10 pages)
- ND 287 Quick Start (26 pages)
- ND 282 B (39 pages)
- ND 281 A (44 pages)
- ND 281 B v.1 (53 pages)
- ND 281 B v.2 (65 pages)
- ND 221 v.2 (10 pages)
- ND 231 B v.2 (56 pages)
- ND 231 B v.1 (44 pages)
- ND 221 B v.2 (45 pages)
- ND 550 v.2 (8 pages)
- NDP 560 (10 pages)
- ND 523 (93 pages)
- ND 570 (8 pages)
- ND 750 v.2 (46 pages)
- ND 760 v.3 (72 pages)
- ND 770 v.1 (40 pages)
- ND 770 v.3 (41 pages)
- ND 760 E (44 pages)
- IOB 49 (21 pages)
- NDP 960 (68 pages)
- ND 780 Installation (132 pages)
- ND 970 (47 pages)
- ND 1100 Quick Start (36 pages)
