Teledyne LeCroy Sierra M124 User Manual User Manual
Sierra m124 sas/sata protocol analyzer user manual
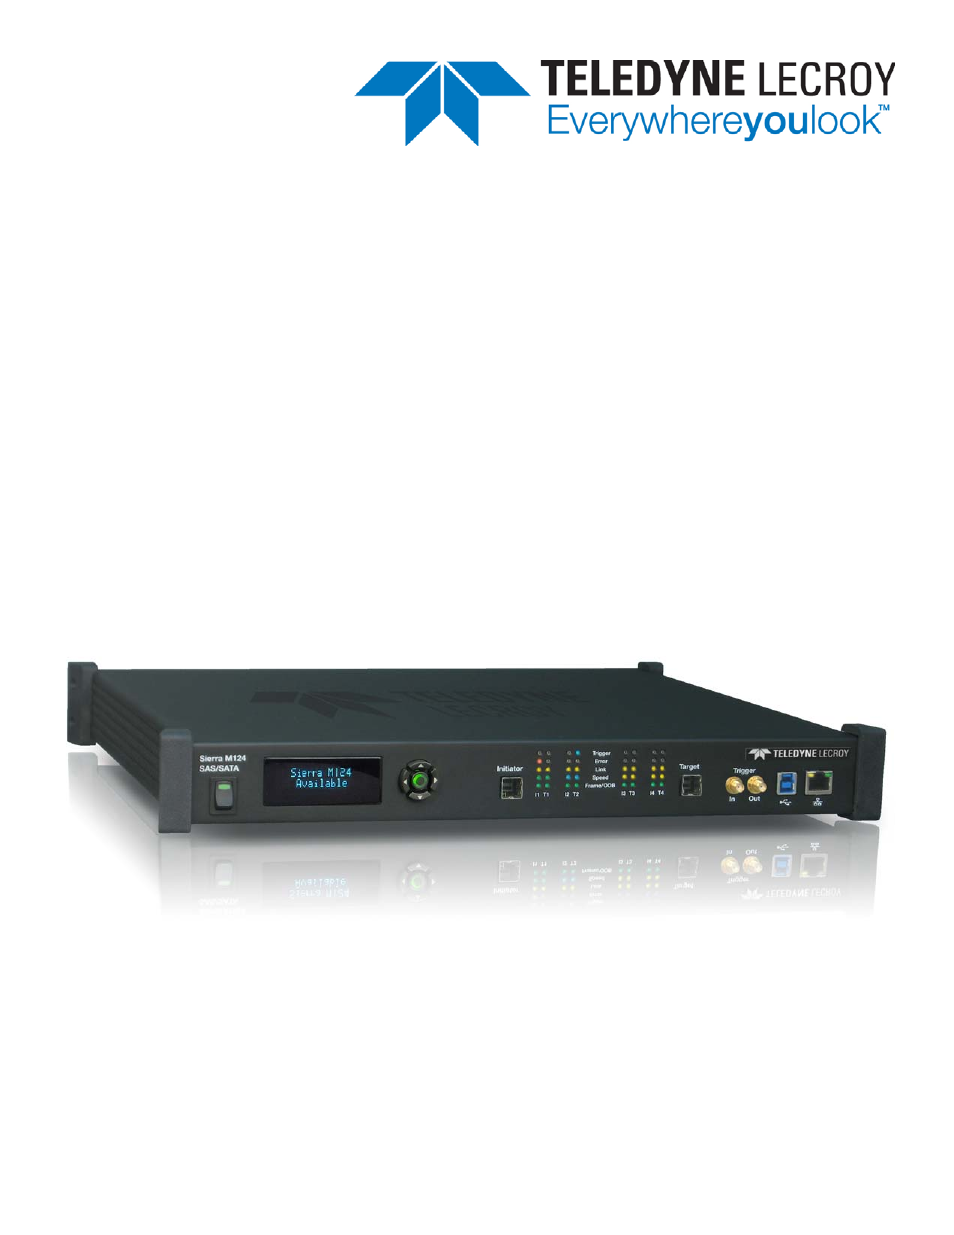
Table of contents
Document Outline
- Contents
- Introduction
- 1.1 Analyzer Overview
- 1.2 Features
- 1.3 Receiving Your Analyzer
- 1.4 Unpacking Your Analyzer
- 1.5 Analyzer Features
- 1.6 LEDs
- 1.7 Installing Your Analyzer
- 1.8 Software Installation
- 1.9 Hardware Setup
- 1.10 Expandability
- 1.11 Connecting via Ethernet
- 1.12 Connecting to a Network
- 1.13 Connecting over Different Subnets
- 1.14 TCP and UDP Ports Must be Open to Connect over Ethernet
- 1.15 Launching Your Analyzer
- 1.16 Operating in Simulation Mode
- 1.17 Using the Software
- 1.18 Getting Started with the Protocol Analyzer
- 1.19 Teledyne LeCroy SAS/SATA Protocol Suite Menu Options and Toolbars
- 1.20 Port Status
- 1.21 InFusion
- 1.22 Trainer
- Protocol Analysis
- 2.1 Easy Mode (Pre-Defined Setups)
- 2.2 SAS/SATA Software Menus and Toolbars
- 2.2.1 SAS Main Toolbar
- 2.2.2 SATA Main Toolbar
- 2.2.3 Start Recording
- 2.2.4 Launch Jammer
- 2.2.5 Launch Trainer
- 2.2.6 CrossSync Control Panel
- 2.2.7 Save Workspace
- 2.2.8 Saving a Trace Capture
- 2.2.9 Exporting
- 2.2.10 Export to Trainer
- 2.2.11 Export Paired SAS Address Report
- 2.2.12 Trace Properties
- 2.2.13 Edit Comment
- 2.2.14 Projects
- 2.2.15 Trigger Setup
- Snapshot Mode
- Manual Trigger Mode
- Any Trigger in Pattern Mode
- Bus Condition
- Symbol
- Primitive
- ATA Command
- Data Pattern
- Training Sequence
- Protocol Errors
- ATAPI
- Address Frame (SAS only)
- STP Frame
- SMP Frame (SAS only)
- SSP Frame (SAS only)
- SCSI Command (SAS only)
- Timeout
- ATA Command Pattern (SATA only)
- FIS (SATA only)
- FIS Pattern (SATA only)
- Sequential Trigger Mode
- Timer
- Defining Patterns
- Triggering Order
- Pre-Trigger
- 2.2.16 Project Settings
- 2.2.17 Analyzer Settings
- 2.2.18 Add a Project Note
- 2.2.19 Advanced Mode (User-Defined)
- 2.2.20 Multi - Link Triggering
- 2.2.21 Set Timers
- 2.2.22 Timeout
- 2.2.23 Useful Key Sequences
- 2.3 Project Settings
- Display Manipulation
- 3.1 Viewer Display
- 3.2 Trace Properties
- 3.3 Analysis
- 3.3.1 Show Analysis Toolbar
- 3.3.2 Decoding Assignments
- 3.3.3 Packet View
- 3.3.4 Changing the Default View
- 3.3.5 Spreadsheet View
- 3.3.6 Text View
- 3.3.7 Frame Inspector View
- 3.3.8 Waveform Display
- 3.3.9 Statistical Report
- Generating Statistical Read/Write Report
- Report Between Cursors
- Report Between Events
- Statistical Report Content
- Report Options
- General Report
- Primitive Report
- Bus Condition Report
- ATA Command Report
- ATAPI Report
- Protocol Error Report
- Others Report
- SSP Transport Report (SAS)
- SMP Transport Report (SAS)
- STP Transport Report (SAS)
- SCSI Command Report (SAS)
- SMP Command Report (SAS)
- Task Command Report (SAS)
- SAS Address Report (SAS)
- Lanes Report (SAS)
- Read/Write Command Report (SAS)
- Performance Report (SAS)
- Performance Report (SATA)
- FIS Report (SATA)
- Queue Command Report (SATA)
- PM Statistic Report (SATA)
- PM Performance Report (SATA)
- Read Write Command Report (SATA)
- To display the Read/Write Co
- 3.3.10 Statistical Report Toolbar
- 3.3.11 Formatting the Statistical Report View
- 3.3.12 Histogram View
- 3.3.13 Bus Utilization View
- 3.3.14 Data Report
- 3.3.15 Compare Two Data Payloads
- 3.4 Using the Power Expansion Card
- 3.5 Running Verification Script Engine (VSE)
- 3.6 Navigation + View Toolbar
- 3.7 Packet View Toolbar
- 3.8 Port Status
- 3.9 Toolbars
- 3.10 Status Bar
- 3.11 Using the Cursors and Bookmarks
- 3.12 Display Configuration
- 3.13 Set Port Alias
- 3.14 SAS Address Alias (SAS only)
- 3.15 TxRxVout & Preemphasis
- 3.16 Preferences
- 3.17 Floating License
- 3.18 External Trig Setting
- 3.19 Update Device
- 3.20 User-Defined Decoding
- 3.21 Help Menu
- 3.22 Find DUT
- InFusion Overview
- 4.1 Key Features
- 4.2 Interface
- 4.3 Port Configuration for InFusion
- 4.4 InFusion Scenarios
- 4.5 Scenario Libraries
- 4.6 Scenario Properties
- 4.7 Scenario Events
- 4.8 Scenario Actions
- 4.9 Creating Global Rules
- 4.9.1 Example 1: Creating a Single Event and Action that Removes a Primitive
- 4.9.2 Example 2: Wait for a Primitive and Replace It with an Error
- 4.9.3 Example 3: Creating OR Conditions
- 4.9.4 Example 4: Multiple Triggers and Actions
- 4.9.5 Example 5: Multiple Actions on a Single Event
- 4.9.6 Example 6: Using Timers
- 4.10 Creating a Sequence
- 4.11 Running Scenarios
- 4.12 Scenario Batch Files
- Sierra Trainer Traffic Generation
- 5.1 Sierra Trainer Menus
- 5.2 Sierra Trainer Main Toolbar
- 5.3 Setting Up for Generating Initiator Traffic
- 5.4 Setting Up for Generating Target Traffic
- 5.5 Creating a Traffic Generation File
- 5.6 Overview of Generation and Global Settings Files
- 5.7 Primitive and Frame Definitions
- 5.8 Starting the Script Editor
- 5.9 Multi-Port Trainer Script Assignments to Links
- 5.10 Generating Traffic
- 5.11 Sierra Trainer Generation Language
- 5.11.1 File Structure
- 5.11.2 Language
- 5.11.3 Generation Block
- 5.11.4 Definitions
- 5.11.5 Connecting the Trainer
- 5.11.6 Trainer Script Enhancements
- 5.11.7 Sierra Trainer Generation Commands
- 5.11.8 Generation Options
- 5.11.9 Generation Rules Toolbar
- 5.11.10 Generation Rules Page: How It Works
- 5.11.11 Creating Event Buttons
- 5.11.12 Dragging a Button to the Main Display Area
- 5.11.13 Assigning an Action
- 5.11.14 Generation Rules Pop-Up Menus
- 5.11.15 Events and Event Properties
- 5.11.16 Setting Complex “Wait For” Conditions
- 5.11.17 Find
- 5.11.18 Data Pattern Mask and Match
- 5.11.19 Find Next
- 5.11.20 Search Direction
- 5.12 Display Options
- Creating a Pattern Generator File
- China Restriction of Hazardous Substances Table
- How to Contact Teledyne LeCroy
- Index