0 - installling an automax coaxial dcs-net network, 1 constructing a coaxial cable system, 2 inspecting and testing the cable – Rockwell Automation 57C570 AutoMax PC3000 User Manual User Manual
Page 99: 0 installing an automax coaxial dcsćnet network
7Ć1
7.0 INSTALLING AN AutoMax
COAXIAL DCSĆNET
NETWORK
Installing the Coaxial DCSĆNET network requires special tools and
procedures.
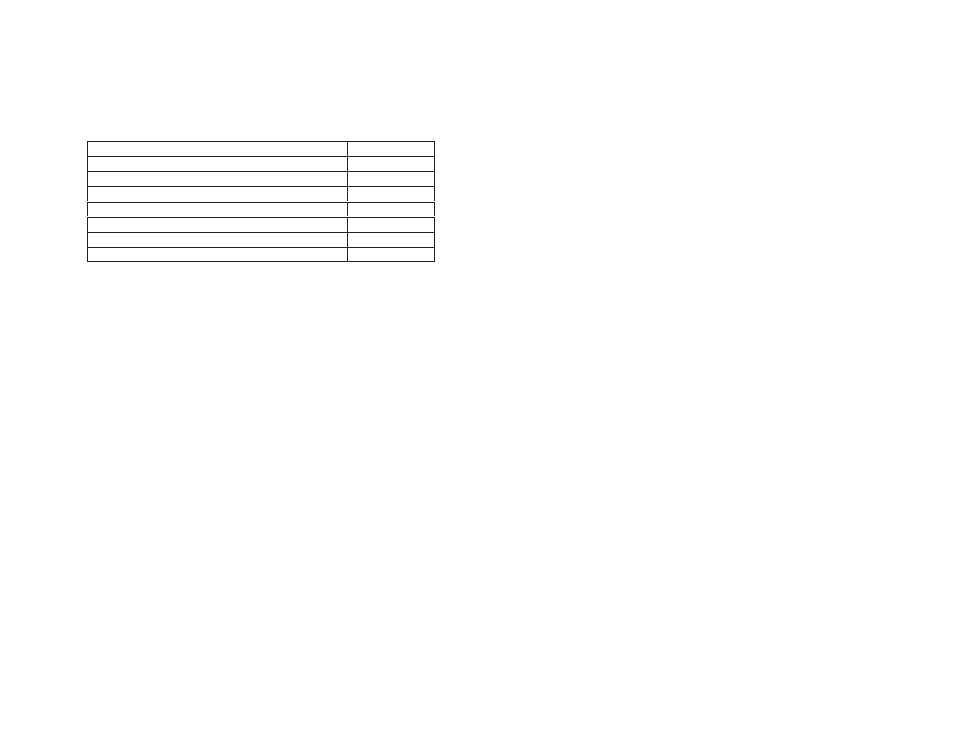
For information about:
See this section:
Constructing a Coaxial Cable System
7.1
Inspecting and Testing the Cable
7.2
Pulling the Cable
7.3
Terminating the Cable
7.4
Testing Cable Segments
7.5
Constructing Long Cable Segments
7.6
What to Do Next
7.7
7.1
Constructing a Coaxial Cable System
Construction of the network coaxial cable system consists of the
following steps. Each step is described in detail in the sections that
follow.
Step 1.
Inspect and test all cable before installation.
Step 2.
Pull the first cable segment.
Step 3.
Terminate each end of this cable segment with a BNC
plug connector.
Step 4.
Test this cable segment.
Step 5.
Pull the next cable segment and repeat steps 3 and 4.
Continue until all segments are installed.
Step 6.
Assemble the complete cable system. Connect cables to
the appropriate taps. Connect the terminating loads to
the taps at both ends of the cable system. Connect the
drop cables to the taps.
7.2
Inspecting and Testing the Cable
Inspect and test the cable before the installation. This helps ensure
that the attenuation does not exceed the expected values at
frequencies of interest (as specified in Appendix C) and that internal
discontinuities causing reflections do not exist. Many cable suppliers
(including Belden) pretest and certify the cable before shipment.
However, the cable can be damaged when shipped or stored
improperly. Because of this, it is very important to test the cable
before the installation. To test for damage, shorts, and discontinuity,
use a time domain reflectometer (TDR) or a return loss meter.