Gasboy SiteOmat Maintenance Manual User Manual
Page 149
145
SiteOmat Setup and Maintenance Manual – MDE 4817G
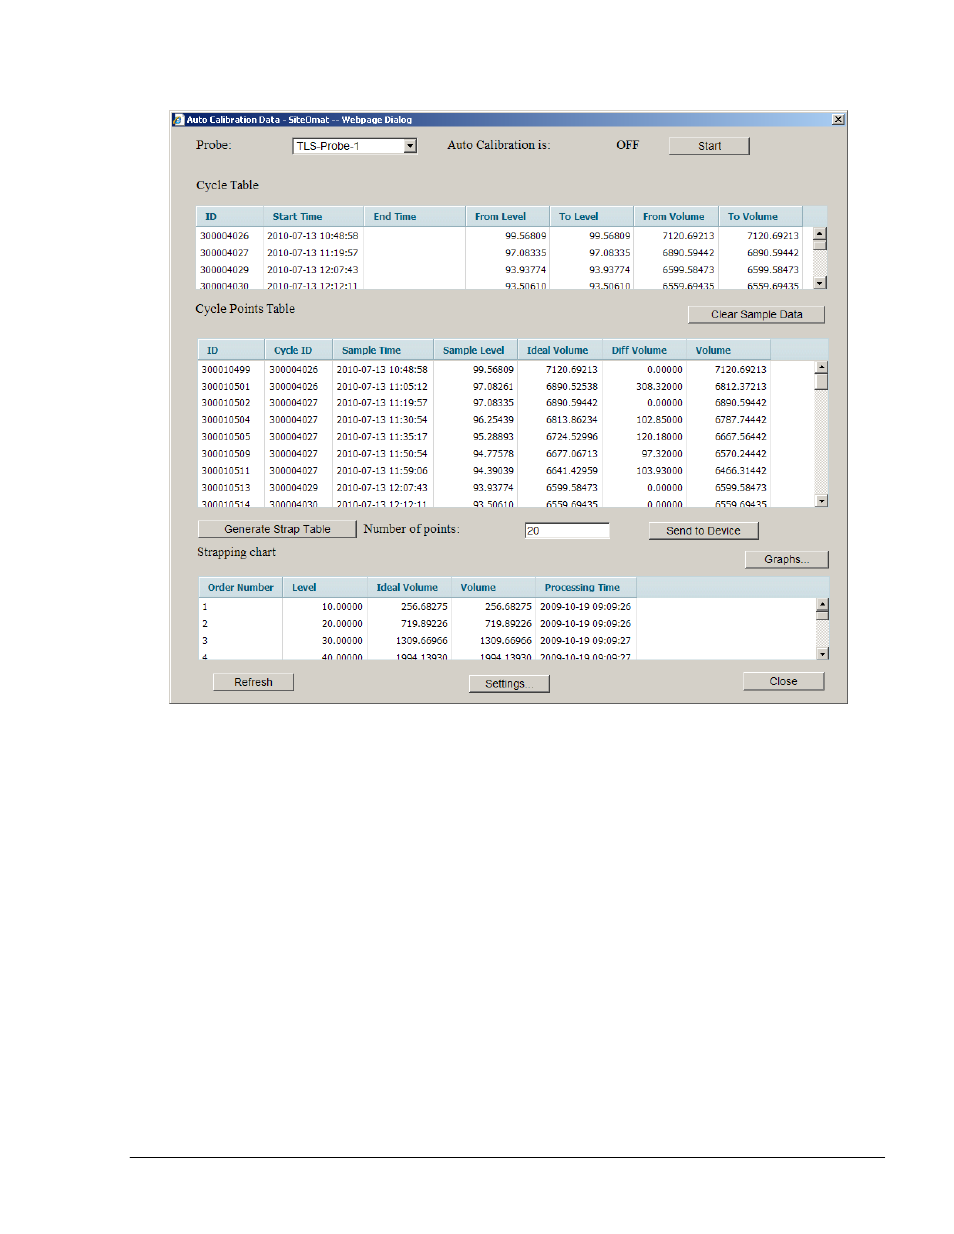
Figure 7-16. Auto Calibration Data Dialog Box
4. Select the required probe from the drop-down list
5. Click on the Start button to start the Auto Calibration process. Once this feature has been
enabled, the Start button changes to Stop
The dialog box contains three tables:
a. Cycle Table: Displays an entry for each cycle of samplings
b. Cycle Points Table: Displays all sampling points for all cycles
a. Strapping chart: The calculated charts based on the sampled data
In addition, the screen includes the following functional buttons:
a. Clear Sample Data: Clears all data in both Cycle Table and Cycle Points Table
b. Generate Strap Table: Calculates the strapping chart based on the sampling data. The
Number of points
text box enables setting the measurement points required (i.e. Veeder
Root requires 20 and OPW 45)
- 216S (18 pages)
- Atlas Fuel Systems Site Prep Manual (42 pages)
- Atlas Technician Programming Quick Ref (2 pages)
- ATC M05819K00X Kits (28 pages)
- Atlas Fuel Systems Owner Manual (80 pages)
- Gilbarco Global Pumping Unit Operation Manual (42 pages)
- 26 (7 pages)
- Atlas Valve Replacement Kits (10 pages)
- Atlas Fuel Systems Installation Manual (100 pages)
- 9820K (6 pages)
- 9120K (8 pages)
- Atlas Single Std. Inlet Centering Kit (8 pages)
- 8800 Atlas (1 page)
- 9120K Series Service Manual (40 pages)
- 9800A Atlas (6 pages)
- 9800 Atlas (14 pages)
- 9800 Atlas (20 pages)
- M08400 (6 pages)
- 9100 Series (8 pages)
- 9820K Series Installation (62 pages)
- 9853K (8 pages)
- 9216KTW (36 pages)
- Recommended Spare Atlas (14 pages)
- DEF Atlas (28 pages)
- 9820K Series (12 pages)
- 9800Q (1 page)
- Q Series (3 pages)
- 8753E (2 pages)
- 9152AXTW2 (1 page)
- 8800E (1 page)
- 8800E (2 pages)
- 9820Q Series (1 page)
- Atlas Start-up (230 pages)
- 9800A (4 pages)
- 9820A (1 page)
- 2600A (3 pages)
- 2600A (12 pages)
- 2600A (2 pages)
- 9800Q Front Load Vapor (2 pages)
- 215A (1 page)
- 9800Q Vapor (2 pages)
- 216A (31 pages)
- 215A (2 pages)
- Lamp Kit (2 pages)
- 9120Q Pulser (1 page)