Gasboy 9820Q Series User Manual
Installation instructions, 9820q totalizer kit
031907
Rev. 12/03/03
INSTALLATION INSTRUCTIONS, 9820Q TOTALIZER KIT
This instruction sheet details installation of the 9820Q totalizer kit. Be sure to read and obey all warnings and safeguards
as outlined in the enclosed Warnings and Safeguards Sheet. Kit contents are as follows:
Item P/N
Description
1
015113
Bracket, 9 dig. tot. mount, Qty 1
2
039070
Nut, #8-32 Hex Keps, Qty 2
3
039824
Odometer, 9-dig. CCW, Gallon, Qty 1
039825
Odometer, 9-dig. CCW, Liter, Qty 1
4 017366 Cable
Assy., Drive, 9-dig. tot. , Qty 1
5
043220
Pin, Spirol, 1/16” x 1/2” , Qty 1
Item P/N
Description
6
C04039
Screw, #6-32 x 1/2” Phil. Pan Hd, Qty 2
7
042290
Pin, Cotter, 3/64” x 1/2” , Qty 1
8
C08126
Cable Tie, Qty 1
9
022577
Totalizer Bracket, Qty. 1
10
053919
Screw, Qty. 2
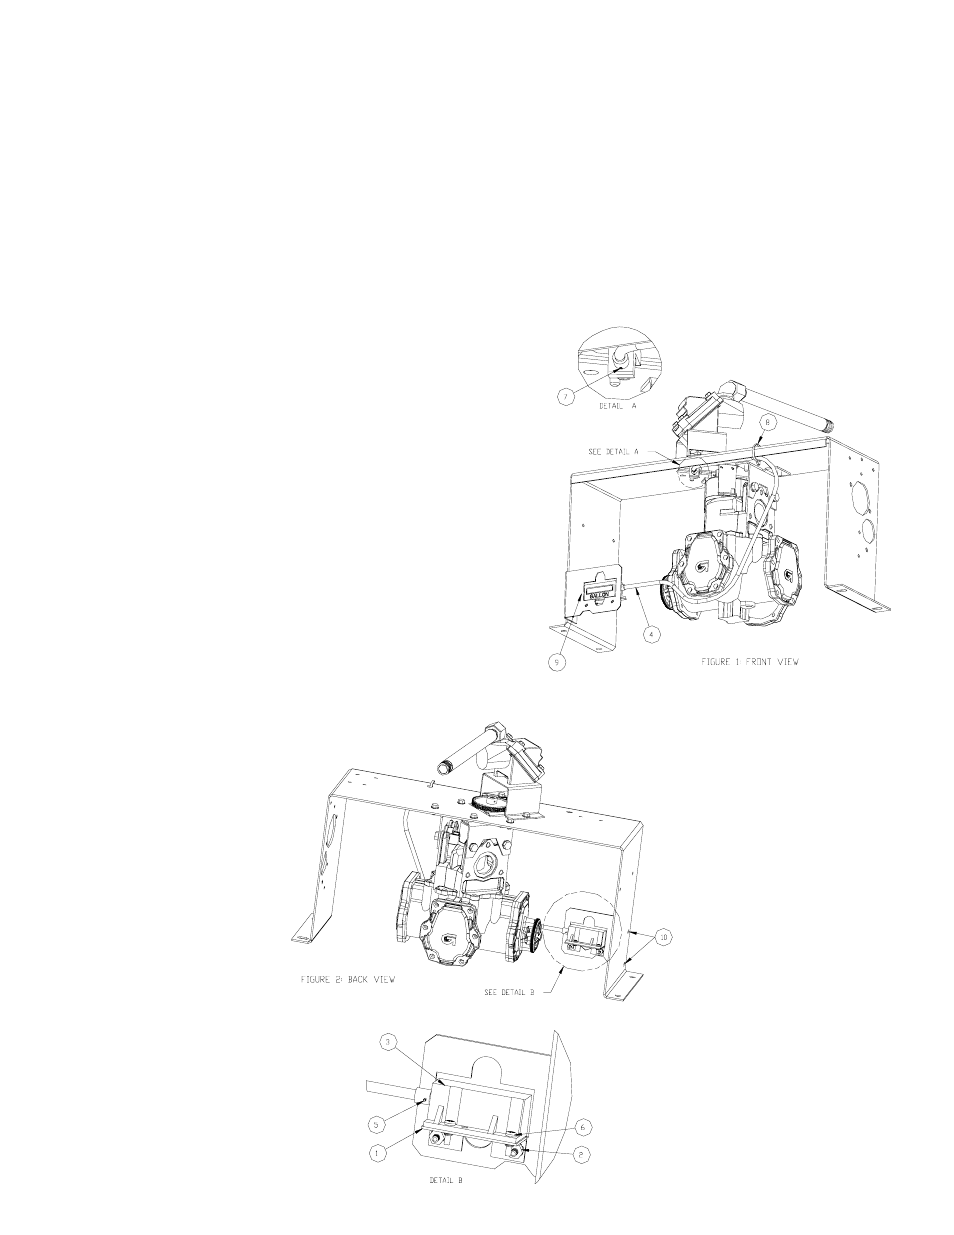
031907 Installation
Instructions
1. Turn off and lock out all power to the system.
2. Remove sheet metal cover from the unit.
3. Install Totalizer Bracket (9) to the frame with two 1/4-20 x 1/2
Taptite screws (10). (See Figure 1.)
4. Install the Drive Cable Assembly (4) to the Totalizer/Odometer
(3) using the Spirol Pin (5) NOTE: Cable end fitting with smaller
mounting hole goes to totalizer. (See Figure 2, Detail B.)
5. Install assembled Drive Cable Assembly (4) with the
Odometer/Totalizer (3) to the Totalizer Bracket mount (1), using
the two 6-32 screws (6). Then, use the two 8-32 hex keps nuts
(2) to attach this completed assembly to the Totalizer Bracket (9)
that was installed in Step 3. (See Figure 2, Detail B.)
6. Route the Drive Cable Assembly under the meter and up to the
flange of the frame. Use the cable tie (8) to secure the drive
cable in place where a hole is located in the frame. (See Figure
1.)
7. Install the loose end of the
Drive Cable Assembly to
the Gear Train Assembly
under the pulser housing
using the Cotter Pin (7).
(See Figure 1, Detail A.)
8. Restore power to the unit
and check for proper
operation of the totalizer.