Region edit, For more information, see “region, Sequencer mode – KORG Electronic Keyboard User Manual
Page 560
Sequencer mode
550
will be modified.
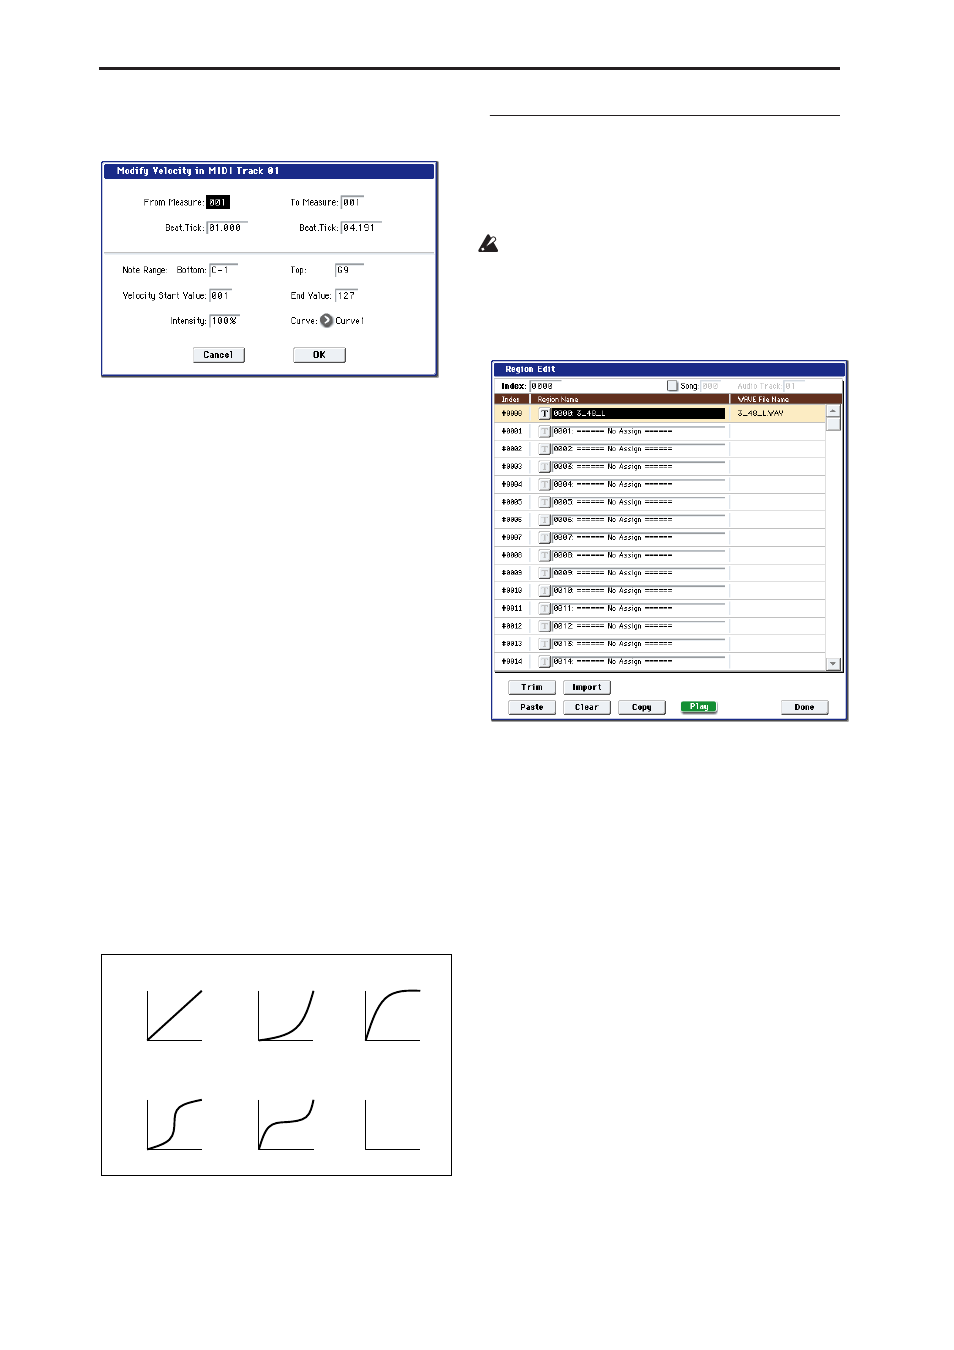
2. Select “Modify Velocity” to open the dialog box.
3. Specify the range in which note velocity will be
modified.
From Measure and To End of Measure specify the
measure, and Beat.Tick specify the beat and clock.
(By default, From Measure and To End of Measure
will be set to the range that you specified in the
Track Edit page.)
4. Specify the range of notes that will be affected by
the Modify Velocity command.
Note Range: Bottom is the lower limit, and Top is
the upper limit. If you wish to edit all notes, set
Bottom to C–1 and Top to G9. These settings can
also be made by holding down the ENTER switch as
you play a note on the keyboard.
5. In “Velocity Start Value” specify the value at
which the velocity data will start, and in “End
Value” specify the final velocity value.
These settings can also be made by holding down
the ENTER switch as you play a note on the
keyboard.
6. In “Intensity,” specify the degree to which the
velocity data will be adjusted toward the curve
you specify in step 7.
With a setting of 0 [%], the velocity will not change.
With a setting of 100 [%], the velocity will be exactly
as described by the curve.
7. “Curve”* lets you select from six types of curve to
specify how the velocity will change over time.
The six curves are as follows:
8. To execute the Modify Velocity operation, press
the OK button. To cancel, press the Cancel button.
Region Edit
Here’s how to edit the regions used in an audio track.
In addition to Importing or Pasting a region, you can
use the Trim dialog box to specify the range in which a
WAVE file will play back.
Editing a region will affect all audio tracks of the
song. Use caution when editing a region that is
already used by an audio track.
1. Use Track Select to select an Audio Track.
2. Choose “Region Edit” to open the region edit
dialog box.
3. Use Index at the top of the dialog box to specify
the index number of the region you want to edit;
this will be displayed at the beginning of the list
in the dialog box.
You can also touch the scroll bar at the right to move
to the region you want to edit.
If you check Song, only regions of the specified
song number and audio track number will be
displayed. This is convenient if you have difficulty
finding the region you want to edit.
The song number and audio track number of a
region is specified when it is recorded. You can also
modify these in the Trim dialog box (step 6).
4. If you want to edit the region name, press the text
edit button.
Press the text edit button to open the text edit dialog
box, and input the desired region name (up to 24
characters).
Regions whose names are shown as “=No Assign=”
are empty. You cannot edit these names.
5. Select the region that you want to edit, and use the
buttons at the bottom of the dialog box to edit the
region.
The available buttons will differ depending on
whether you’ve checked Song.
• Importing a region
You can copy a region from a .SNG file, or create a
region from a WAVE file.
127
Velocity
1
Start
Measure
End
Measure
Curve 1
Start
Measure
End
Measure
Curve 2
Start
Measure
End
Measure
Curve 3
Start
Measure
End
Measure
Curve 4
Start
Measure
End
Measure
Curve 5
Start
Measure
End
Measure
Rndm
RANDOM
127
Velocity
1
127
Velocity
1
127
Velocity
1
127
Velocity
1
127
Velocity
1
For a Start Velocity of 1 and End Velocity of 127