Copy tone adjust, Reset tone adjust, Show eq graphic – KORG Electronic Keyboard User Manual
Page 545: Copy vector envelope, Copy pad setup, Detune bpm adjust, Midi step recording
Sequencer: Page Menu Commands Copy Tone Adjust
535
2. Select “Bounce All Tracks To Disk” to open the
dialog box.
3. Use “Drive Select,” “Open,” and “Up” to select the
directory in which the WAVE file will be saved.
4. Use “Name” to specify the filename of the WAVE
file that will be created by bounce-recording.
5. Press the OK button to execute the command. If
you decide to cancel, press the Cancel button.
The bounce-source song will start playing, and
recording will begin simultaneously. When song
playback ends, bounce-recording will end.
Note: The Recording Level will automatically be set
to +0.0 [dB].
Copy Tone Adjust
For more information, see “Copy Tone Adjust” on
page 143.
Reset Tone Adjust
For more information, see “Reset Tone Adjust” on
page 143.
Show EQ Graphic
This calls up a floating window, showing a graphic
representation of the selected Track’s EQ settings. You
can leave the window open as you work; as you
change EQ settings, or select different Tracks, the
graphic will update accordingly.
The window will cover the parameters for some of the
Tracks on either the right or left sides of the display. If
you select one of these Tracks, the window will
automatically move to the other side of the display.
Copy Vector Envelope
For more information, see “Copy Vector Envelope” on
page 144.
Copy Pad Setup
For more information, see “Copy Pad Setup” on
page 144.
Detune BPM Adjust
If you’ve created a phrase or rhythm loop multisample
or sample at a specific BPM in Sampling mode (or that
you loaded in Disk mode), and want to use it with a
program in a track, you can use this command to
change the BPM of that multisample or sample. The
“Detune BPM Adjust” command modifies the BPM of
the phrase or rhythm by changing its pitch.
This command is available when the “Detune” setting
of that track is selected. When you execute this
command, the selected “Detune” value will be
adjusted.
For more information, see “Detune BPM Adjust” on
page 408.
MIDI Step Recording
Step recording allows you to specify the length and
velocity of each note numerically, and to input MIDI
data, the pitches, from the keyboard. You can also use
the on-screen buttons to enter Rests or Ties.
If you use step recording to input data into a track
that already contains sequence data, all data will be
erased from the From Measure and subsequent
measures. If after recording, you decide to revert to
the prior data, use the Compare function.
To input data with a continuously-changing value such
as pitch bend, it is best to use the “Create Control
Data” menu command. To input individual data
events such as program changes, use the “MIDI Event
Edit” menu command.
1. Use Track Select to select the track into which you
wish to input data, and use From Measure (4–1b)
to specify the measure at which you wish to begin
input.
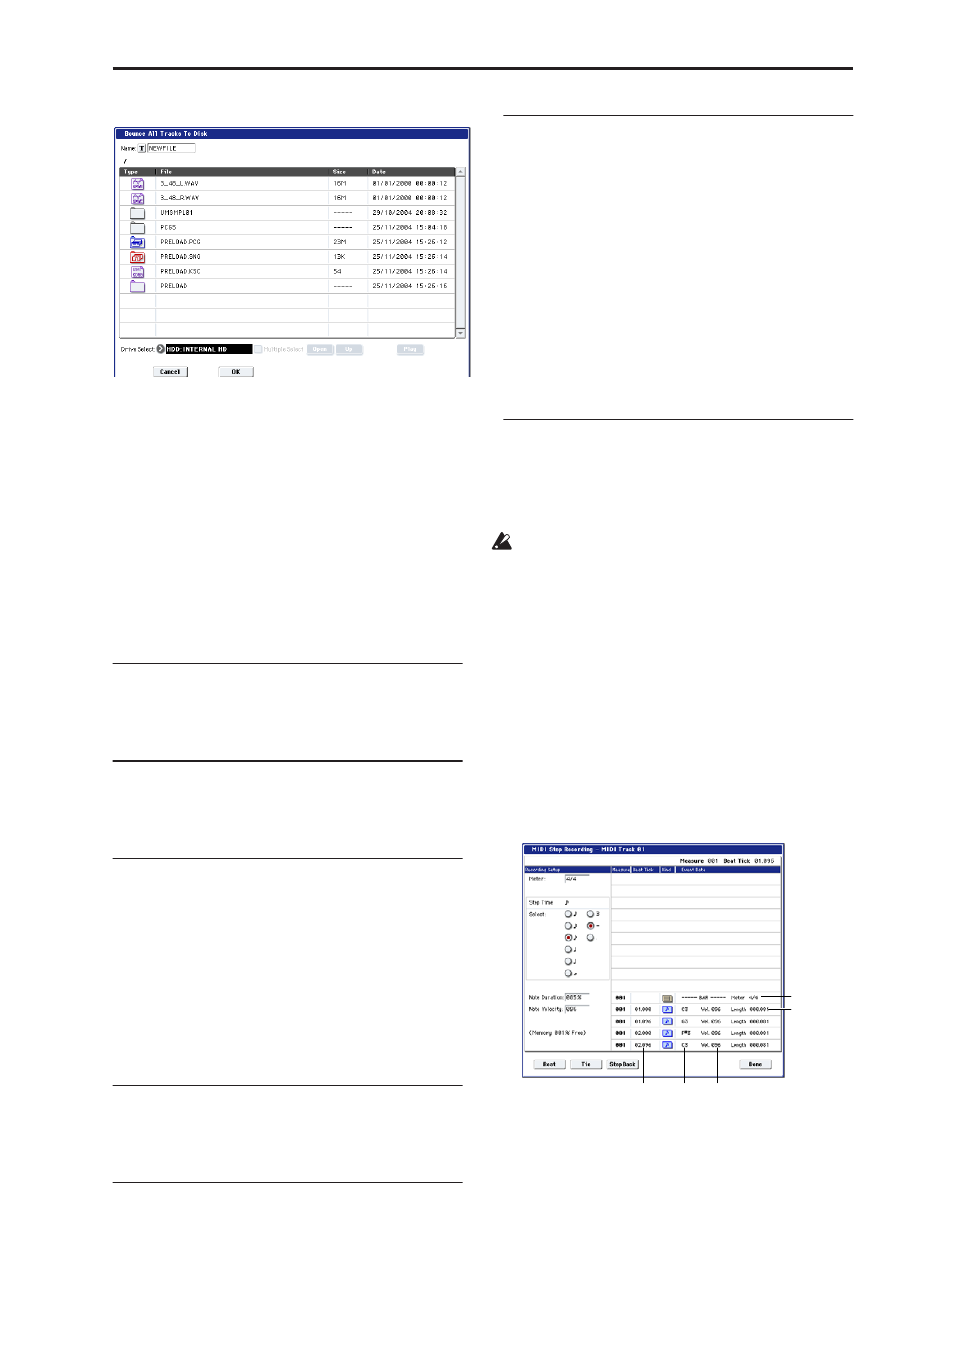
2. When you select “MIDI Step Recording,” the
following dialog box will appear.
3. In Meter, set the time signature.
This will show the time signature that has already
been set for the measure.
If you change the time signature setting, the time
signature data of the measures you record will
change, and all tracks will change to the time
signature you specified.
Note number
Location within the
measure (beat, clock)
Length
(beats, clocks)
Time signature
Velocity