Dip switches – Wavetronix Click 400 (900 MHz radio) (CLK-400) - User Guide User Manual
Page 113

112
CHAPTER 10 • CLICK 112/114
One benefit of using DIP switches to configure is that if you ever have a field service call and
need to replace a Click 112/114, all you need to do is match the pattern of the DIP switches
on the card you are replacing. This paradigm will even work in situations where the old rack
card will not power up.
On the other hand, a benefit of using the software configuration is that you can remotely
manage the configuration of the cards, if you are connected to them. In this paradigm, it
becomes the user’s responsibility to keep a record of how each card was configured, which
is easy to do using Click Supervisor.
Note
The Click 112/114 receives datagrams from the connected SmartSensor. These data-
grams must be mapped to device outputs (covered in the next section). If the Click
112/114 does not receive a datagram describing the device’s channels for ten seconds,
the device will enter fail-safe mode. In fail-safe mode, all outputs will assert a detec-
tion condition, and will continue to do so until the device receives a datagram that
updates the state of its configured channels.
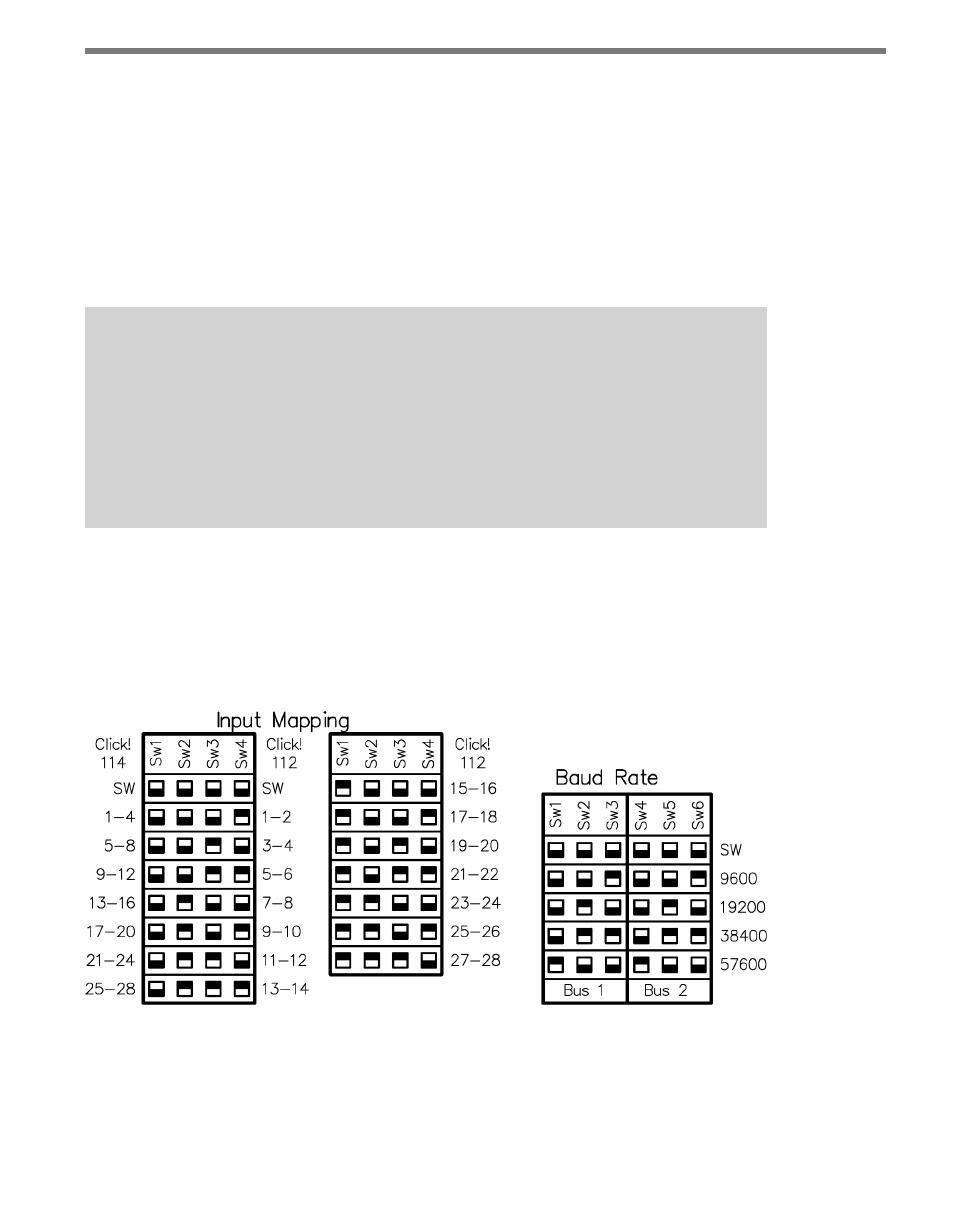
DIP Switches
The DIP switches are located on the lower part of the circuit board, behind the faceplate.
Printed on the board above the switches is information about configuring the card using the
DIP switches, as shown in Figure 10.4.
Figure 10.4 – Click 112/114 DIP Switches
The Click 112/114 feature two DIP switches labeled S4 and S5 on the silk screen. The
switches are used to configure a total of three different parameters:
˽
Bus 1 baud rate
- Click 421 (bluetooth to serial converter) (CLK-421) - User Guide Click 342 (lean managed ethernet switch) (CLK-342) - User Guide Click 341 (lean managed ethernet switch) (CLK-341) - User Guide Click 340 (lean managed ethernet switch) (CLK-340) - User Guide Click 331 (unmanaged ethernet switch) (CLK-331) - User Guide Click 330 (unmanaged ethernet switch) (CLK-330) - User Guide Click 304 (RS-232 to RS-485 converter) (CLK-304) - User Guide Click 305 (RS-232 to RS-485 converter) (CLK-305) - User Guide Click 301 (serial to ethernet converter) (CLK-301) - User Guide Click 100 (16 output contact closure) (CLK-100) - User Guide Click 104 (4-channel DIN rail contact closure) (CLK-104) - User Guide Click 110 (4-channel contact closure eurocard) (CLK-110) - User Guide Click 112 (detector rack card) (CLK-112) - User Guide Click 114 (detector rack card) (CLK-114) - User Guide Click 120 (screw terminal relay) (CLK-120) - User Guide Click 121 (spring cage relay) (CLK-121) - User Guide Click 200 (surge suppression) (CLK-200) - User Guide Click 201 (1 amp AC to DC converter) (CLK-201) - User Guide Click 202 (2 amp AC to DC converter) (CLK-202) - User Guide Click 203 (UPS and battery) (CLK-203) - User Guide Click 204 (4 amp AC to DC converter) (CLK-204) - User Guide Click 210 (AC circuit breaker) (CLK-210) - User Guide Click 211 (AC outlet) (CLK-211) - User Guide Click 221 (DC surge protector) (CLK-221) - User Guide Click 222 (system surge protector) (CLK-222) - User Guide Click 223 (dual-485 surge protector) (CLK-223) - User Guide Click 230 (AC surge protector) (CLK-230) - User Guide Click 250 (wireless surge protector) (CLK-250) - User Guide
