1 the ethernet edit screen, Figure 149 network > interface > ethernet, Table 50 network > interface > ethernet – ZyXEL Communications 200 Series User Manual
Page 207
Chapter 10 Interface
ZyWALL USG 100/200 Series User’s Guide
207
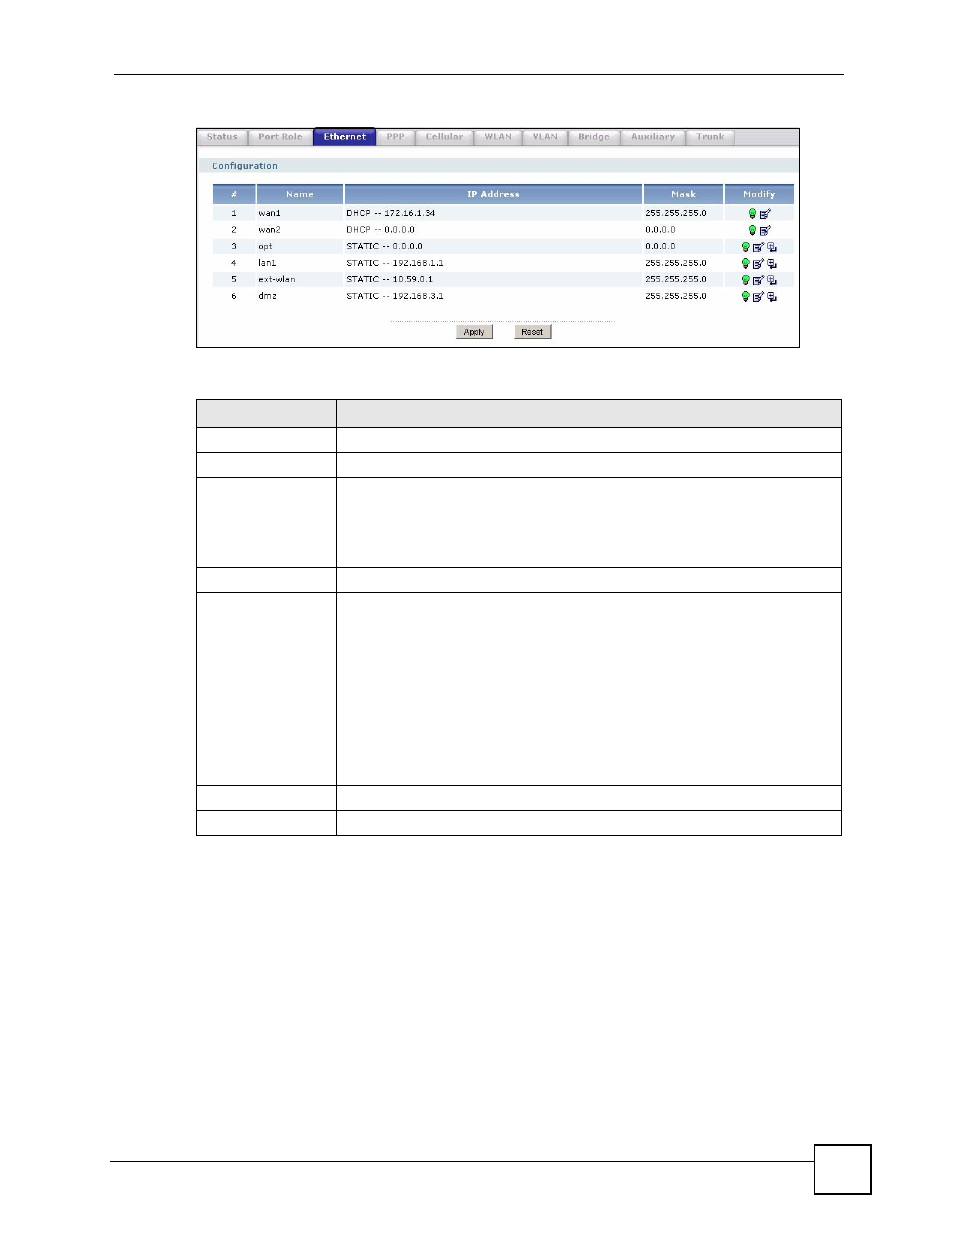
Figure 149 Network > Interface > Ethernet
Each field is described in the following table.
10.4.1 The Ethernet Edit Screen
Click Network > Interface > Ethernet and then the interface’s Edit icon to display the
Ethernet Edit screen. Use the Ethernet Edit screen to configure an Ethernet interface’s
properties, IP address assignment settings, interface parameters, RIP settings, OSPF settings,
connectivity check settings, and MAC address settings.
For the WAN and OPT interfaces you can click the Wizard tab to configure just the key
settings. See
for details.
The OPT interface’s Edit > Configuration screen is shown here as an example. The screens
for other interfaces are similar and contain a subset to the OPT interface screen’s fields.
Table 50 Network > Interface > Ethernet
LABEL
DESCRIPTION
#
This field is a sequential value, and it is not associated with any interface.
Name
This field displays the name of the interface.
IP Address
This field displays the current IP address of the interface. If the IP address is
0.0.0.0, the interface does not have an IP address yet.
This screen also shows whether the IP address is a static IP address (STATIC)
or dynamically assigned (DHCP). IP addresses are always static in virtual
interfaces.
Mask
This field displays the interface’s subnet mask in dot decimal notation.
Modify
This column lets you create, edit, remove, activate, and deactivate interfaces.
You cannot add or remove Ethernet interfaces, however.
To create a virtual Ethernet interface, click the Add icon next to the
corresponding Ethernet interface. The Virtual Interface Add/Edit screen
appears. See
.
To edit an interface, click the Edit icon next to it. The Ethernet Edit screen or
Virtual Interface Add/Edit screen appears accordingly.
To remove a virtual interface, click the Remove icon next to it. The ZyWALL
confirms you want to remove it before doing so.
To activate or deactivate an interface, click the Active icon next to it. Make sure
you click Apply to save and apply the change.
Apply
Click Apply to save your changes back to the ZyWALL.
Reset
Click Reset to begin configuring this screen afresh.