Lull 944E-42 Service Manual User Manual
Page 420
Hydraulic System
8.168
Model 644E-42/944E-42
Rev. 6/04
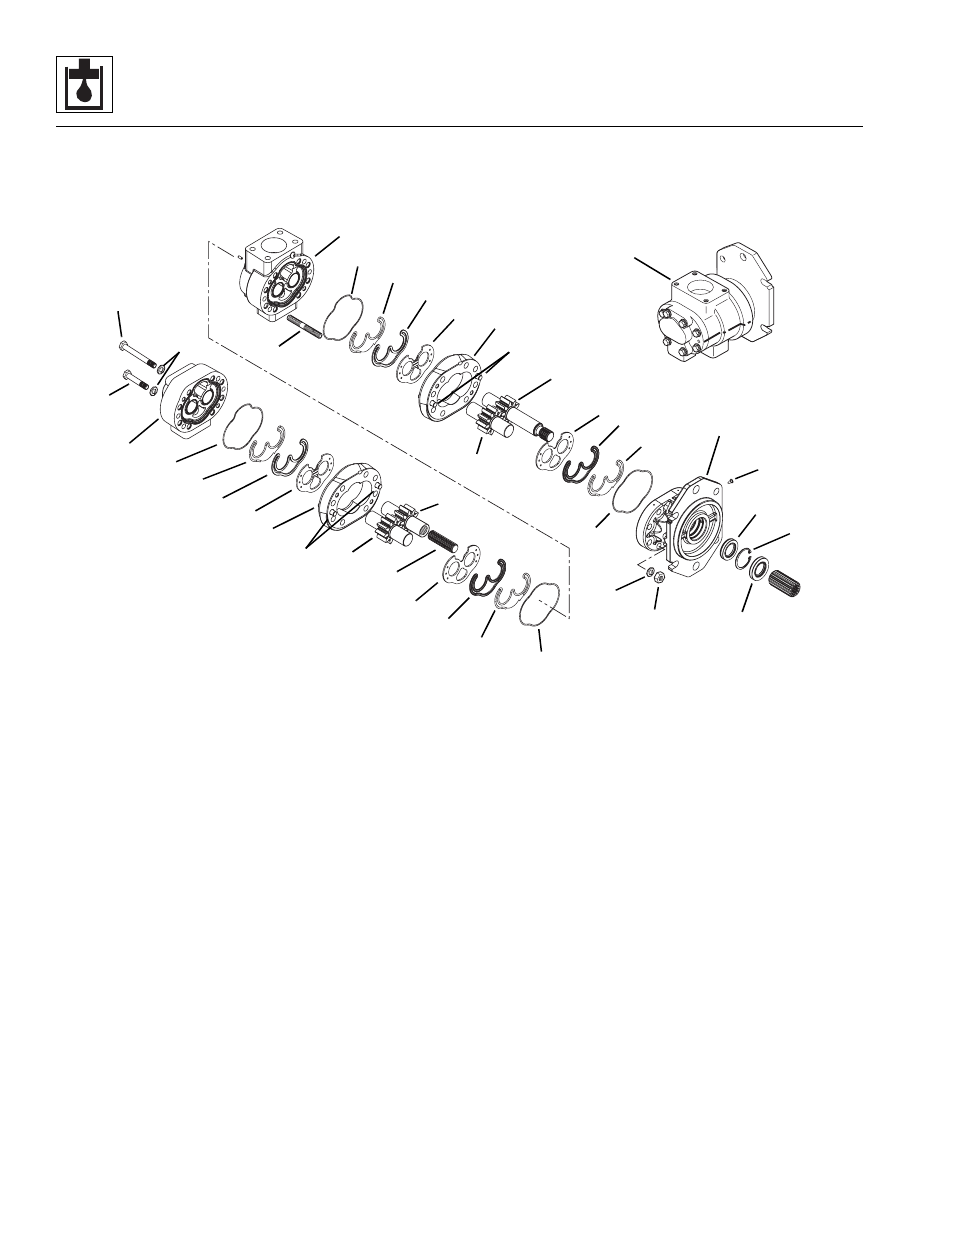
d. Pump Disassembly
1. Plug all ports and thoroughly clean the outside of the
pump (1) before starting to disassemble the pump.
2. Remove the port plugs and drain all the oil from the
pump into a suitable container.
3. Place the pump in a vise with the shaft end up.
Tighten the jaws of the vise securely on the pump.
4. Loosen and remove the eight nuts (2) and
lockwashers (3) from the stud bolts (4). Save the
lockwashers and nuts for reassembly.
5. Use a plastic mallet to separate the mounting flange
housing (5) from the front center section (6). The two
dowel pins (7) which align the front center section (6)
and the mounting flange housing (5) are a tight fit
and will require the use of the plastic mallet to
separate. DO NOT use a screwdriver or other pry
tool to separate these parts as damage will result.
Remove the mounting flange housing from the
pump.
6. Remove the wear plate (8) from the mounting flange
housing (5). Place the wear plate on a clean surface.
7. Remove the plastic seal retainer (9) with the seal
gland (10) from the mounting flange housing (5).
Discard the seal retainer with seal gland.
8. Remove the square cross section o-ring (11) from
the mounting flange housing (5). Discard the o-ring.
9. Use marking fluid to identify the intersecting teeth of
the drive gear (12) and the driven gear (13).
Carefully remove the driven gear and then the drive
gear from the pump and place on a clean surface.
10. Use a plastic mallet to separate the center
section (6) from the ported section (14) of the pump.
The two dowel pins (7) which align the front center
section (6) and ported section (14) are a tight fit and
will require the use of the plastic mallet to separate.
DO NOT use a screwdriver or other pry tool to
separate these parts as damage will result.
11. Remove the center section from the pump.
12. Remove the wear plate (15) and the plastic seal
retainer (16) with the seal gland (17) from the ported
section (14). Discard the seal retainer with seal
gland. Place the wear plate on a clean surface.
MM3561
1
2
3
4
5
6
7
8
9
10
11
12
13
14
15
16
17
18
19
20
21
22
23
25
26
27
28
29
30
31
32
33
34
35
24
36
37
38
39