Brocade Virtual ADX Graphical User Interface Guide (Supporting ADX v03.1.00) User Manual
Page 35
Brocade Virtual ADX Graphical User Interface Guide
23
53-1003242-01
High Availability
5
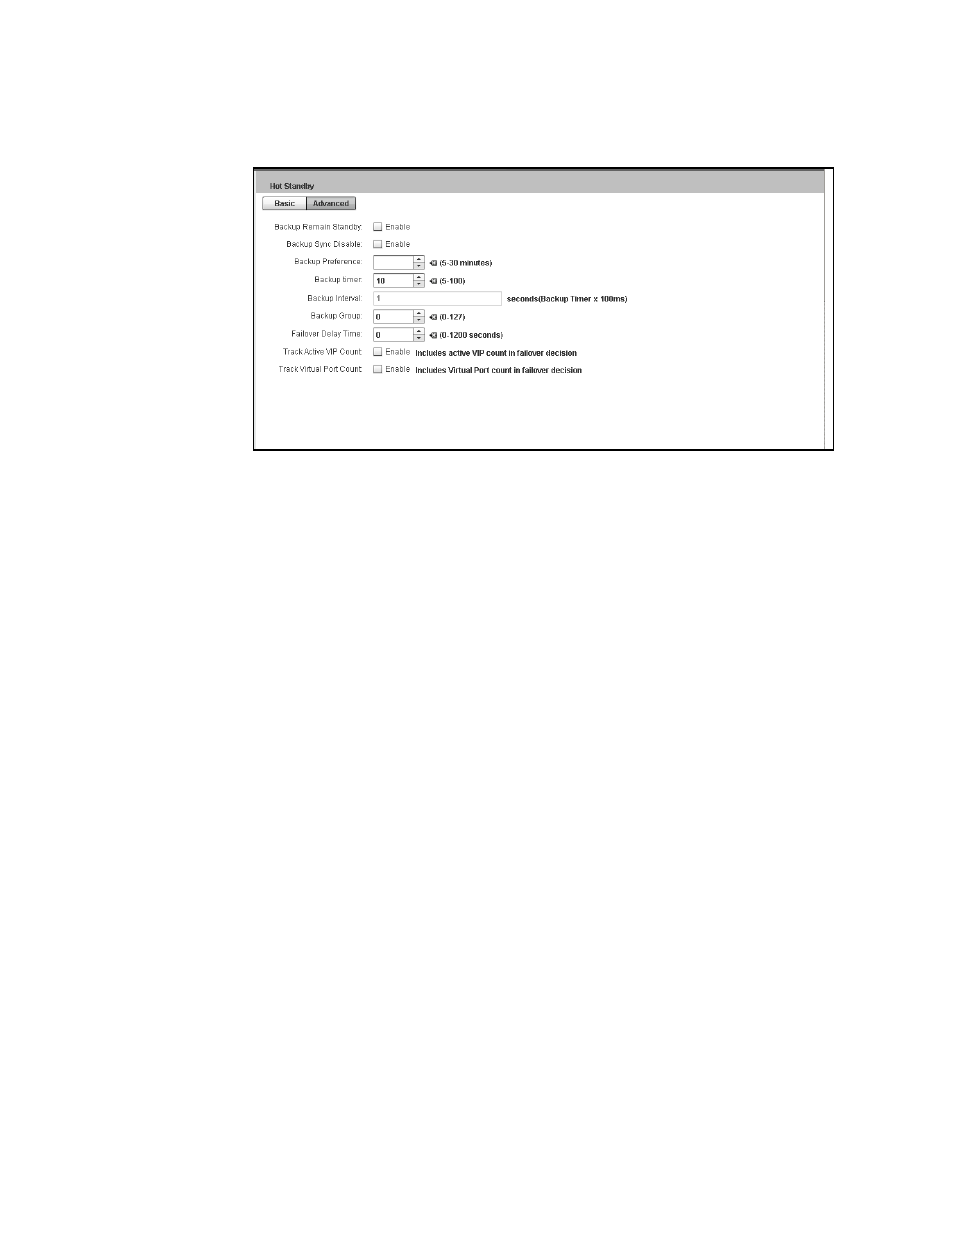
FIGURE 14
Hot standby advanced configuration
6. Under the Advanced tab, provide the following information:
•
Backup Remain Standby: Select the Enable check box to force the Brocade Virtual ADX to
remain in the standby state, regardless of any changes in the system parameters (such as
no heart beat, fewer router ports, and other changes). The Brocade Virtual ADX transitions
to the standby state and remains as the standby until this setting is disabled.
•
Backup Sync Disable: Select the Enable check box to enable the synchronization of an SLB
configuration from the active Brocade Virtual ADX to the standby Brocade Virtual ADX. This
setting is disabled by default.
•
Backup Preference: Enter the time interval during which the standby device waits for the
configured time before taking the active role. The range is from 5 through 30 minutes. The
default value is 5 minutes.
•
Backup Timer: Enter the time for the backup device to wait for a Hello message or
synchronization data from the active device before assuming the active device is no longer
available. The range is from 5 through 100. The default value is 10.
•
Backup Interval: The backup interval represents the timer count in units of
100 millisecond.
•
Backup Group: Enter the backup group ID to configure the hot standby pairs within a single
Layer 2 broadcast domain for exchanging the backup information.
•
Failover Delay Time: Enter the time in seconds for which the Brocade Virtual ADX to wait
before beginning the failover check in seconds. The range is from 0 through 1200
seconds. The default value is 0 seconds.
•
Track Active VIP Count: Select the Enable check box to configure the failover based on the
router ports and the active VIP counts.
•
Track Virtual Port Count: Select the Enable check box to allow the Brocade Virtual ADX to
track the failure of the virtual port.
7. Click Apply to save your entries.
Click Reset to revert the configuration to the previous configured values.
For more information on hotstandby configuration, refer to the Brocade Virtual ADX Server Load
Balancing Guide.