Accepting / rejecting welds – Dr. Livingstone, I Presume WELDWISE 2400 User Manual
Page 42
0432-INS-400 Rev. E
5-8
Accepting / Rejecting Welds
Once a master has been created and updated, the monitor has a basis on which to compare subsequent
welds. If all parameters fall within the master tolerance limits, the weld is accepted by the monitor. If
any of the parameters fall outside of the master tolerance limits, the weld is rejected by the monitor.
This section will demonstrate an accepted weld
and a rejected weld.
Making an accepted weld
1. ESCAPE to the main program screen.
2. Make another weld. Notice that the newly
created master is displayed in the top left,
indicating that the weld was compared against
this master, as shown in figure 5-14. Ideally
this weld should have accepted and a check
mark should be displayed in the Weld Status
box. If there are flashing arrows in the Weld
Status box, then weld rejected for some
reason. Either the weld was rejected because
the master tolerances are set too tightly, or
either the master weld or the last weld made
was not characteristic of a typical weld for this process.
3. Go to the Weld Summary screen and look at the Accept Status for the weld you just made (the
most recent weld will be at the top). An Accept Status of 0 indicates that the weld was accepted. If
the weld was rejected, highlight the Accept Status number and press the SELECT key to see what
parameters failed.
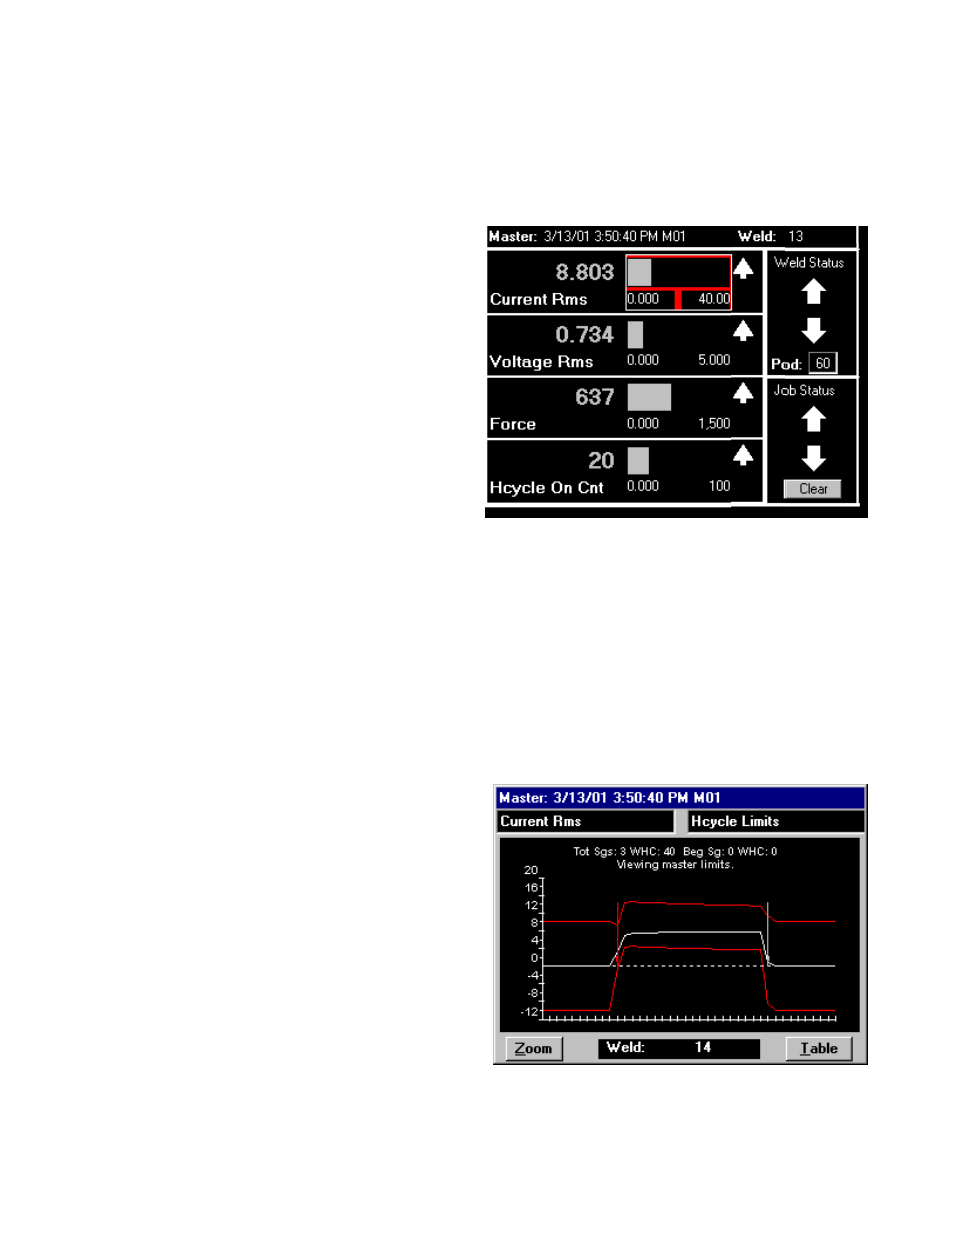
4. Go to the Halfcycle Summary Screen to graphically compare the halfcycle data with the master
tolerance limits. Change the parameter in the top left box to Current Rms and the parameter in the
top right box to Hcycle Limits. Your screen
should now look similar to figure 5-15.
The thin vertical arrows pointing down separate
the three default segments (Pre-weld, Weld and
Post-weld) of the weld process. The upper and
lower horizontal lines represent the default
tolerances assigned to the master. The middle
line represents the weld signature for the weld
number at the bottom of the screen. As you can
see, the parameter Current Rms was within the
tolerance defaults of this master. For the weld
to be accepted, all
parameters must be within
the master tolerance limits.
Selecting different parameters in the upper left
box will allow you to compare all parameters
with the master tolerance limits.
Figure 5-14 Main program screen with new master
date/time stamp displayed
Figure 5-15 Halfcycle Summary, Current Rms
shown with Halfcycle Limits