Gathering data – Dr. Livingstone, I Presume WELDWISE 2400 User Manual
Page 36
0432-INS-400 Rev. E
5-2
Gathering Data
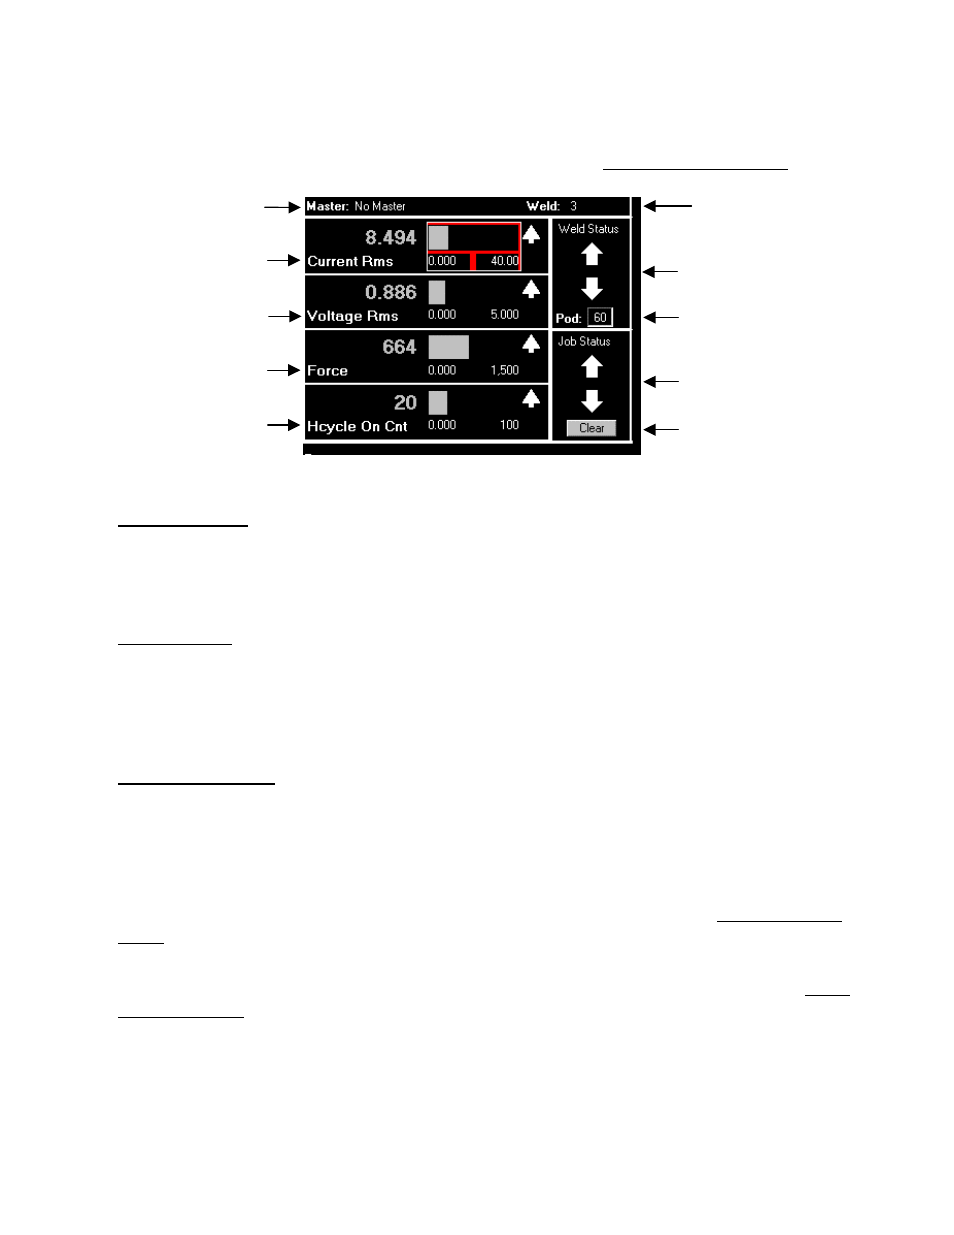
1. Make one weld and then look at the main screen of the monitor. It should appear similar to the
figure below (Please refer to Main Program Screen in Section 6, WMS Reference Guide, for main
screen specifics):
• Weld Master ID
Indicates which master the displayed weld data was compared to. If masters are not enabled, or if
there aren't any updated masters, it will say No Master. If there is an active master, the name of the
master will be displayed.
• Weld Number
The weld number indicates which weld corresponds to the displayed data. In figure 5-2, the weld
number is 3. This means that for Weld 3, the Current Rms was 8.494 KA, the Voltage Rms was
0.886 Volts, the Force was 664 lbs. and the Hcycle On Cnt was 20 Halfcycles. Each time a weld
is recorded by the monitor, the weld count will increase.
• Parameter Displays
Four parameters may be viewed on the main screen at one time. In this example, Current RMS,
Voltage RMS, Force and Hcycle On Cnt are shown. Your screen may look different if other
parameters have been selected. There are multiple parameters recorded by the monitor: Current
Rms, Current Peak, Voltage Rms, Voltage Peak, Force, Conduction Angle (Cond. Angle),
Setdown, Expansion, Initial Thickness, Final Thickness, Resistance, Energy, and Halfcycle On
Count (Hcycle On Cnt). These parameters are explained in detail in Chapter 6, WMS Reference
Guide.
In each parameter display window is the weld summary value for that parameter. To the right of
each value is a bar graph. To adjust the high and low settings see Graph Setup in Section 6, WMS
Reference Guide. You can select the bar graph to view a trend of the last 30 welds taken, as shown
in figures 5-3 and 5-4 below. Use ESCAPE to return to the main screen.
ID Select
Parameter Display #1
Parameter Display #2
Parameter Display #3
Parameter Display #4
Weld Master ID
Weld Number
(last weld recorded)
Figure 5-2 Main screen
Weld Status
Indicators
Job Status
Indicators
Clear Indicators
Button