Deutsch, Shooting, Notes – Panasonic NVS90E User Manual
Page 24: Aufnahme, T| aufnehmen vom bandanfang an, Hinweise, Auf nehmen vom bandanfang an
Attention! The text in this document has been recognized automatically. To view the original document, you can use the "Original mode".
ENGLISH
DEUTSCH
Shooting
jT|
How to Shoot from the Beginning of
the Video Cassette
Notes;
®lf the Movie Camera is left in the Shooting Pause Mode
for more than 6 minutes, it will automatically switch off
to protect the tape and to consen/e Battery Pack
power. This condition is called “Recording Lock” (the
tape remains in contact with the video heads).
To resume shooting from this condition, turn in the
[POWER] Switch (the Movie Camera is switched off)
and then turn it out again.
If the Movie Camera is left in the Recording Lock Mode
for more than 48 hours, the Recording Lock Mode will
be cancelled and the Movie Camera will automatically
switch itself off (motor noise!).
»When putting the Movie Camera in the Shooting Pause
Mode, a playback picture may be displayed briefly (for
0.1-0.5 second) in the Viewfinder. However, this is for
checking the VITC number and is not malfunction.
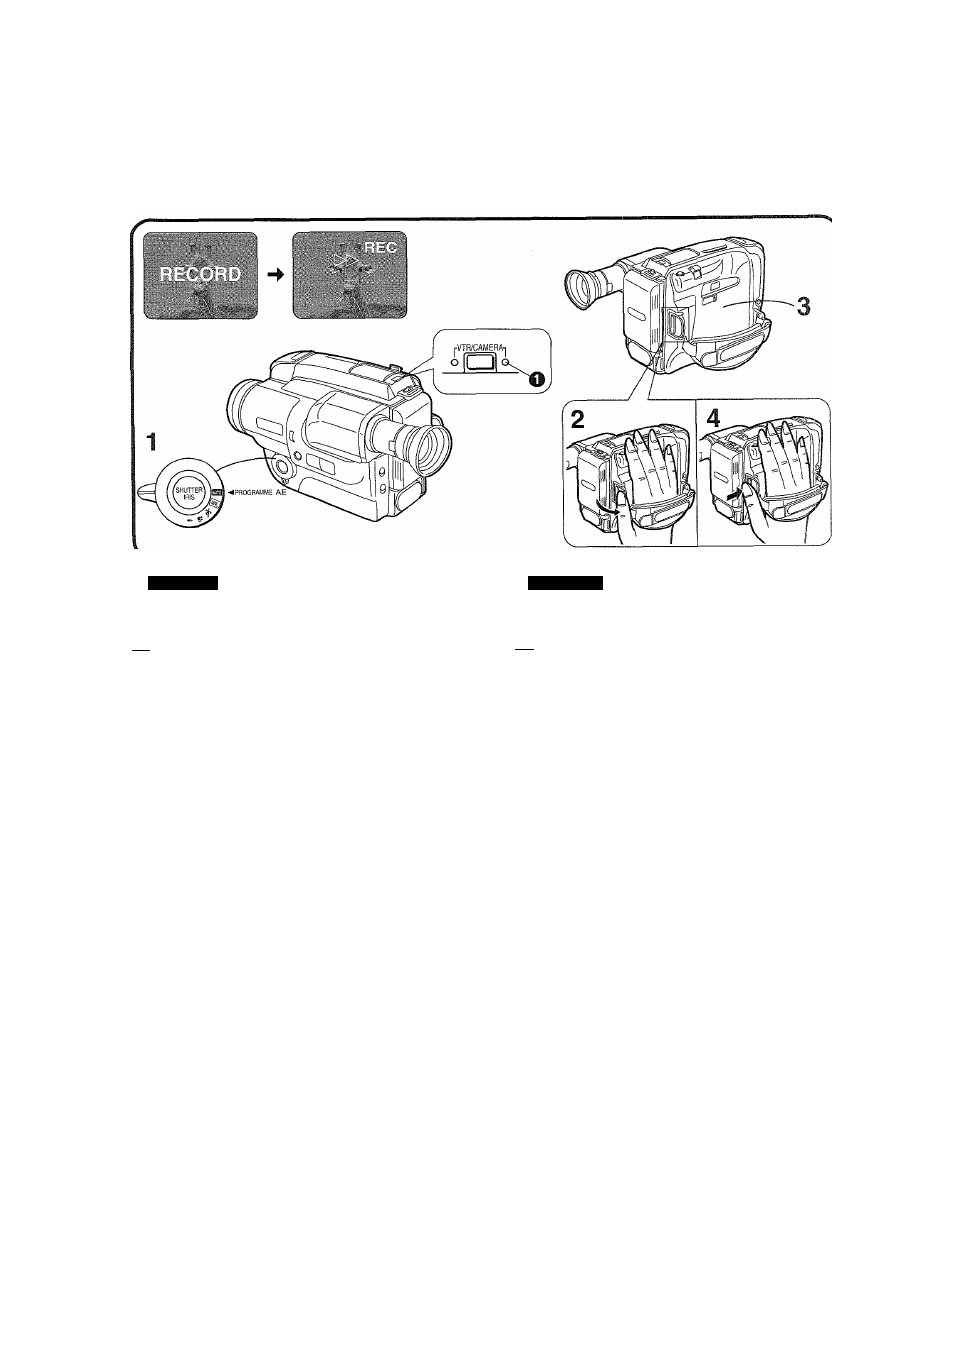
After attaching the Battery Pack and removing the Lens
Cap, start shooting as follows:
1
Confirm that the [AE] Dial is set to
“AUTO”.
2
Turn out the [POWER] Switch. (The Movie
Camera is switched on.)
•The “CAMERA” Indication Lamp @ is lit.
3
Insert a cassette with intact erasure
prevention tab.
•See “How to Insert the Video Cassette’ ’. (-> 20)
•The “PAUSE” Indication appears in the
Viewfinder.
4
Press the Start/Stop Button.
•The Tape Run Indication and the “REC”
Indication appear in the Viewfinder. The shooting
starts.
Aufnahme
[T|
Aufnehmen vom Bandanfang an
Hinweise:
•Wenn der Camerarecorder länger als 6 Minuten in der
Betriebsart Aufnahmepause bleibt, wird diese
Betriebsart aufgehoben, um das Band zu schützen und
Akkustrom zu sparen. Dieser Zustand wird Aufnahme-
Verriegelung genannt (das Band bleibt mit den
Videoköpfen in Berührung).
Um aus diesem Zustand erneut aufzunehmen, den
Schalter [POWER] nach innen drehen (der
Camerarecorder ist ausgeschaltet), und ihn dann
wieder nach außen drehen.
Bleibt der Camerarecorder länger als 48 Stunden in
der Betriebsart Aufnahme-Verriegelung, so wird sie
aufgehoben, und der Camerarecorder schaltet sich
automatisch aus (Motorgeräuschei).
•Wenn der Camerarecorder in die Betriebsart
Aufnahmepause versetzt wird, erscheint unter
gewissen Umständen kurz ein Wiedergabebild (für 0,1
bis 0,5 Sekunden) im Sucher. Dies ist jedoch keine
Funktionsstörung sondern dient zum Feststellen des
erreichten VITC-Wertes.
Nach dem Anbringen des Akkus und Abnehmen des
Objektivdeckels kann auf folgende Weise mit dem
Aufnehmen begonnen werden:
Sicherstellen,
daß
der [AE]-Wahlschalter
auf „AUTO“ steht.
1
2
Den Schalter [POWER] nach außen
drehen. (Der Camerarecorder ist
eingeschaltet.)
• Die Anzeigelampe „CAMERA“ Q leuchtet.
Eine Cassette mit intakter
Löschschutzlasche einsetzen.
•Siehe „Einsetzen einer Videocassette“. (-» 20)
•Die Anzeige „PAUSE“ erscheint im Sucher.
Die Start-/Stop-Taste drücken.
•Die Bandiauf-Anzeige „t»“ und die Anzeige
„REC“ erscheinen im Sucher. Die Aufnahme
beginnt.
-24-