Fig. 36: new ip address is reset, Fig. 37: rear panel/devicenet connection, For hi 3010 only – Hardy HI 3010 Filler/Dispenser Controller User Manual
Page 30: Fig. 38: configuration menu/selecting setup, Fig. 39: setup menu/selecting devicenet, Fig. 40: devicenet sub-menu/setting the baud rate, Is reset, Ear panel/devicenet connection, Configuration menu/selecting setup, Up menu/selecting devicenet
HI-3000 Series
16
Operation and Installation
Step 7. Click on the Set button. The old address will disap-
pear.
Step 8. Reset the HI 3000 Instrument by cycling the power
off and on.
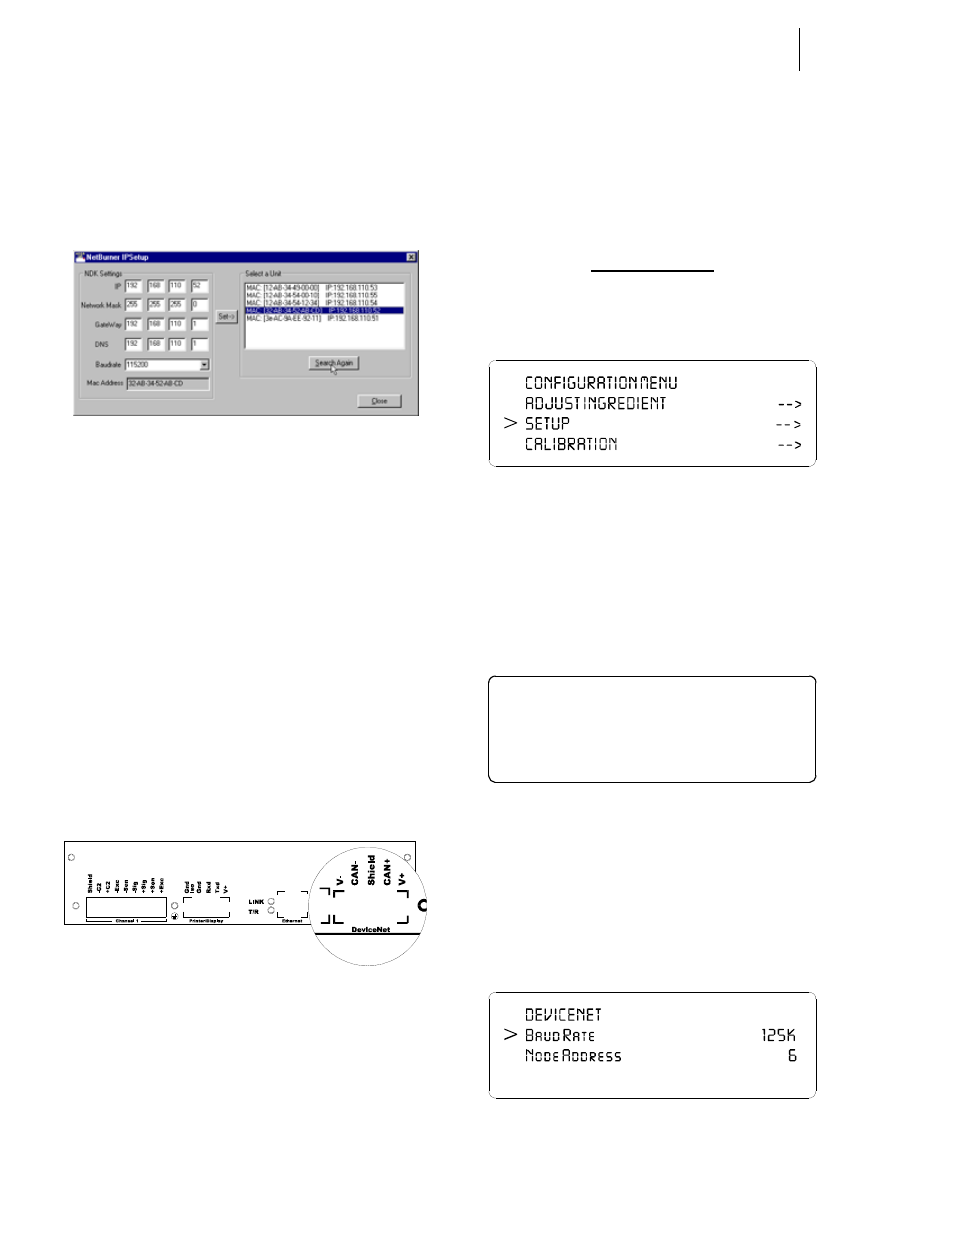
Step 9. Press the Search Again button. The new address
appears in the Select a Unit field. (See Fig. 36)
FIG. 36: NEW IP ADDRESS IS RESET
Step 10. The IP Address has been reset.
DeviceNet Connection and Setup From the
Front Panel
Hardware Requirements:
DeviceNet Cable
Software Requirements:
RSNetWorx™
RSLinx™
Hardy EDS File
NOTE:
RSNetWorx™ and RSLinx ™ are trademarks of
Rockwell Software.
FIG. 37: REAR PANEL/DEVICENET CONNECTION
CAUTION: D
O
NOT
CONNECT
V-
AND
V+
IF
YOU
HAVE
AN
EXTERNAL
POWER
SOURCE
ON
THE
D
EVICE
N
ET
B
US
.
Cable color Code for DeviceNet connector:
•
V-
Black
•
CAN-
Blue
•
Shield
Ground Wire
•
CAN+
White
•
V+
Red
Step 1. Connect the Cable to the connector using the color
code.
Step 2. Connect the cable connector to the DeviceNet con-
nector at the rear panel. (See Fig. 37)
For HI 3010 Only
Step 1. At the front panel click on the Setup button. The
Configuration Menu appears. (See Fig. 38)
FIG. 38: CONFIGURATION MENU/SELECTING
SETUP
Step 2. Push the up or down arrows until the cursor is next
to “SETUP”. (See Fig. 38)
Step 3. Press the Enter button. The Setup submenu appears.
Step 4. Press the up or down arrows until the cursor is in
front of “Devicenet”. (See Fig. 39)
FIG. 39: SETUP MENU/SELECTING DEVICENET
Step 5. To toggle Devicenet on or off press the right or left
arrow buttons. Notice when Devicenet is toggled
ON there is an arrow to the right of “ON”. The
arrow indicates another sub menu.
Step 6. Press the Enter button. The Devicenet sub-menu
appears. (See Fig. 40)
FIG. 40: DEVICENET SUB-MENU/SETTING THE
BAUD RATE
>
SETUP MENU
Set LCD Cont r ast
Devicenet ON - >
Et her net . ON - >