Fig. 8: configuration menu/selecting options, Fig. 9: options/selecting remote i/o, Fig. 10: remote i/o menu/setting parameters – Hardy HI 3010 Filler/Dispenser Controller User Manual
Page 20: Fig. 11: remote i/o/setting rack size, Fig. 12: remote i/o selecting starting quarter, Onfiguration menu/selecting options, Ecting remote i/o, Ing parameters, Emote i/o/setting rack size, Emote i/o selecting starting quarter
HI-3000 Series
6
Operation and Installation
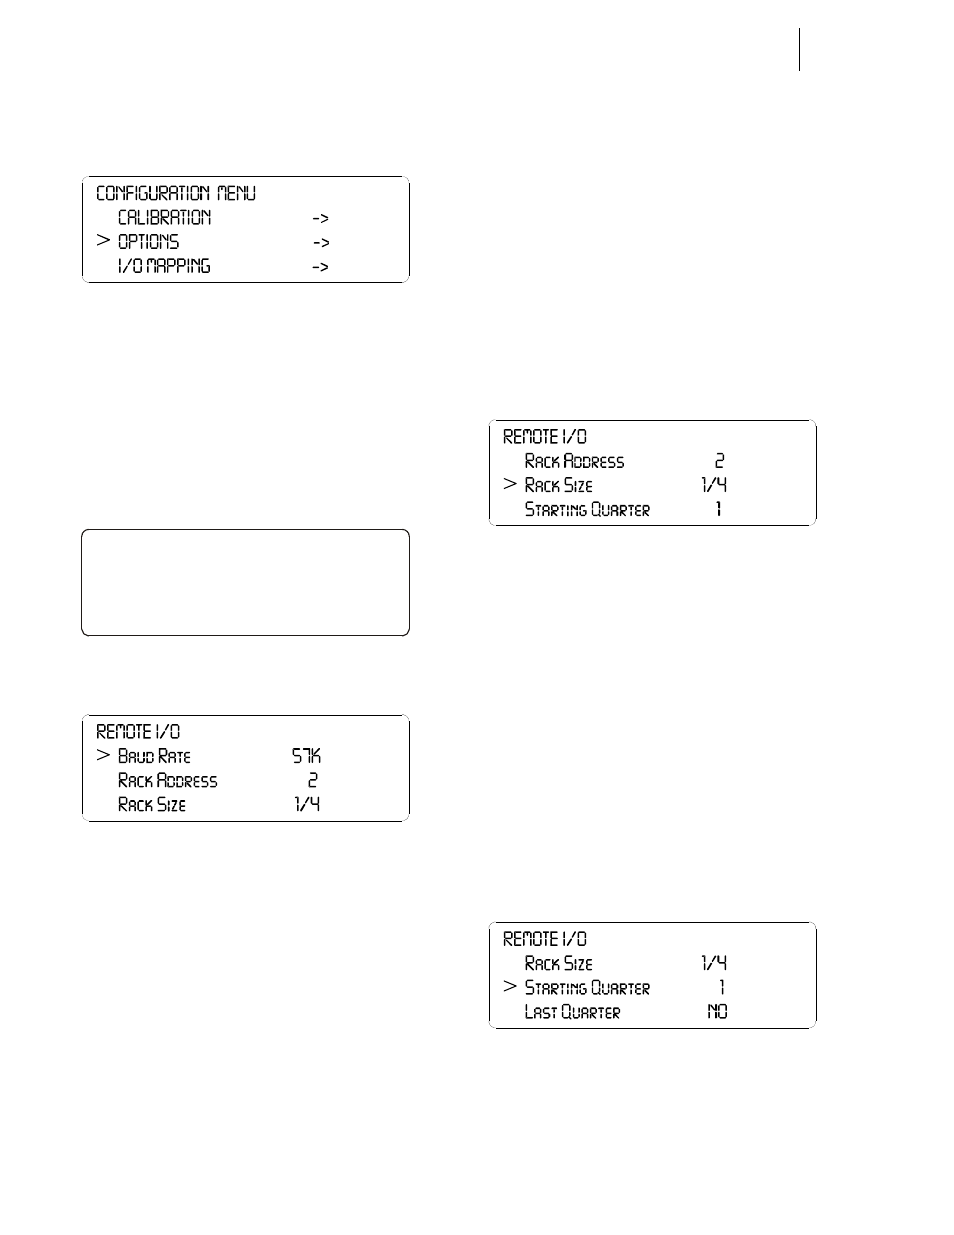
Step 2. Push the up or down arrows until the cursor is next
to “OPTIONS”. (See Fig. 8)
FIG. 8: CONFIGURATION MENU/SELECTING
OPTIONS
Step 3. Press the Enter button. The Options submenu
appears with Remote I/O selected. (See Fig. 9)
Step 4. If the cursor is not in front of Remote I/O, push the
up arrow until the cursor is aligned with Remote I/
O.
Step 5. Press the Enter button. The Remote I/O Menu
appears. (See Fig. 10)
FIG. 9: OPTIONS/SELECTING REMOTE I/O
FIG. 10: REMOTE I/O MENU/SETTING
PARAMETERS
Step 6. Press the right or left arrow buttons to select the
Baud Rate. Left arrow decreases the rate and the
right arrow increases the rate. Baud Rate Selections
are:
•
57 kbaud
•
115 kbaud
•
230 kbaud.
Step 7. Press the Enter button to save the setting.
Step 8. Press the down arrow button until the cursor is in
front of Rack Address.
•
You can set the rack address in one of two
ways.
1.
Press on the clear button to clear the
existing value then use the alphanu-
meric keys to enter the address for this
module.
2.
Press on the right or left arrow buttons
to select the address.
•
Address Range - 0-59
Step 9. Press the Enter button to save the setting.
Step 10. Press the down arrow button until the cursor is in
front of Rack Size. (See Fig. 11)
FIG. 11: REMOTE I/O/SETTING RACK SIZE
Step 11. Press the right arrow button to select the rack size
of this module. The choices are:
•
1/4 quarter (Can start at 1,2,3,4)*
•
1/2 half (Can start at 1,2,3)*
•
3/4 three quarter (Can start at 1,2)*
•
FULL (Can start at 1)*
NOTE:
*The starting points are important when making
the starting quarter selection. For example you
can have a 1/4 rack start at quarter 1 and a 1/2
rack start at quarter 2.
Step 12. Press the Enter button to save the setting.
Step 13. Press the down arrow button until the cursor is in
front of Starting Quarter. (See Fig. 12)
FIG. 12: REMOTE I/O SELECTING STARTING
QUARTER
Step 14. Press the right or left arrow buttons to select the
starting quarter for this module. Keep in mind the
starting quarter requirements due to rack size.
>
OPTIONS
Remot e I/ O ON - >
Cont r ol Net I/ O OFF