Fig. 27: configuration menu/selection setup, Fig. 28: setup menu, Fig. 29: setup menu/ethernet sub-menu – Hardy HI 3010 Filler/Dispenser Controller User Manual
Page 28: Fig. 30: ethernet menu/default ip address, Fig. 31: enter ip address in browser address field, Onfiguration menu/selection setup, Up menu, Up menu/ethernet sub-menu, Ter ip address in browser address field
HI-3000 Series
14
Operation and Installation
FIG. 27: CONFIGURATION MENU/SELECTION
SETUP
Step 3. Push the up or down arrows until the cursor is next
to “SETUP”. (See Fig. 27)
Step 4. Press the Enter button. The Setup Submenu
appears. (See Fig. 28)
FIG. 28: SETUP MENU
Step 5. Press the up arrow until the cursor appears in front
of Ethernet. (See Fig. 29)
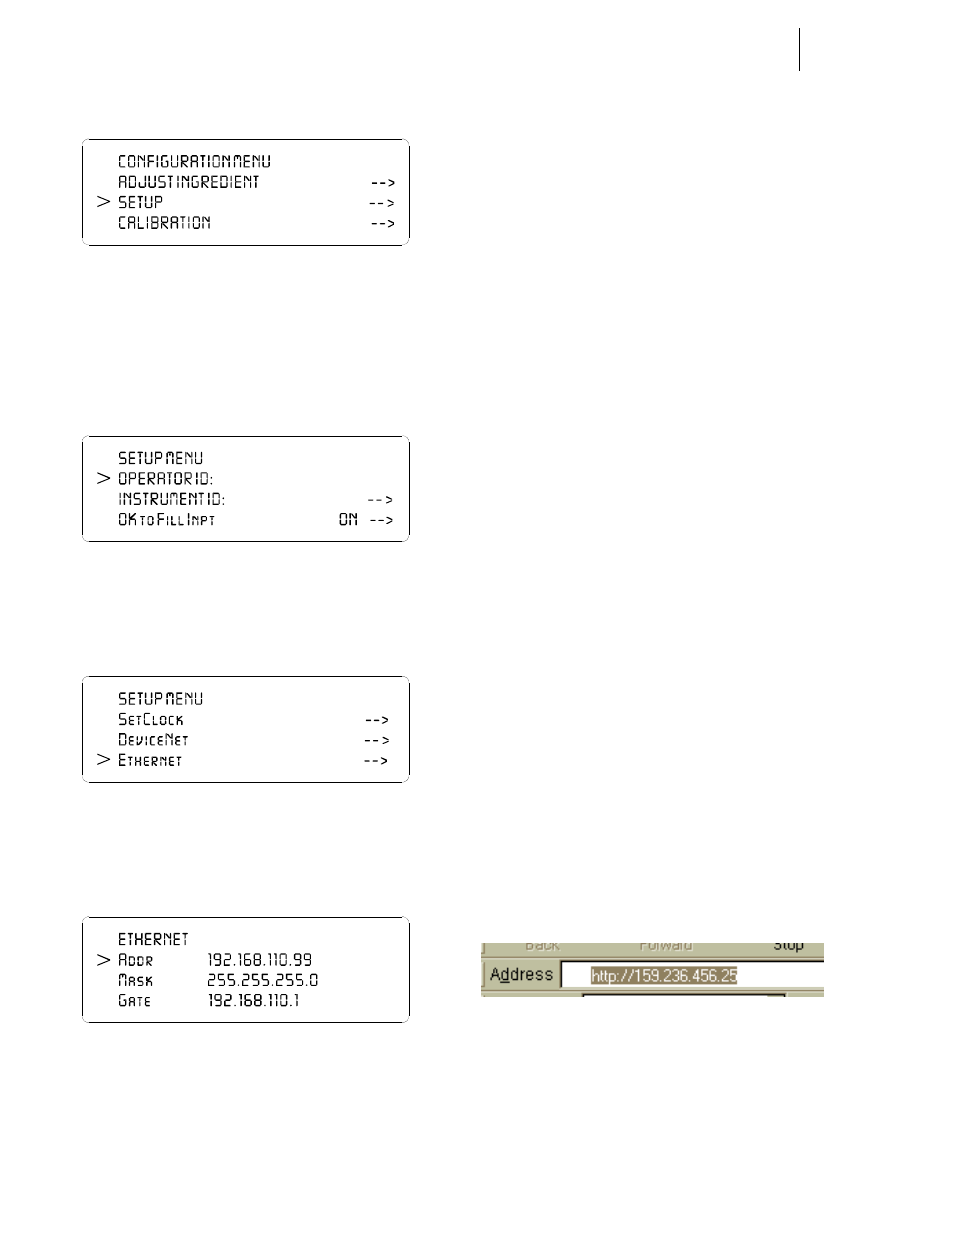
FIG. 29: SETUP MENU/ETHERNET SUB-MENU
Step 6. Press the Enter button. The Ethernet sub-menu
appears. (See Fig. 30)
FIG. 30: ETHERNET MENU/DEFAULT IP ADDRESS
Step 7. The IP address shown in Figure 8 is the default IP
address set at the factory. DO NOT USE THIS
ADDRESS. You must enter a new address. You
must do the following:
•
Do not repeat any IP addresses used on your
network.
•
Make sure that you enter integers before the
periods between values. Do not leave any
periods out of the address.
Bad address: 153.956.124
Correct address: “159.236.456.25”.
NOTE:
Check with your network administrator to get the
correct IP address for your instrument. IP
addresses used in this manual except for the
default IP address are for illustration purposes
only.
Step 8. Use the up or down arrows and move the cursor in
front of “Addr”. Press the clear button to clear the
current or default entry. Use the keypad and enter
the new IP address. Be sure and put the periods
between the entered values of the address.
Step 9. When you have entered the IP Address, press the
Enter button to set the IP Address in the instrument.
Step 10. DO NOT CHANGE THE MASK OR GATE VAL-
UES AT THIS TIME. For information about con-
figuring the Mask, Gate and DNS, please check
with your network administrator or check with
Technical Support at Hardy Instruments Inc.
Step 11. Press the Exit button until you get to the Standby
display.
Step 12. Recycle power to make the IP Address change take
effect.
Step 13. Now that the instrument has a unique IP address
you can connect to it from your browser.
Step 14. Make sure that the ethernet cable is connected to
the HI 3000 Series Instrument and to the ethernet
card in your computer.
Step 15. Type in the Instruments IP address in the Address
field of your browser. For example: “http://
159.236.456.25”. (See Fig. 63) Do not enter the
quotation marks. Once the IP address is entered
press Enter on your computer keyboard. The Sys-
tem Web page appears and you are ready to use the
instrument via the Ethernet. (See Fig. 31)
FIG. 31: ENTER IP ADDRESS IN BROWSER
ADDRESS FIELD