Edl import settings – Apple Color 1.5 User Manual
Page 102
The EDL Import Settings dialog appears, defaulting to the default project directory specified
in the User Prefs tab of the Setup room.
3
Choose the appropriate project properties from the available lists and pop-up menus.
For more information, see
.
4
When you finish choosing all the necessary settings, click Import.
A new project is created, and the EDL is converted into a sequence of shots in the Timeline.
The position of each shot should match the Timeline of the original project.
Note: If the Source Directory you specified has any potential media conflicts (for example,
two clips with overlapping timecode or a missing reel number), you see a warning dialog
that gives you the option of writing a text file log of all potential conflicts to help you
sort them out.
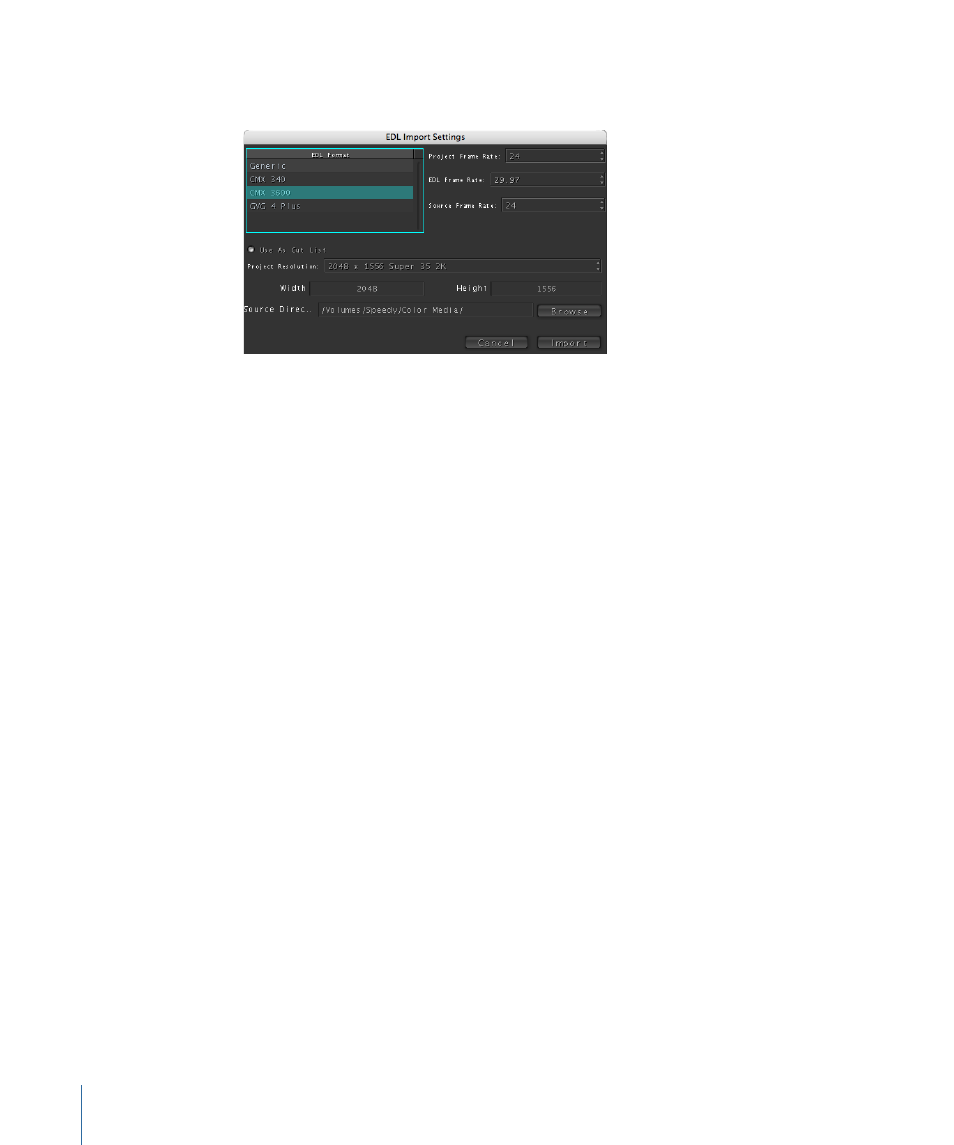
EDL Import Settings
The settings in this dialog determine the options used when importing an EDL into Color.
• EDL Format: The format of the EDL file you’re importing.
• Project Frame Rate: The frame rate of the Color project you’re about to create. In most
cases, this should match the frame rate of the EDL you’re importing.
• EDL Frame Rate: Choose the frame rate of the EDL you’re importing. If the EDL Frame
Rate is 29.97 fps but you set the Project Frame Rate to 24 fps, Color will automatically
do the necessary conversions to remove 3:2 pull-down from the shots in the project.
Note: This option lets you deal with workflows where the imported EDL was generated
from an offline edit of a project using telecined 29.97 fps video, but the subsequent
scanned 2K image sequences were reacquired at film’s native 24 fps.
• Source Frame Rate: The frame rate of the source media on disk that you’re linking to.
• Use As Cut List: This checkbox lets you specify that this EDL should be used as a cut list
to “notch” a matching video master file.
102
Chapter 4
Importing and Managing Projects and Media