2 autotuning faults, Performing autotuning – Yaskawa G5HHP Drive User Manual
Page 137

6.2 Open-loop Vector Control
6 - 19
3. At this point, it is still possible to change the constant settings by pressing the Increment and Decrement
Keys to display the desired constant.
4. Press the STOP Key to cancel autotuning, and then press the MENU Key and DATA/ENTER Key. The
operation mode display will appear.
* Rated voltage forvectorcontrol motors is approx. 10 to 20% lowerthan general--purpose mo-
tors. Always verify motor voltage listed on the nameplate or test report before use.
J
Performing Autotuning
D
Autotuning will start if the RUN Key is pressed when the “Tuning Ready?” message is being displayed.
D
The motor will operate during autotuning, so be sure that it is safe for the motor to operate before press-
ing the RUN Key.
D
The following message will be displayed when the RUN Key is pressed:
Tune Proceeding
Hz
A
The “Tune Proceeding” message will blink.
D
Autotuning takes up to 1.5 minutes. The message“Tune Successful” will be displayed when autotuning
has been completed.
D
If autotuning has been completed successfully, press the MENU Key and proceed to the next operation.
D
If a fault occurred during autotuning, refer to 6.2.2 Autotuning Faults for details on correcting the cause
of the fault and perform autotuning again.
6.2.2 Autotuning Faults
D
One of the fault messages in the following table will be displayed if a fault occurs during autotuning
and the motor will stop. In this case, determine the cause of the fault, correct it, and perform autotuning
again.
D
The fault display can be cleared by pressing the MENU Key.
D
The motor constants will revert to their default settings if a fault occurs. Set these constants again before
starting autotuning again.
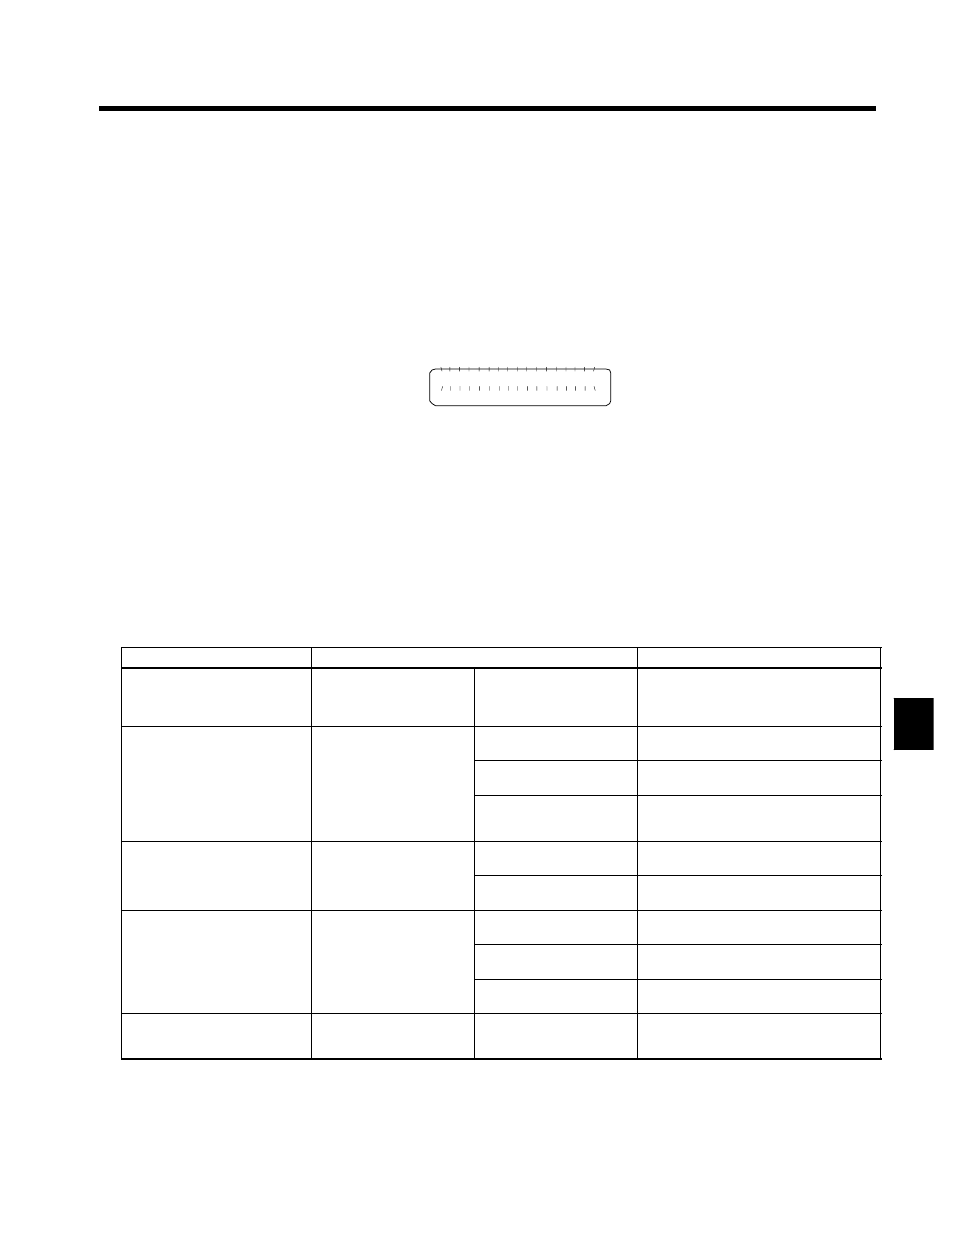
Table 6.2 Troubleshooting Autotuning Faults for Open-loop Vector Control
Fault Display
Probable Cause
Remedy
Data Invalid
(Motor data fault)
There was a fault in the data
set during autotuning.
There was a fault in the rela-
tionship between the rated
frequency, rated speed, and
number of poles.
Change the settings to conform to the follow-
ing equation:
Rated speed < 120 × Motor frequency/Num-
ber of poles
A load is connected to the
motor.
Remove the load.
ALARM: Over Load
(Excessive tuning load)
The effective load factor ex-
ceeded 20% during autotun-
ing
There was a setting fault dur-
ing autotuning.
Check the rated current setting. Change if
necessary.
(Excessive tuning load)
ing.
There is a motor bearing
problem.
Turn the Inverter off and rotate the motor by
hand.
Replace the motor if it doesn’t turn smoothly.
Motor speed
The torque reference value
exceeded 100% during auto
There is a broken/discon-
nected motor power wire.
Check and replace wiring components if nec-
essary.
Motor speed
(Motor speed fault)
exceeded 100% during auto-
tuning.
A load is connected to the
motor.
Remove the load.
The torque limit function is
operating.
Initialize the torque limit constants (H7-01 to
H7-04).
Accelerate
(Acceleration fault)
The motor doesn’t accelerate
within the prescribed time.
The acceleration time is too
short.
Increase acceleration time 1 (C1-01).
(Acceleration fault)
A load is connected to the
motor.
Remove the load.
Rated Slip
(Rated slip fault)
The rated slip setting can’t be
tuned within the prescribed
time.
A load is connected to the
motor.
Remove the load.
6
