Counter settings, Ii – 2 installation set u p – HEIDENHAIN ND 287 User Manual User Manual
Page 77

ND 287
77
II – 2 Installation Set
u
p
Counter settings
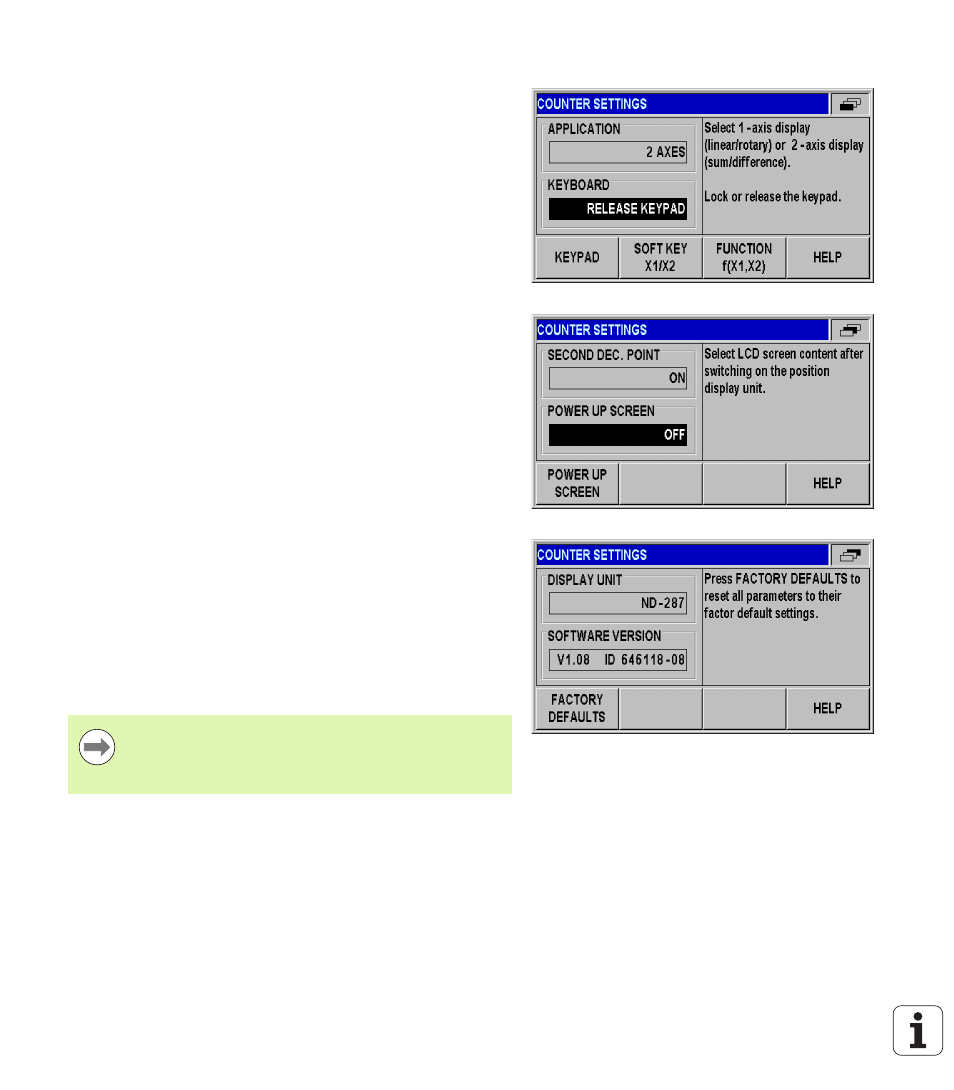
In the COUNTER SETTINGS form, you define the user application for
the position display unit (see Fig. II.25):
In the INSTALLATION SETUP menu, select COUNTER SETTINGS.
In the APPLICATION field, press the 1 AXIS/2 AXES soft key to
select the inputs you want to activate:
If the position display unit is configured for 1 AXIS, then only input
X1 is active.
If the position display unit is configured for 2 AXES, inputs X1 and
X2 are active. The ND can display the axis values separately, or as
a coupled position value. After you have selected 2 AXES, the
SOFTKEY X1/X2 and FUNCTION f(X1,X2) soft keys will be
displayed. Press the SOFTKEY X1/X2 soft key to define the
display modes for axes X1 and X2 that can be selected on the
standard screen. Press the FUNCTION f(X1,X2) soft key to enter
a formula for the coupled position display ((see page 78)).
In the KEYBOARD field, use the KEYPAD soft key to release/lock
the keypad. To release the locked keypad, press and hold the
NAVIGATION key for at least three seconds. Then enter the
password (246584) for releasing the keypad and confirm your entry
by pressing the ENTER key, or cancel by pressing the C key.
Press the DOWN arrow key to move to the next parameter.
Press the SECOND DEC. POINT soft key to display a second
decimal point after 1/1000 inches (mm).
Press the POWER UP SCREEN soft key to define whether the ND
displays the initial screen after it has been switched on.
Press the DOWN arrow key to move to the next parameter.
The DISPLAY UNIT field shows the type of position display.
The SOFTWARE VERSION field shows the currently installed
software version
and its identification number. To update your
software version, see "Software update (firmware update)
The FACTORY DEFAULTS soft key resets the configuration
parameters to factory defaults. Press the ENTER key to confirm, or
press the C key to cancel.
Fig. II.25 COUNTER SETTINGS form
Fig. II.26 COUNTER SETTINGS form
Fig. II.27 COUNTER SETTINGS form
When a temperature sensor at input X2 is used, the ND
compensates the axis error (see "Analog sensor with
