Bio-Rad BioLogic Signal Import Module (SIM) User Manual
Page 205
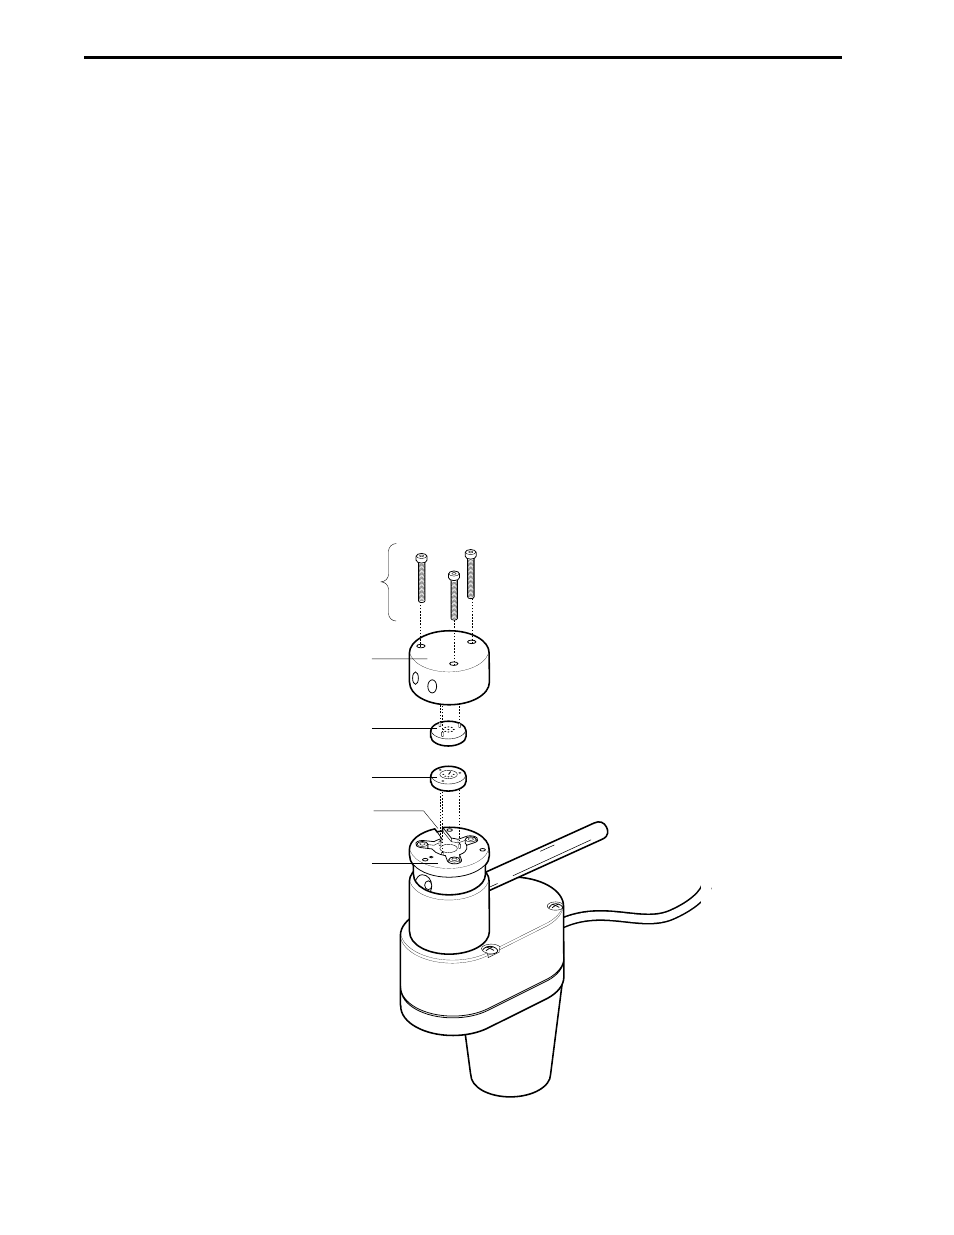
3.
Remove the stator face assembly with your fingers and set it aside.
4.
Remove the rotor seal by placing a small flat blade screwdriver into the slot on the side of the stator
ring. Gently pry up the rotor seal, which will pop off.
5.
Inspect the components from the disassembled valve. Make sure there are no scratches or foreign
material on the sealing surfaces of the valve. Clean as necessary. Soak or sonicate in a bath
containing a mild detergent.
To reassemble the valve:
1.
Place the new rotor seal (slot-side facing the stator body), onto the three seal pins of the stator ring.
It will only fit one way. Press the rotor seal so that it fits firmly.
2.
Place the new stator face assembly onto the stator body so that the pins slip into the mating holes in
the stator body. It will only fit one way.
3.
Replace the stator body and stator face assembly so that the stator ring enters the mating hole on
the stator body.
4.
Using the three screws, re-assemble the valve. Tighten each screw equally.
Figure 11-8. AVR7-3 and AVR9-8 Valve Assembly
1
2
STATOR SCREWS (3)
STATOR BODY
STATOR RING
ACCESS TO
ROTOR SEAL
STATOR FACE
ASSEMBLY
ROTOR SEAL
MAINTENANCE
MAINTENANCE AND TROUBLESHOOTING
11-12
- BioLogic DuoFlow Pathfinder 80 System DuoFlow™ Chromatography System BioLogic DuoFlow Pathfinder 20 System DuoFlow™ Chromatography System BioLogic DuoFlow Maximizer 80 System DuoFlow™ Chromatography System BioLogic DuoFlow Maximizer 20 System DuoFlow™ Chromatography System BioLogic DuoFlow QuadTec 40 System DuoFlow™ Chromatography System BioLogic DuoFlow QuadTec 10 System DuoFlow™ Chromatography System BioLogic DuoFlow 40 System Chromatography System BioLogic DuoFlow 10 System Chromatography System