The real-time view page – TeeJet Swath XL User Manual
Page 143
Swath XL
Software Version 3.00
4-23
Chapter 4 - Waypoint Navigation
About Nav 2 Point Real-Time Navigation
The Real-Time View Page
There is only one real-time page associated with the Nav 2 Point real-time process, see Figure 4 -23. The left side of
the real-time page contains the map window. This is where the vehicle and any map data, points, boundary, and grid,
can be viewed.
The right side of the view page contains several buttons located in the button bar, see Figure 4 -23. A detailed descrip-
tion of each button is listed in Table 4 -10. The number of buttons located in the button bar varies based on how you
have setup the Nav 2 Point application. For example, if you have selected to create the field boundary in the setup
process, a Map Field Boundary button is included in the button bar. To navigate up and down in the button bar, use
the
keys located on the Smartpad. To select or activate a highlighted button in the button bar press the
key on the Smartpad.
The bottom of the view page contains the information window. Various information about the current real-time pro-
cess is displayed in this window. There is a specific Information button located in the button bar. When this button is
either highlighted or pressed, information such as point name is displayed. If you have a field boundary displayed in
the map window, the area of the field boundary, in acres or hectares, are also displayed in the information window.
Located at the bottom right corner of the view page is the key code box. This box displays which Smartpad keys are
active based on the current view page and button bar state.
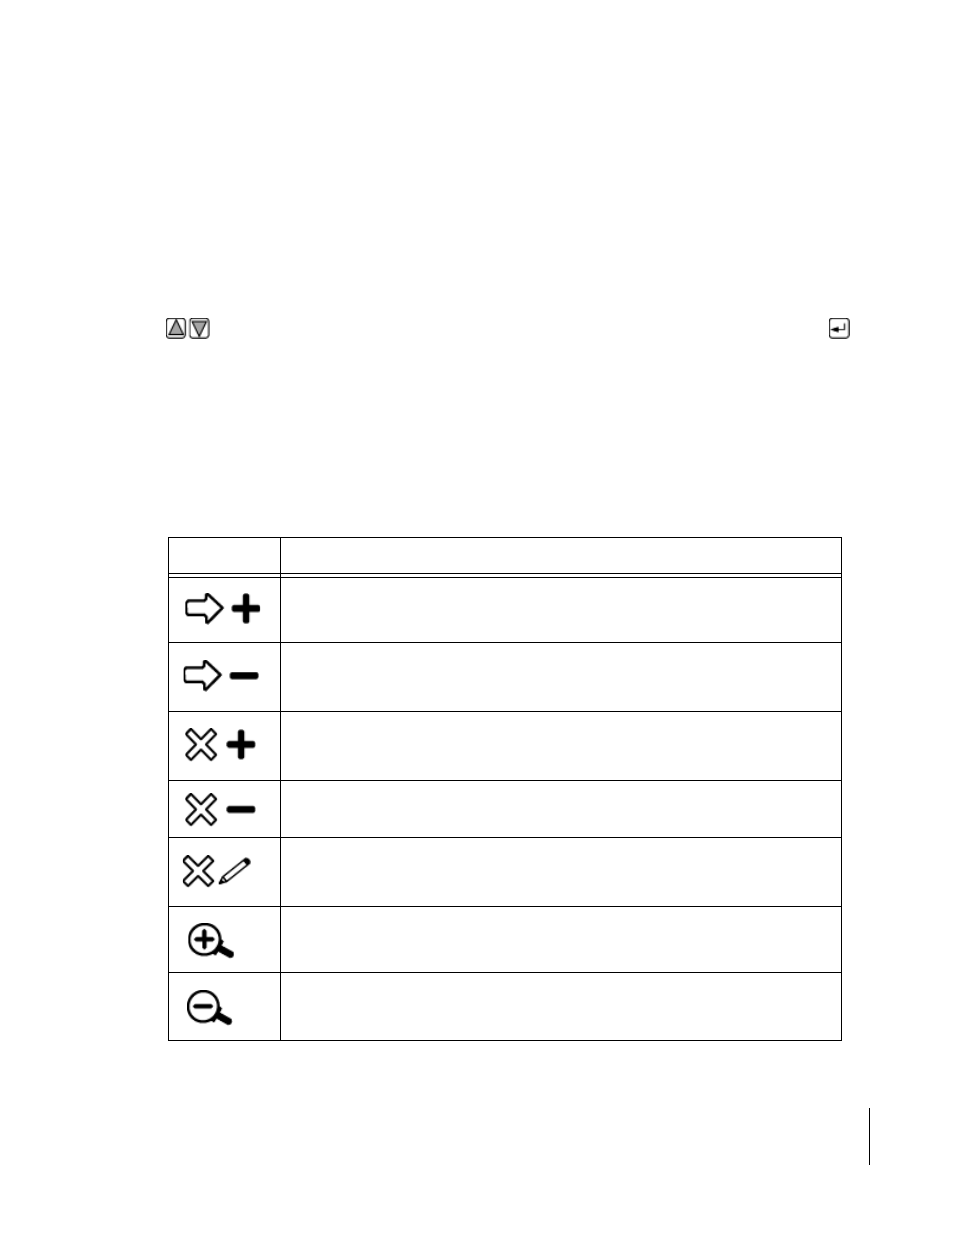
Button Description
The Start Navigation button. Press this button to select and navigate to an existing
point. Once pressed this button changes to the Stop Navigation button.
The Stop Navigation button. This button appears only when the Start Navigation button
has been pressed. Once pressed, the current navigation to an existing point is stopped
and this button changes back to the Start Navigation button.
The Add Sample button. Once pressed a sample point is dropped at the antenna offset
position. The user is prompted for sample number and name, depending on how they
have Data Setup configured.
The Delete Sample button. The user must be over (very close to) an existing sample
point, once pressed that sample point is removed from the view and data file.
The Edit Sample button. The user must be over (very close to) an existing sample point.
Once pressed, a dialog containing the sample number and name appears. The user is
able to edit these two sample point attributes.
The Zoom In button. When pressed, decreases the area displayed in the view page.
There are 5 zoom levels
The Zoom Out button. When pressed, increases area displayed in view page. There are
5 zoom levels.
Table 4-10: Nav 2 Point View Page Buttons