SkyTrak 3606 Service Manual User Manual
Page 97
Cab, Covers and Mirrors
4-11
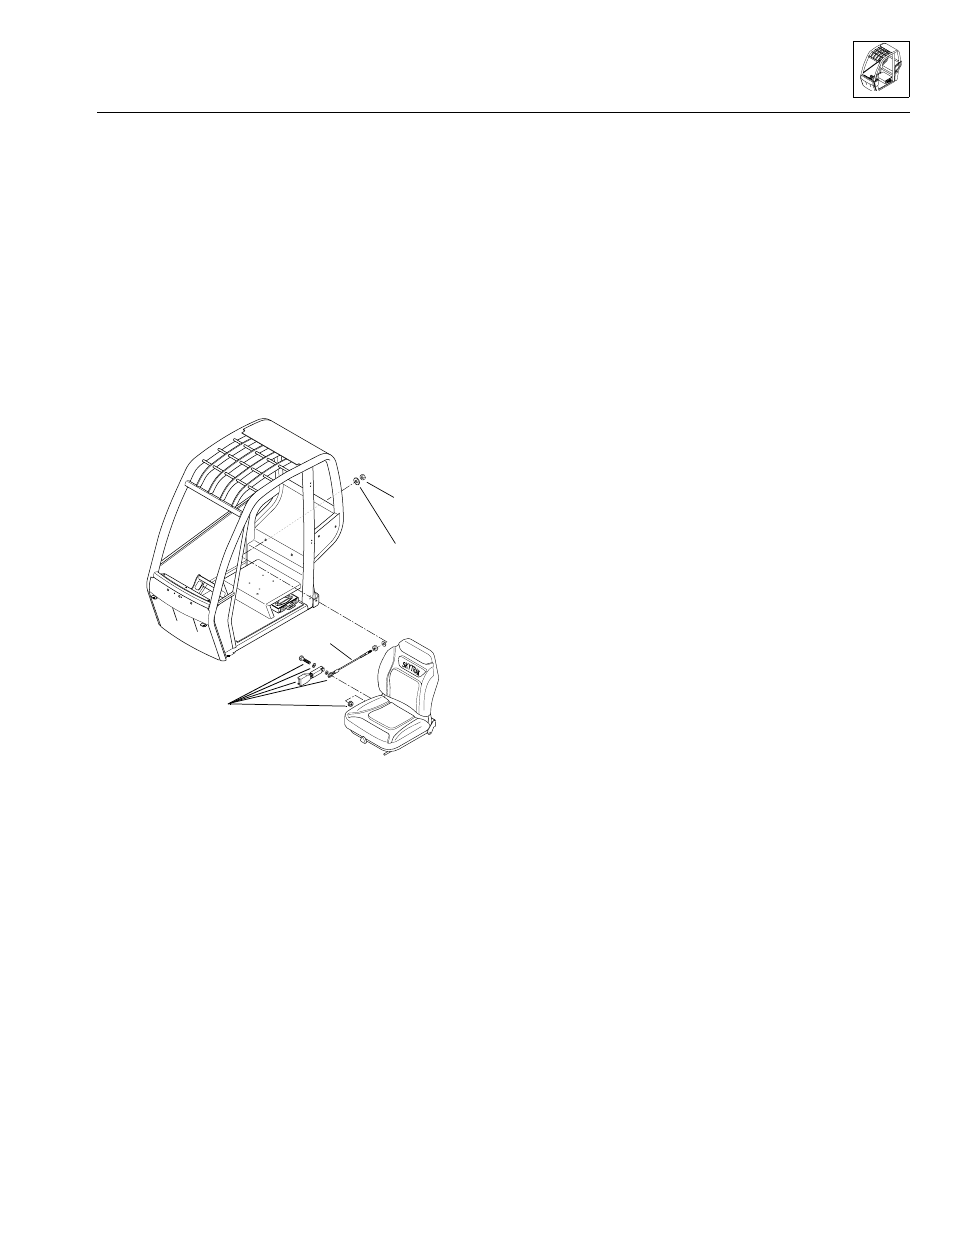
Standard Seat Installation
1. Install the seat belt assembly (4, Fig. 4–9) and
tethers (2) on the seat with the seat out of the cab.
2. Within the cab, access to the right-side tether
(Fig. 4–10) is restricted due to the closeness of the
seat to the cab wall. Move the seat all the way
forward, and tip the seat back all the way forward to
gain access as needed to the tether mounting
hardware from inside the cab. If necessary, install the
right-side tether before securing the seat base
mounting hardware.
Note: Early production cabs included a threaded hole for
tether mounting. In Fig. 4–9, items 13 through 16 are not
used on early production cabs.
Figure 4–10. Typical late-model seatbelt tether attachment.
3. Position the seat on the seat support (9, Fig. 4–9).
Align the seat bracket mounting holes with the holes
in the seat support. Secure the seat to the seat
support with four 5/16-18 hex-lock elastic nuts (12)
and four 5/16 flat narrow washers securing the seat
(1) to the seat support (9). Torque to 18 lb/ft (24 Nm).
Note: ALWAYS replace elastic-lined nuts with new
elastic-lined nuts to help ensure proper fastening.
4. Working at the outside rear of the cab with the rear
cab panel removed (refer to the General Overview
illustration on page three), secure the tethers (2, Fig.
4–9) to the cab with 3/8-16 hex-lock elastic nuts (16)
and rebound washers (15).
Note: Early production cabs included a threaded hole for
tether mounting. In Fig. 4–9, items 13 through 16 are not
used on early production cabs.
Note: ALWAYS replace elastic-lined nuts with new
elastic-lined nuts to help ensure proper fastening.
5. Attach the rear cab panel (refer to the General
Overview illustration) to the cab with 5/16-18 button-
head capscrews, 5/16 plastic washers and 5/16-18
retaining nuts.
Optional Seat Removal
1. Working from the outside rear of the cab, remove the
rear cab panel (refer to the General Overview
illustration on page three) to gain access to the seat
tether mounting hardware. The rear cab panel is
secured to the cab with 5/16-18 button-head
capscrews, 5/16 plastic washers and
5/16-18 retaining nuts.
Note: Early production cabs included a threaded hole for
tether mounting. In Fig. 4–9, items 11 through 14 are not
used on early production cabs.
2. Remove the 3/8-16 hex-lock elastic nuts (optional
seat item 14, Fig. 4–9) and rebound washers (13)
securing the tethers (2) to the rear of the cab.
Note: ALWAYS replace elastic-lined nuts with new
elastic-lined nuts to help ensure proper fastening.
3. Access to the right-side tether (Fig. 4–10) is
restricted due to the close proximity of the seat to the
cab wall. Move the seat all the way forward, and tip
the seat back all the way forward to gain access as
needed to the tether mounting hardware from inside
the cab. If necessary, remove seat base mounting
hardware before removing the right-side tether.
4. Remove four 5/16-18 hex-lock elastic nuts (10,
Fig. 4–9), eight 5/16 flat narrow washers (9), and four
5/16-18 x 1" Grade 5 hex-head capscrews (8)
securing the seat (1) to the cab seat platform.
Note: ALWAYS replace elastic-lined nuts with new
elastic-lined nuts to help ensure proper fastening.
5. Remove the seat from the cab. Remove the seat belt
assembly and tethers (or transfer these parts to the
replacement seat) with the seat out of the cab.
Optional Seat Installation
1. Install the seat belt assembly (4, Fig. 4–9) and
tethers (2) on the replacement seat with the seat out
of the cab.
2. Access to the right-side tether (Fig. 4–10) is
restricted due to the closeness of the seat to the cab
wall. Move the seat assembly all the way forward,
and tip the seat backrest all the way forward to gain
access as needed to the tether mounting hardware
from inside the cab. If necessary, install the right-side
tether before securing the seat base mounting
hardware.
MS0910
Cab
Hex-lock
elastic nut
Rebound
washer
Tether
Right-side
seat belt
hardware
Model 3606 • Origin 10/99