SkyTrak 3606 Service Manual User Manual
Page 155
Perkins Engine
8A-9
To remove the radiator and oil cooler:
1. Level the vehicle, ground the attachment, place the
travel select lever in NEUTRAL (N), engage the
parking brake switch and shut off the engine.
Remove the ignition key. Secure accident prevention
tags to both the steering wheel and the ignition
switch.
2. Unlatch, unlock and open the engine cover. Allow the
engine to cool before proceeding. Draining the
cooling system while the engine is hot can cause
cracks in the engine block.
3. Disconnect the negative (-) battery cable.
4. Place a suitable container beneath the radiator
petcock. Slowly turn the radiator cap to the first stop
and allow any pressure to escape. Remove the
radiator cap.
5. Place a funnel at the base of the radiator to channel
the drained coolant into the container. Open the
radiator drain plug or petcock and allow the coolant to
drain into the funnel. Transfer the coolant into a
properly labeled container. Dispose of properly if
coolant needs to be replaced. Close the radiator
drain plug or petcock.
6. Loosen clamps (items 19 and 24, Fig. 8A–4) on the
radiator return (lower) hose (26). Work the hose off
the radiator. Position the hose out of the way to allow
radiator removal, or remove the hose from the
engine. Inspect the hose and replace if necessary.
7. Loosen clamps (19 and 24, Fig. 8A–4) on the radiator
input (upper) hose (25). Work the hose off the
radiator. Position the hose out of the way to allow
radiator removal, or remove the hose from the
engine. Inspect the hose and replace if necessary.
8. Loosen the fan belt and remove the fan (item 3, Fig.
8A–1). Remove the four hex-head capscrews (not
shown) and lockwashers (not shown) securing the
fan (3) to the engine water pump.
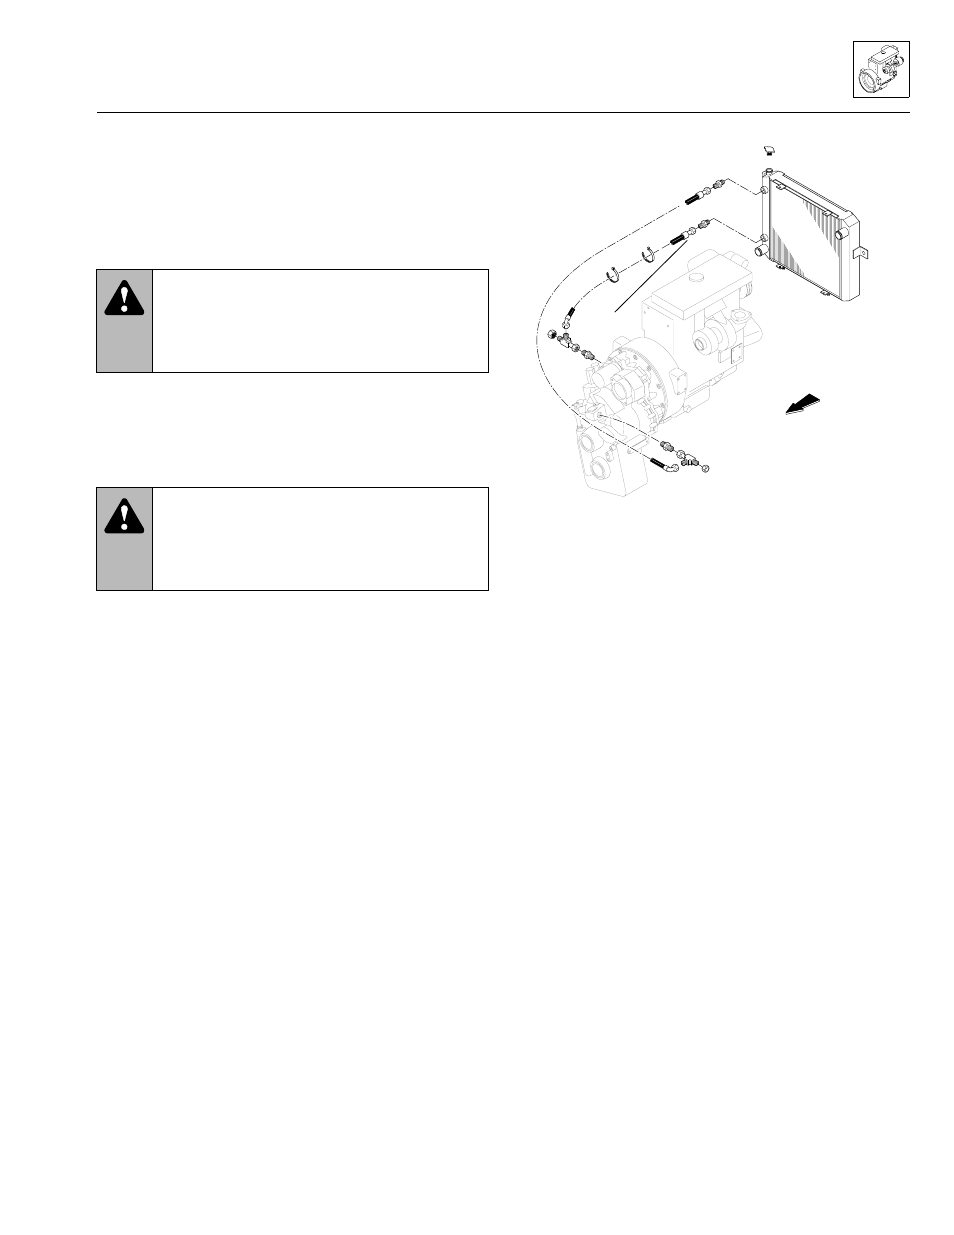
9. At the radiator, disconnect and cap the transmission
inlet and outlet hoses (Fig. 8A–5).
Figure 8A–5. Transmission hose routings.
10. Working above the radiator, remove two 5/16-18 x
3/4" Grade 5 hex-head capscrews (item 31,
Fig. 8A–4), 5/16" lockwashers (30) and 5/16" narrow
flat washers (29) securing the radiator (27) at the
upper mounting tabs to the radiator shroud (18). The
radiator shroud contains 5/16" weld nuts that retain
the capscrews.
11. Working below the radiator, remove two 5/16-18 x
3/4" Grade 5 hex-head capscrews (31), 5/16"
lockwashers (30) and 5/16" narrow flat washers (29)
securing the radiator at the lower mounting tabs to
the radiator shroud (18).
12. Working from beneath the radiator, remove two 3/8-
16 hex-lock elastic nuts (14), 3/8" rebound washers
(7) and rubber mounts (17) secured to the welded
studs on the bottom of the radiator.
13. At the sides of the radiator, remove the 3/8 x 1-1/2 x
5/16-18 hex-socket head shoulder bolts (12), spacers
(10), 3/8" rebound washers (7), radiator mount
bushings (9), radiator mount rings (6), and 5/16-18
hex-lock elastic nuts (8) securing the radiator at its
side mounting tabs to the radiator brackets (8 and
34). Carefully remove the radiator from the vehicle.
14. At the bottom of the hydraulic system oil cooler (Fig.
8A–6), disconnect and cap the 90° elbow. Remove
and discard the flat-faced O-ring seal. Disconnect
and cap the 3/4" I.D. x 28" hose.
15. Remove the six 1/4-20 x 1-1/2" hex-head capscrews
(38, Fig. 8A–4), 1/4" lockwashers (37), 1/4" flat wide
washers (36) and well nuts (35) securing the radiator
baffle assembly (3) to the oil cooler (5).
WARNING: DO NOT attempt this procedure
when the engine is hot. Wait for the engine,
muffler, and tailpipes to cool down before pro-
ceeding. Failure to do so could result in severe
burns.
WARNING: NEVER remove the radiator cap
while the engine is hot. The cooling system is
under pressure. Hot coolant can cause severe
burns or eye injury. Wear protective clothing
and safety glasses.
PS0750
Inlet
hose
Radiator
Outlet
hose
Inlet
hose
Model 3606 • Origin 10/99