1, fig. 10– 35, T (8, R (6 – SkyTrak 3606 Service Manual User Manual
Page 362: 11 and 12, T (13), T (16)
Section 10
10-44
Model 3606 • Origin 10/99
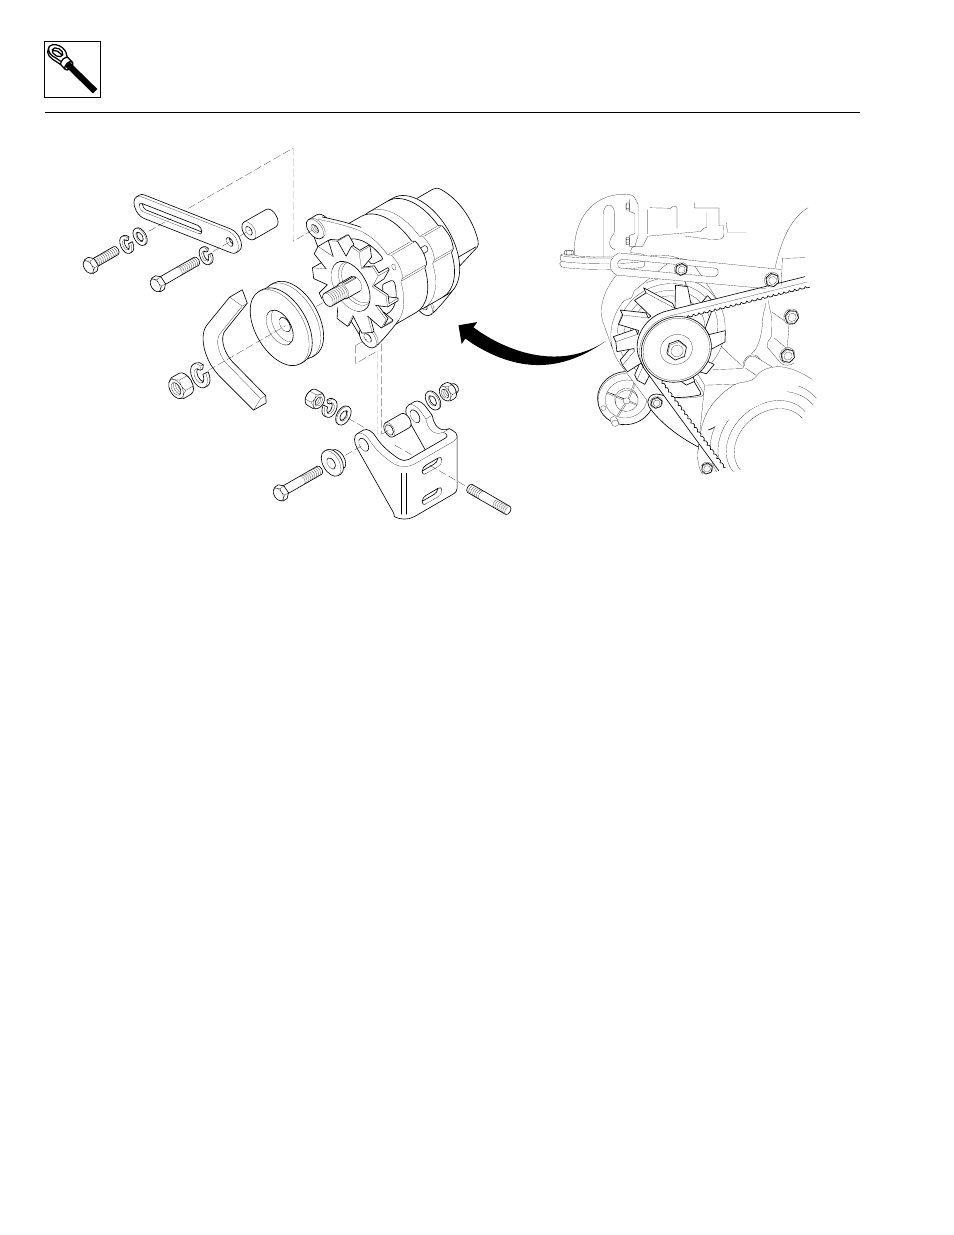
Figure 10– 35. Perkins alternator mounting detail.
b. Perkins Alternator Installation
1. If required, install pulley (21, Fig. 10– 35), belt (20),
lockwasher (19), and hex nut (18).
2. If required, install the stud (17), bracket (16), flat
washer (15), lockwasher (14), and hex nut (13).
3. Slide the sleeve (11) over the hex-head capscrew
(10) and position these parts in the mounting hole on
the front of the bracket (16).
4. Position the alternator (22) so that its front lower
mount hole is aligned in the bracket (16), and begin
to push the screw (10) through the front lower mount
hole. Position sleeve (12) so that the screw (10) goes
through it, through the alternator rear lower mount
hole, and out the rear of the bracket (16). Install the
washer (9) and self-locking nut (8) onto the screw
(10) but DO NOT tighten at this time.
5. Install the spacer (7), lever (6), lockwasher (5), and
screw (4), and thread the screw (4) into the tapped
hole in the engine block.
6. Install the flat washer (3), lockwasher (2) and screw
(1) securing the lever (6) to the tapped hole in the
alternator (22).
7. Rotate the alternator toward the engine and place the
fan belt (20) into position. In order to tighten the lower
screw (10), use a wrench to hold the self-locking nut
(8). Rotate the alternator with the fan belt away from
the engine and tighten the upper hex-head capscrew
(1) and lower hex-head capscrew (10) securely.
8. Check for proper fan belt deflection (refer to Section
2.12.8 Engine Fan Belt).
9. At the ground stud on the back of the alternator,
install the two alternator ground wires and secure
with a hex nut.
10. Connect the three-wire plug at the rear of the
alternator.
11. Connect the negative (-) battery cable (Fig. 10– 33) to
the negative (-) battery terminal.
1. Screw
2. Lockwasher
3. Washer
4. Bolt
5. Lockwasher
6. Lever
7. Spacer
8. Self-locking Nut
9. Washer
10. Screw
11. Sleeve
12. Sleeve
13. Nut
14. Washer
15. Washer
16. Bracket
17. Stud
18. Hex Nut
19. Washer
20. Belt
21. Belt Pulley
22. Alternator
MA1111