3 layout menu, 1 fader banks, Button colour – DiGiCo SD Series User Manual
Page 46: Clear, Fader banks, Layout menu, Move, Swap, 3 layout menu -12, 1 fader banks -12
Chapter 2 - The Master Screen
2-12
2.3 Layout Menu
2.3.1 Fader Banks ..........................................................................
Note that not all of the functions described in this section are available on all console models. The example
below represents the full set of functions from an SD7.
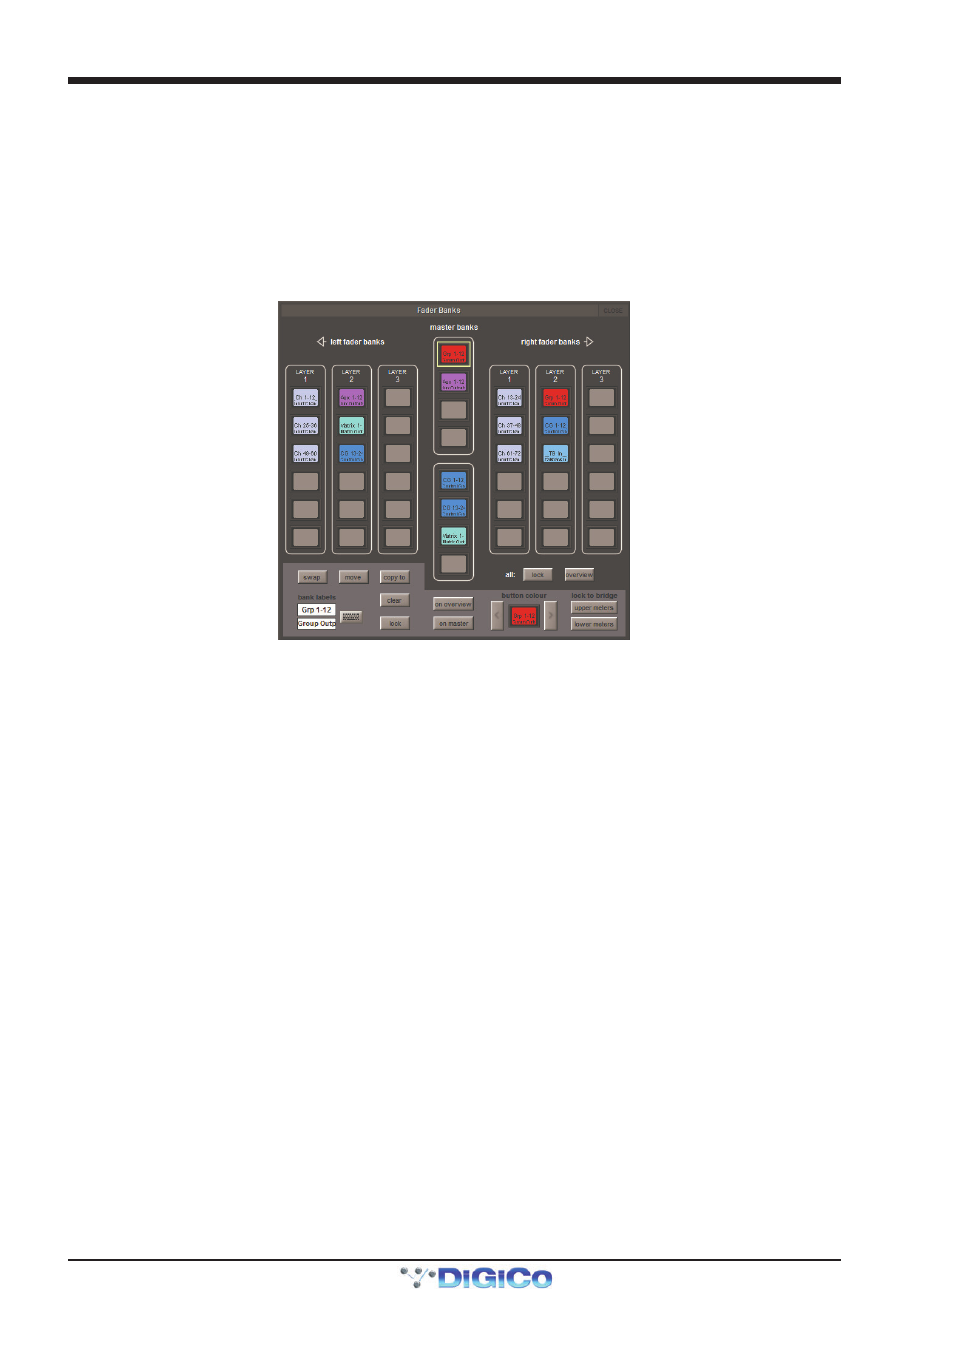
Touching on Fader Banks in the Layout menu brings up the Fader Banks display. This display allows the location of each fader
bank to be altered. The bank buttons available within each layer of each section of the desk are displayed with their current fader
set, with the left and right section banks on the left and right and the master banks down the middle. Towards the bottom of the
display there are a number of grey function buttons which turn light-grey to indicate that they have been selected.
The SD7 Fader Banks panel
To swap the locations of two fader sets, touch one set’s bank so that it is highlighted in yellow, touch swap (located below the
left fader bank’s layer 1) and touch the other set’s bank.
To move a fader set to a new bank location, highlight the fader set you wish to move, touch move (located to the right of the
swap button) and touch the bank to which you wish to move it. If there is currently a fader set in the destination bank, the current
fader set will shift down one, as will any other sets below it until there is a blank bank which can be filled. If a fader set located in
the lowest bank of a layer is shifted down, it will move to the first bank of the next layer. If there are no spaces between the
selected destination bank and the end of the console section, a pop-up appears indicating that the move cannot be completed.
To copy a fader set to a new bank location, highlight the fader set you wish to copy, touch copy to (located to the right of the
move button) and touch the bank to which you wish to copy it. If there is currently a fader set in the destination bank, it will be
overwritten.
To clear a bank, highlight the fader set you wish to copy, and touch clear (located below the copy to button). Banks can be
protected from being accidentally cleared by locking them: Touch the bank you wish to lock and touch lock (located below the
clear button). On SD7, the lock button will turn light grey whenever a locked bank is highlighted. All banks can be locked by
pressing the lock button to the right of the all: legend, underneath the right fader banks in the display.
Note that locked banks can still be moved and overwritten. If a locked bank is moved, the lock function stays
with the fader set, not the bank location.
The labelling within the bank LCD buttons can be edited using the text boxes in the bottom left-hand corner of the display. By
default, the top row of the button displays a short version of the channel type (Ch for input channels, Aux for aux channels, Grp
for group channels, Matrix for matrix channels and CG for control group channels) followed by the channel number range, and
the bottom row displays the channel type in full. To edit the either row, touch its text box, type in the new name using the on-
screen or external keyboard and press OK. The keyboard symbol to the right also activates the naming function for the top row.
Note that this label affects the bank button displays, not the channel faders within the bank.
On an SD7, the colour of the bank LCD buttons can be altered using the button colour buttons in the bottom right-hand corner of
the display. By default, the LCD buttons are coloured to match the colour of their channel type: Light-blue for input channels,
purple for aux channels, red for group channels, light-green for matrix channels and dark blue for control group channels. The
arrow buttons either side of the button colour legend can be used to cycle through the available colours, and the current colour
selection is displayed in between them.