Wing lift & fold cylinder repair – Alamo HYDRO 15 User Manual
Page 86
HYDRO 15 (Service Manual) 10/06
© 2006
Alamo Industrial
Section 5 - 12
5.
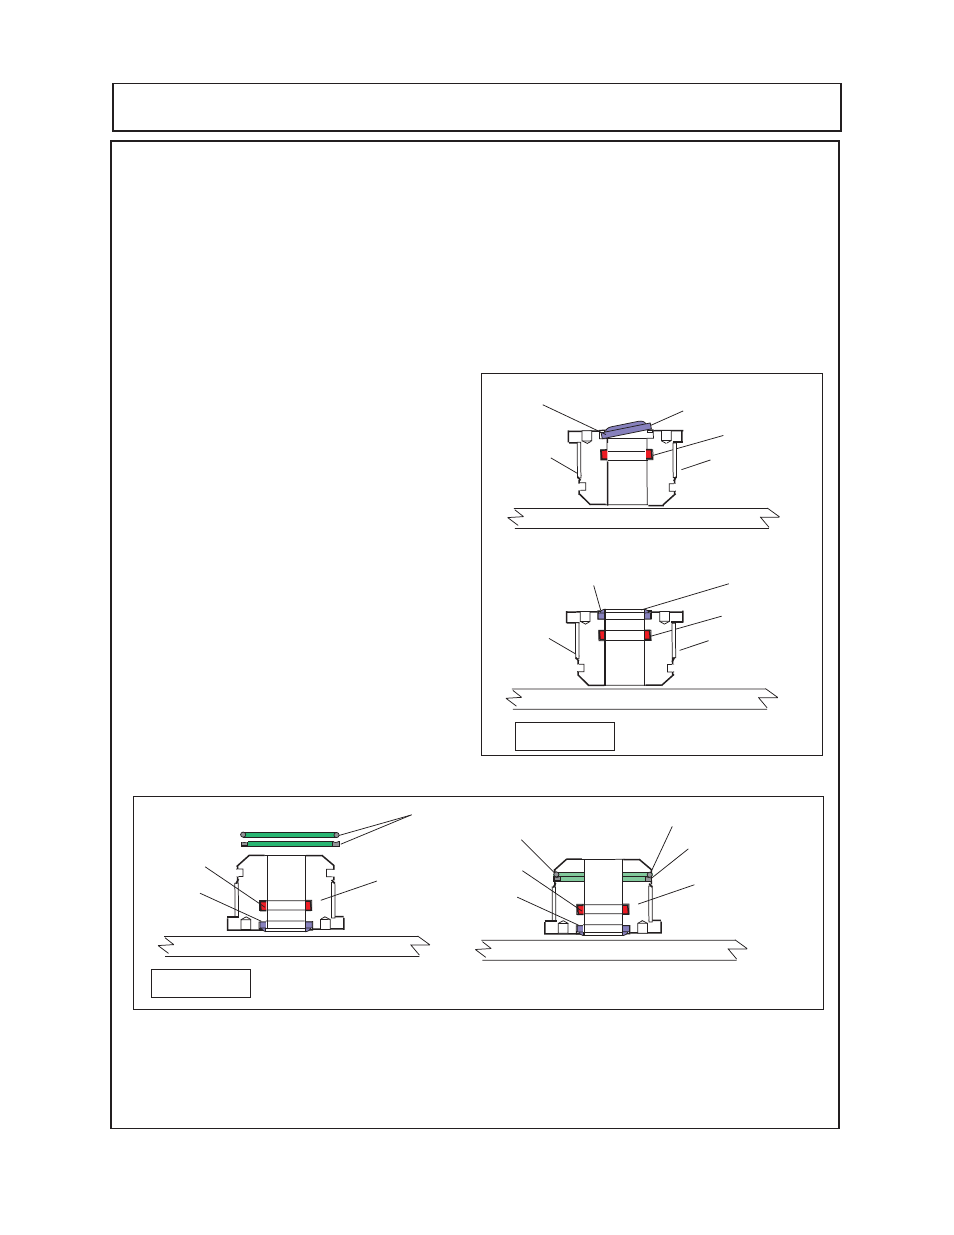
Install cylinder head seal
(figure 8 step 1
item 4A)
. Turn the cylinder head over as shown
(figure 9 step 1). Coat the back-up ring with
light coat of oil and slide it down over cylinder
head, NOTE: some back rings have a round
depression in one side, this side will be mounted
up so the round O-ring seal will fit in the
depression. Slide the back-up ring down over
cylinder head until it is seated into the groove
(figure 9 step 2 item 4A)
. Coat the O-Ring
(figure 9 item 4A)
with oil and slide it down onto
the cylinder head until it is seated into the
groove
(Figure 9 step 2 item 4A)
. The Cylinder
head is complete, set it aside for now.
6.
Install the Cylinder Head
(figure 10 item 4)
onto the cylinder rod. Coat the cylinder rod with
light coat ofoil and slide the cylinder head onto
it. It should slide on with minimum effort but it
must be slid on square and straight,
DO NOT
use a hammer to force the cylinder head onto
cylinder rod if it will not slide on by hand force
check the components something is wrong
and forcing it could damage head and seals.
WING LIFT & FOLD CYLINDER REPAIR
3.
Install the cylinder rod seal into the cylinder head
(figure 7 item 4C)
. Install the rod seal first
coating the seal with petroleum jelly (vaselene) on the OD of seal. Slide the seal into the ID of the
of the cylinder head
(figure 7 step 1).
Using a nylon (plastic) rod press down on seal, light taps with
small hammer will be ok providing you watch the bottom of the seal and make certain it is started
in the seal groove and not being driven on through cutting seal
(Figure 7 step 2).
drive seal in until
it is seated into the groove (Figure 7 step 3)
.
4.
Install the snap in cylinder rod wiper seal into the cylinder head
(figure 8 item 4B)
. Turn the
cylinder head over where the groove for the wiper seal is up-ward. Install the wiper seal first coating
the seal with petroleum jelly (vaselene) on the OD of seal. Slide the seal into the ID of the of the
cylinder head
(figure 8 step 1).
Press down and inward on seal until seal is seated in groove
(Figure
8 step 2).
Check seal to make certain it was nut cut during installation.
Cyl Head
4
4C
Clean Work Bench
12
12
12
12
12
12
12
12
12
12
12
12
12
12
Push Down & Inward Here
Step 1
Cyl Head
4
4C
Clean Work Bench
1
1
1
1
1
1
1
1
1
1
1
1
1
1
Step 2
Push Down & Inward until
Seal is seated in groove
4B
4B
Figure 8
7.
Installing the Piston on the cylinder rod (figure 10 item 6) will require a press,
DO NOT
try to
press piston onto cylinder rod with the piston nut.
Use Locktite 271 or equivalent
when pressing
piston onto cylinder rod. Make certain piston and rod are in alignment when pressing piston, make
certain piston and rod are protected from damage.
Figure 9
Step 1
Cyl Head
4
4C
Clean Work Bench
4B
1
1
1
1
1
1
1
1
1
1
1
1
1
1
4A
Cyl Head
4
4C
Clean Work Bench
4B
1
1
1
1
1
1
1
1
1
1
1
1
1
1
4A
Step 2
Back-Up Seal
O-Ring Seal